 Español
  English
 Українська
 Deutsch
 Français
 日本語
日本語 Русский
 한국어
한국어 Polski
 中文 (中国)
 Português
 Italiano
 Suomi
Suomi Svenska
 中文 (台灣)
 Dansk
Dansk Slovenčina
 Türkçe
 Nederlands
 Magyar
 ไทย
ไทย हिन्दी
 Ελληνικά
 Tiếng Việt
 Lietuviškai
 Latviešu valoda
 Eesti
Eesti Čeština
 Română
 Norsk Bokmål
Primitivos
Import
Importar al espacio de trabajo de Sculpt
Esta herramienta te permite import mallas poligonales.
Generador de árboles
Logo
Logotipo : la herramienta de logotipo le permite import cualquier imagen en blanco y negro y convertirla en vóxeles. Puede convertir imágenes que están en los formatos .BMP, .TGA, .jpeg y .PNG. Haga clic en la herramienta Logotipo y seleccione una imagen. Cuando se importen, los vóxeles se crearán en función de las imágenes en escala de grises. Estará predeterminada en la herramienta de combinación para que pueda usar el gizmo de combinación estándar aquí.
Split y Articulaciones
Split y Uniones en 3DCoat 2022
Split and Joints : es principalmente una mejora del flujo de trabajo para los modelos de construcción/escultura que se exportarán para la impresión 3D. Tenga en cuenta que solo funciona en modo Superficie (solo polígonos).
La herramienta le permite dividir su modelo en partes y crear uniones entre partes. Corta modelo vía redonda. Preste atención a que la ronda debe dividir el modelo en al menos dos partes, así que tenga cuidado al colocar la ronda.
Dividir
Dividir : Esta herramienta es muy similar a la herramienta Cortar y Clonar. Tiene la misma configuración de borde. La diferencia es que rompe una parte del objeto en el que está operando y crea su capa de objeto en VoxTree.
Clon
Clonar : Clona la selección sin cortar.
Cortar y clonar: esta herramienta le permitirá cortar y clonar el volumen de un objeto vóxel en función del tipo de parámetros del pincel. El valor predeterminado es el modo de lápiz de rectángulo de arrastre y copiará todo el volumen del objeto debajo. También puede ajustar sus parámetros de borde con tres tipos diferentes:
Redondo, Plano y Afilado
Extrusión de Vox
Vox Extrude funciona de manera similar a VoxLayer sin crear una nueva capa de objeto pero cambiando toda la capa al modo Superficie. Presione “Aplicar” mientras mantiene presionada la tecla Ctrl si desea invertir la herramienta.
capa de voz
capa de voz
Vox Layer crea una capa delgada alrededor del área congelada del volumen actual. Pinta con el freeze para marcar el área y luego presiona Aplicar.
Puntos a Polígonos
Suma puntos con LMB. Ajusta puntos y agrega caras con RMB. (ver vista previa) Fuerza triángulos con SHIFT. Mantenga el cursor cerca del centro del cuadrante potencial para una ubicación más precisa del cuadrante.
Serpiente
Serpiente : Hacer clic y arrastrar con el LMB crea una forma de serpiente en su ventana gráfica. Su posición se basa en su primer clic y en la perspectiva de su ventana gráfica. Al igual que con la herramienta de curvas, puede restablecerla con el botón Tubo. Puede seleccionar varios perfiles y, por supuesto, también usar ajustes preestablecidos de spline.
Un parámetro único para esta herramienta es la * Velocidad de suavizado: la serpiente se suavizará a lo largo de toda su longitud, haciendo que se mueva. Cuanto más alto sea el valor, más suavizado. (Valores mínimos/máximos: 1-5)
Picos : funciona como la herramienta serpiente, excepto que se estrecha en el punto final, lo que provoca una apariencia de pico.
Pasta de dientes : esta herramienta comparte todas las opciones con la herramienta Músculos excepto los tipos de músculos. Su función es similar a su nombre: es como aplicar pasta de dientes sobre una superficie. Una gran ventaja es que respeta los Brush alfa, por lo que puede usarlos para crear pinceles de rastrillo únicos.
Herramienta muscular . La presión del lápiz óptico y la intensidad de la profundidad determinan el grosor del músculo. Puede desactivar “la presión depende del radio” para obtener resultados más precisos.
Músculos : le permite esculpir fácilmente formas que parecen músculos y tendones. Puede lograr muchos efectos diferentes, por ejemplo, esculpiendo con esta herramienta fuera de un volumen para crear objetos que parezcan alas.
Hay varias configuraciones en esta herramienta:
- Velocidad de suavizado: esto te permite ajustar la velocidad a la que se suaviza el trazo.
- Conformar: Obliga al trazo a adherirse a la superficie del objeto en lugar de pasar por delante del objeto base o atravesarlo.
- Tipos de músculos: Seleccione entre dos tipos diferentes: Músculo y Tendón.
Tela Simulador de tela en tiempo real. No olvide presionar ENTER para bake la tela al objeto de volumen actual. Es mejor subdividir la tela varias veces antes de aplicar el objeto.
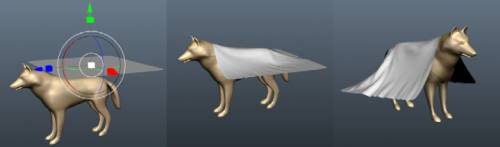
Tela : esta herramienta es un simulador de tela que puede usar para colocar una malla poligonal sobre otro objeto. Hay un paño predeterminado con el que puede probar, pero no está limitado a esto, ya que también puede import una malla poligonal externa.
Tenga en cuenta que cuanto mayor sea la resolución de la malla que utiliza para cubrir, más lenta será la simulación y más tiempo llevará obtener los resultados deseados. La simulación se puede iniciar con el botón Iniciar; una vez que la simulación se está ejecutando, puede Pausar/Reanudar, Finalizar y Restablecer la simulación.
Los parámetros de esta herramienta son los siguientes:
- Seleccionar malla: le muestra un cuadro de diálogo para abrir un archivo que le permite seleccionar un archivo (.OBJ, .LWO, .FBX, .STL, .PLY y .3b) en el disco para usarlo como el objeto que se cubrirá.
- Subdividir: Subdividir el objeto que tiene malla sobre otro objeto. Hay una prueba, pero no está limitado a esto, ya que también puede import una externa. Se puede usar antes o después de ejecutar la simulación.
- Iniciar/Reiniciar: estos dos botones inician y reinician la simulación.
- Elegir de retopo: si ha retopologizado algo y está en la pestaña Retopo , entonces puede usar este botón para seleccionar esa malla como el objeto para cubrir.
- Para retopo: Envía la malla recientemente cubierta a la pestaña Retopo para una posterior repologización.
Otro: Establece varios otros parámetros, como la Gravedad y la Fricción del objeto cubierto sobre el objeto sobre el que está cubriendo, así como el grosor de la Tela. Para el grosor, cuanto mayor sea el valor, más gruesa será la tela.
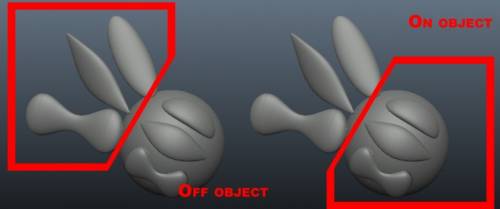
Apéguese al objeto actual:
Gravedad: Cambia la gravedad para hacer que el objeto caiga más rápido/más lento y también el peso general de las cortinas.
Fricción: determina qué tan “pegajosa” es la cortina al objeto sobre el que se cubre.
Grosor de la tela: después de cubrir el artículo, pero antes de aplicarlo como escultura, debe especificar el grosor.
Rápido: Muy rápido para la construcción rápida de formas.
Herramienta de simulación de tela mejorada .
https://www.youtube-nocookie.com/embed/1Psbrf85lZE
El video muestra la herramienta de tela en acción mientras modela una cama.
Articulaciones
La herramienta permite la creación de bloques de modelo geométrico y crea uniones entre piezas.
Tutoriales
Herramienta de tela 3DCoat : use la herramienta de tela para crear una prenda de vestir. Disculpas por la falta de edición y audio deficiente en este tutorial; Tenía muy poco tiempo, así que lo hice de una vez. Hay un enlace a continuación para ayudar a aquellos que no están familiarizados con la retopología. (Por Ian Thompson).
Camiseta en 3DCoat : aquí hay una demostración de cómo hacer rápidamente una camiseta para un personaje con el simulador de tela y las herramientas de retopología de 3DCoat. (Por Phil Nolan.)
Voxel Sketch : 3DCoat v3.01 agregó una nueva herramienta al conjunto de herramientas de voxel llamada herramienta Sketch. Esta herramienta te permite import 2 o 3 imágenes como planos de referencia, y luego la aplicación extrapolará un objeto volumétrico basado en esas imágenes. Es genial para crear un volumen de base rápido para esculpir o cosas como greebles y nurnies. (Por Javis Jones.)