 Italiano
  English
 Українська
 Español
 Deutsch
 Français
 日本語
日本語 Русский
 한국어
한국어 Polski
 中文 (中国)
 Português
 Suomi
Suomi Svenska
 中文 (台灣)
 Dansk
Dansk Slovenčina
 Türkçe
 Nederlands
 Magyar
 ไทย
ไทย हिन्दी
 Ελληνικά
 Tiếng Việt
 Lietuviškai
 Latviešu valoda
 Eesti
Eesti Čeština
 Română
 Norsk Bokmål

Annulla: tasto di scelta rapida Ctrl+Z
Ripeti: tasto di scelta rapida Ctrl+Y
Trasforma senza Gizmo:
Queste voci di menu sono destinate all’assegnazione di tasti di scelta rapida per trasformare gli oggetti senza il gizmo.
1) Premere FINE sulla voce di menu richiesta e assegnare il tasto di scelta rapida.
2) Premi quel tasto di scelta rapida e trasforma l’oggetto.
3) Premere SPACE per inserire valori numerici (se si tratta di una trasformazione unidimensionale).
4) Premere MAIUSC, CTRL o CTRL+MAIUSC per la trasformazione discreta.
5) Premere ESC o RMB per annullare la trasformazione.
6) Premi LMB per completare la trasformazione.
Quando trasformi gli oggetti utilizzando questo metodo, panoramica del menu di modifica in cui imparerai le principali funzioni di modifica e l’impostazione della scena, puoi utilizzare i tasti di scelta rapida (indipendentemente da come sono assegnati in 3D-Coat)
W – Attiva la traduzione libera.
E – Attiva la rotazione libera.
R – Attiva il ridimensionamento gratuito.
X, Y (o C), Z – Agiscono lungo l’asse per la traslazione, rotazione o ridimensionamento, in funzione della modalità corrente.
– Se sei in modalità traduzione:
X, quindi Y o SHIFT Z o ZZ – sposta un oggetto sul piano XY.
Y, quindi Z o SHIFT X o XX – sposta un oggetto sul piano YZ.
Z, quindi X o SHIFT Y o YY – sposta un oggetto sul piano ZX.
F – Scegli un nuovo perno della trasformazione.
Calcola l’occlusione
Calcola occlusione : esegue una routine che calcola “Ambient Occlusion” (illuminazione globale) in base al tracciamento di un numero di raggi di luce che circondano un oggetto. Usalo per simulare situazioni di illuminazione ambientale del “mondo reale”. Il completamento potrebbe richiedere molto tempo. Questo strumento calcola l’illuminazione globale da molti faretti distribuiti sulla semisfera. I risultati della scala di grigi verranno scritti nel livello corrente. Quindi è meglio creare un nuovo livello e impostare l’operazione di colore “Modulate” o “Modulate2X”. Uno strumento di calcolo dell’occlusione è appositamente ottimizzato per poligoni alti (diversi milioni), è veloce ma sai che ha ancora bisogno di un po’ di tempo in poligoni così alti.
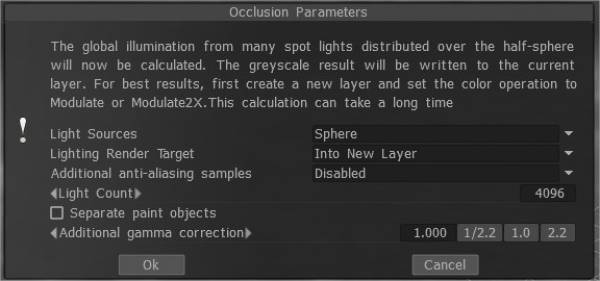
– Sorgenti luminose (distribuzione delle luci):
- 1) sopra l’emisfero
- 2) sopra la sfera
- 3) sopra emisfero + sfera
– Obiettivo di rendering dell’illuminazione: è necessario scegliere un livello su cui posizionare il calcolo dell’occlusione. Puoi scegliere di aggiungere automaticamente un nuovo livello o sovrascrivere il livello corrente. Nel primo caso, non dimenticare di eliminare un nuovo livello per il calcolo della luce. Inoltre, una nuova opzione di colore, “To time”, viene installata per un nuovo livello. Nel caso di rendering del livello precedente, tutte le sue informazioni sul colore verranno eliminate.
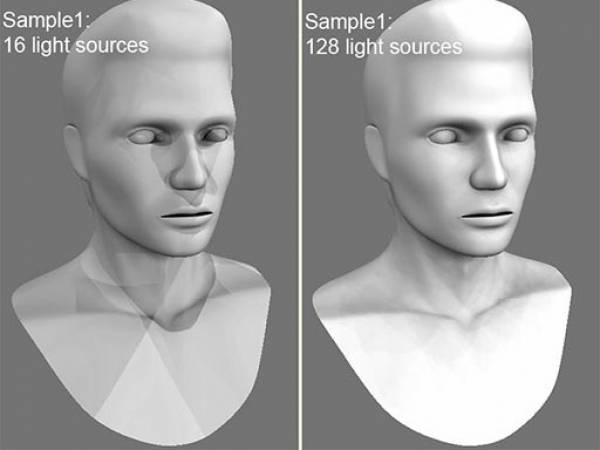
– Conteggio luci: più luci, più lungo è il calcolo. Più sorgenti luminose ci sono, migliore è la qualità dell’illuminazione e più lungo è il suo calcolo. Il valore massimo è 256 e il valore minimo è 16. – Ulteriori campioni di anti-aliasing: quantità di passaggi post-smussatura dopo il calcolo dell’occlusione. Il calcolo utilizzerà la trama più volte più grande. Ciò consente di eliminare alcuni artefatti se sono presenti isole UV troppo piccole o pixel lunghi.
Attenzione: questa funzione rallenterà il calcolo e consumerà più RAM e VRAM.
Oggetti di pittura separati: fai esplodere l’oggetto sulle parti per evitare proiezioni di contatto AO errate.
AO Baking con OpenGL e utilizzo della mappa normale : questo video copre due nuovi importanti miglioramenti alla cottura AO nell’accelerazione OpenGL e nell’utilizzo della mappa normale.
Modificare
Calcola curvatura
Calcola curvatura: lo strato di curvatura è necessario per utilizzare la cavità/curvatura come condizione per i materiali o per la pittura condizionale. Il comando aggiornerà il livello cavità/curvatura utilizzando lo spostamento corrente e la normal map.
Prestare attenzione che la curvatura consiste di due componenti.
- Il primo è la curvatura locale che consente di rilevare piccoli dettagli e graffi.
- Il secondo è la curvatura a lungo raggio che scorre uniformemente e consente di rilevare grandi dettagli.
Impostare l’intensità per entrambi i tipi di curvatura.
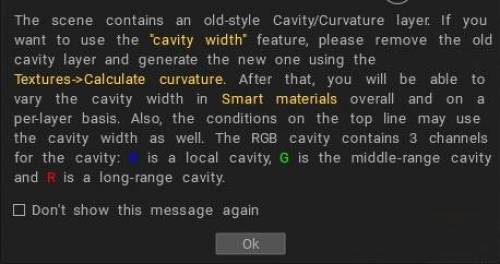
A partire da 3DCoat 2021.53 la cavità RGB è stata introdotta come metodo di calcolo predefinito in Texturing. Questa è una caratteristica molto significativa per il PBR Painting over the Texture/Mesh.
Questo video mostra come funziona la tecnologia della cavità migliorata. Questa è una tecnologia migliorata già chiamata cavità RGB.
Innanzitutto, devi assicurarti che la versione della cavità RGB sia abilitata, per fare ciò, vai su Modifica> Preferenze, vai alla sezione Strumenti e seleziona Usa cavità RGB come metodo di calcolo della cavità predefinito.
L’uso della cavità RGB in 3DCoat 2021
– Dopo aver abilitato la funzione, vai al menu Texture e seleziona l’opzione Calcola curvatura. Affinché il calcolo venga effettuato, è necessario attendere un po ‘.
– Ora possiamo vedere come è apparsa una mappa Cavity (RGB) nei livelli.
– Vediamo che con la nuova tecnologia, la mappa ha molti colori.
La mappa deve essere chiusa per impostazione predefinita ora; creiamo materiale intelligente per vedere come funziona.
– Concentrati su una nuova icona di modifica -sembra un vaso-, questa è stata aggiunta e non esisteva prima, ed è con i bordi di rotazione che viene configurata la funzione di aggiornamento.
È la larghezza della cavità aggiuntiva: il valore 0 significa che la cavità è presa dalle impostazioni dei materiali così com’è.
Valori inferiori indicano una cavità più nitida, superiore a 0,5 – allargamento della cavità. O, naturalmente, hai bisogno di uno strato di cavità RGB nella scena per variare la larghezza della cavità.
Funziona solo in tali condizioni: più su concavo, più su convesso, meno su concavo, meno su convesso, più o piatto e più su curvo (puoi usare una qualsiasi di queste modalità).
– Il nuovo parametro è responsabile della cavità del raggio. È anche influenzato dalle regolazioni del grado e del contrasto.
Strumento Baking leggero
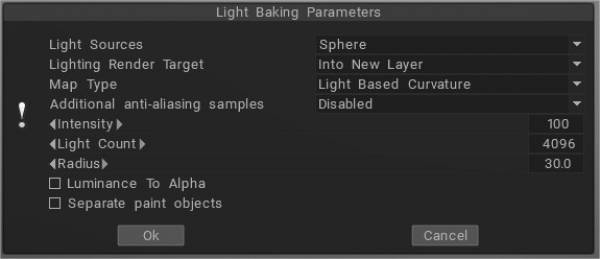
Strumento Light Baking : questo video illustra lo strumento Light Baking in 3DCoat.
Light Based Curvature : calcola più correttamente il risultato su UV Overlap; le aree nere non appaiono più su oggetti diversi che hanno le stesse coordinate UV .
Spessore: Simile ad AO, proietta i raggi dalla superficie della mesh verso l’interno. Può essere utilizzato nell’ombreggiatura SSS.
Luce dalla stanza di rendering: se desideri bake la luce senza un ambiente, usa “luce dalla stanza di rendering” invece di “Luce e riflessi”.
Scattering nel sottosuolo:
Traslucido:
Normali piegate: l’uso delle normali piegate all’interno dei materiali può aiutare a migliorare il modo in cui reagiscono all’illuminazione e all’ombreggiatura. Stabiliva la direzione media dell’illuminazione ambientale.
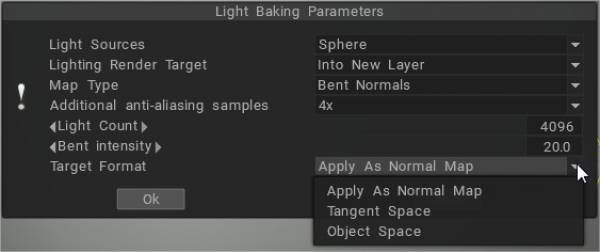
Esempio: vantaggi dell’utilizzo di normali piegate
Luce e riflessi: riempi il livello con qualsiasi materiale intelligente riflettente, bake il tuo riflesso e crea uno strato di riflessione nel livello della trama. Raccoglie qualsiasi luce impostata nella stanza di rendering, inclusa la luce dell’ambiente.
Curvatura locale: calcola la curvatura sugli oggetti con una normal map e analizza la curvatura del modello in molte proiezioni pixel per pixel, il che consente di ottenere un risultato più accurato e bello. Il raggio e l’intensità possono essere regolati.
Local Curvature RGB: trasforma rispettivamente la curvatura con raggio 1, 20 e 100 nei canali RGB. (Usa cavità RGB come metodo di calcolo della cavità predefinito può essere impostato su Preferenze).
La nuova cavità RGB è stata introdotta come possibile metodo di calcolo predefinito. In questo caso, la cavità multi-range verrà calcolata sulla GPU e apparirà un controllo aggiuntivo nell’interfaccia utente di condizioni/materiali intelligenti, la “Larghezza della cavità”. Consente la variazione della larghezza/smussatura della cavità in tempo reale, il che è molto importante per una testurizzazione PBR realistica.
La larghezza della cavità (utilizzando la cavità RGB) può essere utilizzata separatamente per i materiali intelligenti per ogni strato. Ogni strato di materiale ha le proprie impostazioni di larghezza della cavità. Consente effetti molto migliori per i materiali “invecchiati”, come diversi strati di vernice “invecchiati” in modo diverso.
La cavità RGB è una trama di cavità multi-range, ogni canale corrisponde a una diversa scala di cavità. B è la cavità locale, G è una cavità a medio raggio e R è la cavità a lungo raggio.
Se nella scena è già presente il vecchio livello cavità, è necessario eliminarlo per utilizzare questa funzione. Questa è una caratteristica molto significativa per la verniciatura PBR sulla trama/mesh.
Se la cavità RGB è abilitata per impostazione predefinita e stai caricando la scena che ha il livello di cavità vecchio stile, il Coat ti avviserà che è meglio ricalcolare la cavità per ottenere un controllo migliore.
Sincronizza il layer con l’ editor esterno: questo comando consente di sincronizzare il layer corrente con un editor esterno. Puoi impostare il percorso dell’editor in Preferenze. (L’impostazione predefinita è Adobe Photoshop.) Il canale alfa conterrà la maschera di trasparenza.
Quando chiami questo comando, il programma Adobe Photoshop si aprirà automaticamente con il tuo file. Quindi puoi cambiarlo e tornare a 3DCoat premendo CTRL+S.
Modifica tutti i livelli in Ext. Editor: modifica tutti i livelli in un editor esterno. Puoi cambiare l’editor nel menu Opzioni (Adobe Photoshop per impostazione predefinita). Questo editor dovrebbe essere in grado di modificare i file PSD. La trama verrà archiviata come livelli e aperta come file PSD nell’editor esterno. Quindi puoi modificare la trama e persino aggiungere nuovi livelli. Quando lo salvi, 3DCoat lo ricaricherà automaticamente. Tasto di scelta rapida Ctrl+P
Modifica tutti i livelli di lucentezza: modifica tutti i livelli di lucentezza in un editor esterno.
Modifica tutti i livelli di metallo: modifica tutti i livelli di lucentezza in un editor esterno.
Modifica proiezioni in est. Editor: puoi modificare la proiezione corrente in Adobe Photoshop utilizzando i livelli. Puoi cambiare l’editor nel menu Preferenze (Adobe Photoshop per impostazione predefinita). Questo editor dovrebbe essere in grado di modificare i file PSD. La trama verrà archiviata come livelli e aperta come file PSD nell’editor esterno. Quindi puoi modificare la trama e persino aggiungere nuovi livelli. Quando lo salvi, 3DCoat lo ricaricherà automaticamente. Tasto di scelta rapida Ctrl+Alt+P
Proietta attraverso: proietta l’immagine attraverso tutti gli oggetti, anche le facce posteriori.
Scala di proiezione dell’editor esterno : scala aggiuntiva che verrà applicata all’immagine di proiezione da modificare in un editor esterno.
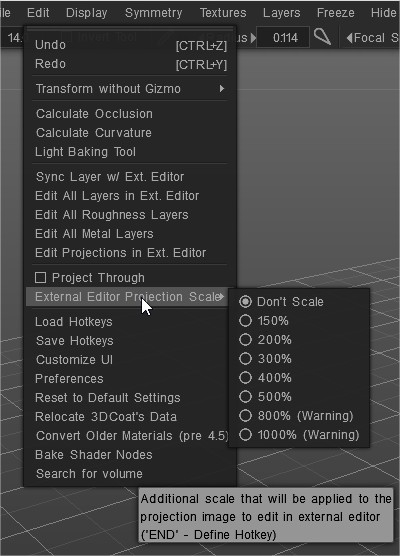
Carica tasti di scelta rapida: carica i tasti di scelta rapida dal file.
Salva tasti di scelta rapida: salva i tasti di scelta rapida dal file.
Personalizza l’interfaccia utente: rimuovi/personalizza l’elemento dell’interfaccia utente.
Preferenze: imposta i tasti di scelta rapida, il tempo di salvataggio automatico, l’editor 2D esterno, i colori dell’interfaccia utente e altro…
Preferenze
Impostazioni di ripristino: il ripristino è necessario se il programma si comporta in modo instabile. Scegli le impostazioni da ripristinare. I file options*.xml verranno eliminati. Il programma verrà riavviato, quindi prima salva le modifiche
Riposiziona i dati di 3DCoat: modifica il posizionamento dei dati.
Converti materiali più vecchi (pre 4.5): Converti materiali più vecchi (pre 4.5)
Cerca volume:
Tutorial
Suggerimento rapido Risoluzione Baking AO : questo video mostra un suggerimento rapido sulla risoluzione dei problemi di cottura AO in 3DCoat, nel caso in cui un utente incontri una quantità irragionevole di ritardo.
AO Baking con OpenCL e utilizzo della mappa normale : questo video copre due nuovi importanti miglioramenti alla cottura AO in 3DCoat 4.5. Accelerazione OpenCL e utilizzo della mappa normale.
Flusso di lavoro di Krita e 3DCoat di Paul Geraskin.