 한국어
한국어  English
 Українська
 Español
 Deutsch
 Français
 日本語
日本語 Русский
 Polski
 中文 (中国)
 Português
 Italiano
 Suomi
Suomi Svenska
 中文 (台灣)
 Dansk
Dansk Slovenčina
 Türkçe
 Nederlands
 Magyar
 ไทย
ไทย हिन्दी
 Ελληνικά
 Tiếng Việt
 Lietuviškai
 Latviešu valoda
 Eesti
Eesti Čeština
 Română
 Norsk Bokmål
복셀은 항상 해당 개체의 전체 볼륨을 포함하므로 매우 상세한 모델을 생성하려면 광범위한 하드웨어 리소스가 필요합니다.
표면 모드에는 동적 세분화 또는 데시메이션이 포함된 삼각형 메쉬가 포함됩니다. 볼륨을 무시하고 모델 표면에만 집중할 수 있도록 하여 놀라운 속도 향상을 얻을 수 있습니다.
Voxel 모드 에서 표면 모드로 변경하려면 표면 모드에서 편집하려는 레이어의 조각 트리 에서 V 아이콘을 클릭해야 합니다. 그러면 표면 모드를 나타내는 S 아이콘이 표시됩니다.
표면 모드에서 조각할 수 있으며 Enter 키를 눌러 dynamesh처럼 다시 메시할 수 있습니다. 편집하다
일반 표면 도구
자산 경제와 작업 속도는 복잡한 프로젝트를 시작하고 완료하는 방법을 결정하는 요인이 되는 경우가 많습니다. 특정 모델의 구조를 고려할 때 볼륨이 항상 필요한 것은 아닙니다.
강력한 하드웨어 어레이의 소유자이든 매우 기본적인 시스템 아키텍처의 제약을 받는 사람이든 관계없이 Surfaces 작업은 빠르고 효율적입니다.
표면은 또한 무한정 다듬을 수 있는 장점과 능력을 제공합니다. 궁극적으로 결과에 만족할 때까지 표면을 더하고, 빼고, 교차하고, 데시메이트하고, 단순화하고, 매끄럽게 하고, 강화하고, 블렌딩하십시오.
표면 모드의 또 다른 장점은 사용자가 조각 레이어 정보를 활용할 수 있다는 것입니다. 깊이 슬라이더를 스크러빙하여 지정된 지점에서 깊이 값을 조절할 수 있습니다.
Layers > Magnify SL과 같은 도구를 활용하여 사용자가 브러시 아래의 깊이 수준을 높이거나 낮출 수 있습니다. Layers > Erase SL도 있어 단순히 로컬에서 범위 계층 정보를 지울 수 있습니다.
표면 다중 해상도
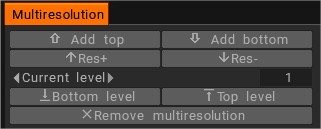
다중 해상도 조각이 도입되었습니다. 레이어, 변위 및 PBR 과 함께 작동합니다. Space를 누르고 맨 아래 줄을 보거나 Windows->팝업->다중 해상도를 사용하십시오.
다중 해상도 조각은 데시메이션을 통해 낮은 수준의 다중 해상도 추가를 지원합니다.
표면 조각 도구
동적 테셀레이션(일명 이전 V4 Live Clay)
버전 2022+에서 Live Clay는 강력한 새 브러시 시스템으로 대체되었습니다. 그러나 일부 LC 도구(예: Snake 및 메쉬 복구 도구)는 고유한 기능을 제공하기 때문에 그대로 유지되었습니다.
LiveClay는 제어 가능하고 정확한 방식으로 폴리곤 모델의 주어진 영역에 필요에 따라 폴리곤을 자동으로 추가(또는 빼기)하는 동적 테셀레이션 루틴을 적용한 것입니다. 매우 큰 장면을 작업하고 개발하는 데 선호되는 방식으로 빠르게 자리잡고 있습니다.
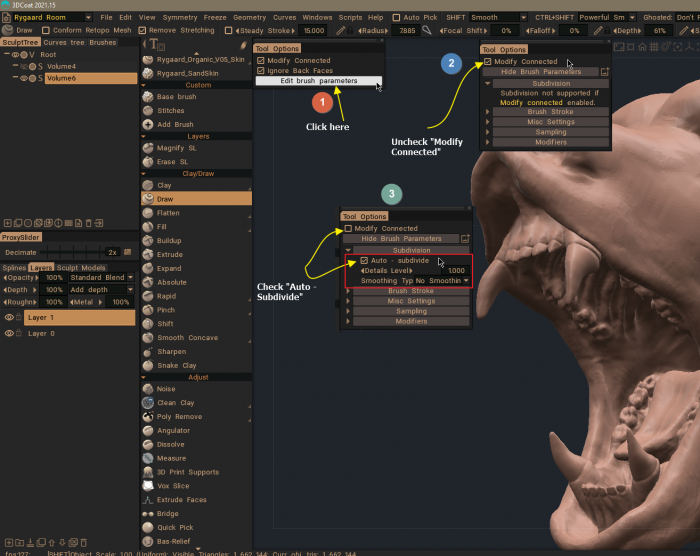
@Rygaard: 아래에서 새 브러시 시스템에 대한 로컬 분할 옵션을 활성화하는 단계를 보여줍니다.
곡선 및 다각형 기반 스플라인 도구와 경계, 내부 및 깊이를 포함하는 무한히 다양한 제공 및 사용자 정의 Brush 알파와 상호 교환하여 작업합니다.
커스텀 베이스 Brush
사용자 지정 브러시를 만드는 새로운 범용 메커니즘입니다.
조정 도구
페인트 도구
이 옵션은 버전 2022+에 추가되었습니다.
Paint Room으로 전환할 수 있는 동일한 도구를 사용하여 Voxel 또는 Surface 모드에서 페인팅을 허용합니다.
포즈 도구
3DCoat 012 소개 – Sculpt Room – 포즈 도구 : Anton Tenitsky 이 비디오에서 복셀 모드에서 작업하는 Sculpt Room의 포즈 그룹 도구 기능을 보여줍니다.
개체 도구
3D Coat 013 소개 – 조각실 – Anton Tenitsky 의 개체 도구 .
곡선 도구
명령
프록시 모드
다중 해상도 프록시라고도 합니다.
폴리페인트
조각 레이어
Anton Tenitsky 의 조각 레이어 .
복구에는 조각이라는 표면 모드의 강력한 기능이 있으며 오른쪽 하단 모서리에 레이어 탭이 표시됩니다. 여기에서 무언가를 조각할 때마다 레이어 중 하나에 할당됩니다. 레이어를 숨기거나 숨김 해제하여 여러 레이어를 가질 수 있습니다. 다른 것을 그릴 수 있습니다. 그런 다음 결합됩니다. 숨기고 숨기고 그들이 어떻게 영향을 미치는지보십시오.
레이어 패널은 작업 중인 룸에 따라 변경됩니다. 레이어는 개체 기반이 아니라 씬 레이어입니다.
페인트 룸에서 레이어는 Photoshop 또는 기타 페인팅 응용 프로그램과 매우 유사하게 사용되며, 혼합 모드 및 불투명도와 같이 각 레이어의 측면을 독립적으로 제어할 수 있지만 깊이 페인팅이 해당 레이어에 미치는 영향에 대한 추가 제어가 가능합니다.
조각실에서는 색상 정보 대신 레이어별 변형 정보를 가지고 있습니다. 예를 들어, 하나의 레이어는 큰 조각 변형을 위한 것이고 다른 하나는 미세한 세부 사항을 위한 것입니다.
Sculpt Layers 데모 : 3DCoat 베타 개발을 위한 Sculpt Layers 데모이지만 실제로는 간단한 데모일 뿐입니다. 정식 버전은 2021+ 버전에서 사용할 수 있습니다.
다중 해상도 프록시로 레이어 조각하기 : 이 비디오는 3DCoat의 다중 해상도 워크플로(프록시 메시 사용)와의 조각 레이어 호환성 기능 추가를 보여줍니다.
고유한 조각 기능 : 이 비디오는 3DCoat 차별화하는 데 도움이 되는 몇 가지 고유한 기능을 강조하는 시리즈를 시작합니다. 3DCoat PBR 텍스처 Painting 과 하이 폴리 스컬프팅을 동시에 활용하는 방법을 보여줌으로써 시작합니다. 일반적으로 시간이 많이 걸리고 지루한 두 가지 작업을 한 번에 빠르게 처리합니다.
조각 레이어를 사용하여 스캔 영역을 캡처되지 않은 지점으로 복제
기술적 인 정보
표면 모드에서 메시 문제 해결 : 이 비디오는 표면 모드에서 조각할 때 메시의 문제 영역을 복구하기 위한 몇 가지 문제 해결 팁과 도구를 다룹니다.
표면 모드 조각을 위한 메시 최적화 : 이 비디오는 Voxel 모드에서 전환한 후 표면 모드 조각을 위한 메시를 최적화하는 몇 가지 기술과 도구를 보여줍니다.
빠른 팁: 표면 메시 정리: 이 비디오는 드물게 발생할 수 있는 표면 모드 메시의 문제를 신속하게 정리하는 몇 가지 도구와 방법을 보여주는 빠른 팁입니다. 탄젠트 스무딩은 표면 세부 사항이나 모양을 저하시키지 않고 즉시 청소합니다.
강력한 스무딩은 또한 구멍이나 표면 결함을 수정하지만 훨씬 더 공격적인 스무딩을 사용합니다. 표면 모드에서 ENTER 키를 누르면 개체가 일시적으로 복셀화되고 다시 메시된 다음 표면 모드로 돌아갑니다. 모두 한 번의 빠른 단계로 이루어집니다.
Sculpt Layers : 이 비디오는 3DCoat 에서 Sculpt Layers를 사용하는 방법을 보여줍니다. 이 비디오는 녹화 시점에 아직 베타 개발 단계에 있습니다. 이를 통해 사용자는 나중에 변조, 삭제 또는 숨길 수 있는 높은 폴리 조각에 조각 편집 레이어를 만들 수 있습니다.
스트레칭 제거 : 이 비디오는 3DCoat 에서 가장 독특하고 유용한 조각 기능 중 하나를 다룹니다. 스트레칭을 제거하십시오 .
브러시 바로 아래에서 메시를 다시 만들고 LiveClay 브러시의 동적 테셀레이션 기능을 표준 표면 모드 브러시로 가져옵니다.
Voxel 변환 대화 상자 옵션 : 이 비디오는 Voxel 변환 대화 상자(표면 모드에서 복셀로 메쉬를 변환할 때 열리는)의 새로운 옵션을 보여줍니다.
또한 세분과 관련된 패싯 또는 기타 문제를 방지하기 위해 모델을 올바르게 가져오기 위한 중요한 고려 사항을 설명합니다.
VoxTree 레이어의 개별 부분 편집 : 이 비디오는 VoxTree 레이어의 개별 부분(Sculpt Workspace에서)을 조작하거나 별도의 하위 레이어로 분리하는 방법에 대한 빠른 팁을 제공합니다.
모델 표면에 객체 복제 : 이 비디오는 3DCoat 에서 객체를 생성하고 객체에서 3D Brush 알파를 생성하거나 다른 객체의 표면을 따라 인스턴스를 복제하는 데 사용할 수 있는 다양한 기술의 데모를 시작합니다.
메쉬를 조각 메쉬로 페인트 : 이 비디오는 페인트 메쉬의 복사본을 조각 작업 공간(복셀화하거나 동적 테셀레이션을 적용할 수 있는 조각 메쉬가 됨)으로 보내고 소규모 조각 편집을 bake 데 필요한 단계를 보여줍니다. 새로운 normal map 통해 Paint Mesh로 돌아갑니다.
DamStandard 및 hPolish 브러시 : DamStandard 및 hPolish 브러시 모의. 커리어게이머.
튜토리얼
Voxel / Surface Mode Sculpting : 이 비디오 데모에서는 UI 요소부터 시작하여 조각 도구의 연습을 시작합니다. 그런 다음 다루는 다른 주제는 다음과 같습니다.
- Voxel 과 Surface 모드의 차이점
- 라이브클레이
- Brush 스무딩 옵션
- 컷오프 도구(부울 유형 연산)
- 스플라인 그리기 모드
- 프리셋 패널
- 다중 해상도 워크플로(서로 다른 SubD/해상도 수준으로 작업)
표면 모드 Brush 선택 : 이 비디오는 조각 작업 공간에서 조각/모델링할 때 더 빠르게 브러시를 선택하기 위한 팁을 다룹니다.