Voxels require extensive hardware resources to produce highly detailed models since they always include the entire volume of that object.
Surface Mode involves a triangulated mesh with dynamic subdivision or decimation.
It allows you to get an incredible speed boost by letting you ignore volume and concentrate only on your model’s surface.
To change from Voxel Mode to Surface Mode, you must click on the V icon in the Sculpt Tree for the Layer you would like to edit in surface mode; you will then see an S icon which represents surface mode.
You can sculpt in surface mode and just hit enter to remesh like dynamesh.
General Surface Tools
Many times asset economy and working speeds are deciding factors in how to start and finish a complex project. Volumes are not always needed when considering the structure of any given model.
Working with Surfaces is fast and efficient whether you are the owner of powerful hardware arrays or are restrained by the very basic system architecture.
Surfaces also offer the advantage and ability to be infinitely refined. Add, Subtract, Intersect, Decimate, Simplify, Smooth, Harden, and Blend your surfaces until you are ultimately satisfied with the outcome.
Another advantage of surface mode is that it enables the user to utilize sculpt layer information. You can scrub the depth slider to modulate the depth value at any given point.
You can also utilize tools such as Layers > Magnify SL, allowing the user to increase or decrease the depth level under your brush. You have Layers > Erase SL also that allows you just simply to erase scope layer information locally.
Surface Multiresolution

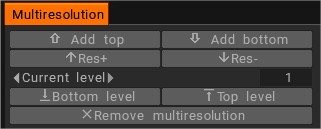
Multiresolution sculpting was introduced. It works with layers, displacement, and PBR. Press Space, look at the bottom line or use Windows->Popups->Multiresolution.
Multiresolution sculpting supports adding the lower level of the multiresolution via decimation.
Surface Sculpting Tools
Dynamic Tesselation (aka old V4 Live Clay)
On version 2022+, Live Clay has been replaced by the powerful new brush system. But some LC tools (like Snake, and mesh repair tools) remained because they offer unique functionality.
LiveClay was our adaptation of Dynamic Tesselation routines which automatically add (or subtract) polygons, as needed, to any given area of a polygonal model in a controllable and precise manner. It is rapidly becoming a preferred way of working and developing very large scenes.
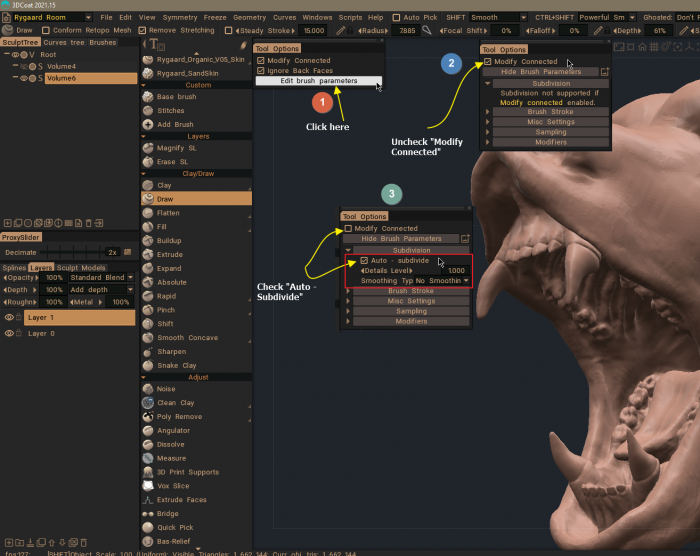
@Rygaard: Below, I show you the steps to activate the local subdivision option for the new brush system.

Work interchangeably with Curve and Polygon-based spline tools and an infinite variety of supplied and user-defined Brush Alphas that contain boundary, interior, and depth.
Custom Base Brush
As a new universal mechanism to create Custom Brushes.
Adjustment Tools
Paint tools
This option was added for version 2022+
Allow painting on Voxel or Surface mode using the same tools that you can find switching to Paint Room.
Pose Tools
Intro to 3DCoat 012 – Sculpt Room – Pose Tools: Anton Tenitsky shows us in this video the functions of the Pose group tools in Sculpt Room working in voxel mode.
Object Tools
Intro to 3D Coat 013 – Sculpt Room – Object Tools by Anton Tenitsky.
Curves Tools
Surface sculpt curves tools
Curves 2022
Command
Proxy Mode
Know also as Multi Res Proxies.
Polypaint
Sculpt Layers
Sculpting Layers by Anton Tenitsky.
Recover has a powerful feature in the surface mode called sculpt, and you can see the layers tab in the bottom right corner.
Every time you sculpt something here, it will be assigned to one of the layers, and I can hide it and unhide it so you can have multiple layers, and I can draw something else, and then they will get combined, and again I can hide and hide and see how they affect.
The Layers Panel changes depending on which Room you are working in. A layer is not per object base but a scene layer.
In the Paint Room, Layers are used much like Photoshop or other painting applications, where aspects of each Layer can be controlled independently, such as blending modes and opacity but with additional control over how Depth painting affects the Layer in question.
In Sculpt room, instead of color information, it has deformation information per layer.
So, for example, one layer could be for large sculpting deformations and another for fine details, etc.
Preserving Sculpt Layers: This video demonstrates a method artists can use to preserve Sculpt Layers while switching from Surface mode to Voxel mode…which would otherwise nullify the Sculpt Layer information.
Sculpt Layers demo: Sculpt Layers demo for 3DCoat Beta development, but this is just a brief demo of it in practice. The full version is available on version 2021+.
Sculpt Layers with Multi-Res Proxies: This video demonstrates the feature addition of Sculpt Layer compatibility with 3DCoat’s Multi-Resolution Workflow (using Proxy meshes).
Unique Sculpting Features: This video begins a series highlighting some of the unique features in 3DCoat that helps set it apart. It begins by showing how 3DCoat leverages PBR Texture Painting and High Poly Sculpting simultaneously…taking care of two normally time-consuming and tedious tasks at once and done rather quickly.
Using sculpt layers to clone areas of a scan to spots that were not captured
Technical Information
Troubleshooting Mesh in Surface Mode: This video covers some troubleshooting tips and tools for repairing problem areas of a mesh when sculpting in Surface Mode.
Optimizing Mesh for Surface Mode Sculpting: This video demonstrates some techniques and tools to optimize the mesh for Surface Mode Sculpting after switching from Voxel mode.
Quick Tip: Clean Surface Mesh: This video is a Quick Tip showing a few tools and methods to clean up issues in Surface mode meshes quickly, which one may encounter on rare occasions. Tangent Smoothing cleans on the fly without degrading surface details or shapes.
Powerful Smoothing also fixes holes or surface imperfections, but with much more aggressive smoothing. Hitting the ENTER key in Surface mode will temporarily Voxelize and remesh the object, then return to surface mode, all in one quick step.
Sculpt Layers: This video demonstrates the usage of Sculpt Layers in 3DCoat, which is still in Beta development at the time of the recording. It allows the user to create layers of sculpting edits on their high poly sculpts that can be subsequently modulated, erased, or hidden.
Remove Stretching: This video covers one of the most unique and helpful sculpting features in 3DCoat.
It remeshes directly beneath the brush and brings much of the Dynamic Tessellation features in LiveClay Brushes to the Standard Surface mode brushes.
Voxel Conversion Dialog Options: This video demonstrates the new options in the Voxel Conversion Dialog (which opens when converting a mesh from Surface Mode to Voxels).
It also explains important considerations for Importing models correctly to avoid faceting or other problems relating to Subdivisions.
Editing Individual Parts of a VoxTree Layer: This video offers a quick tip about manipulating individual parts of a VoxTree layer (in the Sculpt Workspace) or separating them into separate child layers.
Replicating Objects on Model Surface: This video begins a demonstration of various techniques one can use to create an object in 3DCoat, and either generate a 3D Brush alpha from it or replicate instances of it along the surface of another object.
Paint Mesh to Sculpt Mesh: This video demonstrates the steps needed to send a copy of a Paint Mesh to the Sculpt Workspace (where it becomes a Sculpt Mesh that can be voxelized or have dynamic tessellation applied to it) and bake small-scale sculpting edits back to the Paint Mesh via a new normal map.
DamStandard and hPolish Brushes: Mock DamStandard and hPolish Brushes. By CareerGamer.
Tutorials
Voxel / Surface Mode Sculpting: In this video demonstration, the walkthrough of the sculpting tools begins, starting with the UI elements. Then other topics covered include:
- Difference between Voxel and Surface mode
- LiveClay
- Brush Smoothing Options
- Cutoff tool (Boolean type ops.)
- Spline Draw mode
- Preset Panel
- Multi-Res workflow (working with different SubD/Resolution levels)
Surface Mode Brush Selections: This video covers tips for making faster brush selections when sculpting/modeling in the Sculpt Workspace.
 English
  Українська
 Español
 Deutsch
 Français
 日本語
日本語 Русский
 한국어
한국어 Polski
 中文 (中国)
 Português
 Italiano
 Suomi
Suomi Svenska
 中文 (台灣)
 Dansk
Dansk Slovenčina
 Türkçe
 Nederlands
 Magyar
 ไทย
ไทย हिन्दी
 Ελληνικά
 Tiếng Việt
 Lietuviškai
 Latviešu valoda
 Eesti
Eesti Čeština
 Română
 Norsk Bokmål