 Čeština
  English
 Українська
 Español
 Deutsch
 Français
 日本語
日本語 Русский
 한국어
한국어 Polski
 中文 (中国)
 Português
 Italiano
 Suomi
Suomi Svenska
 中文 (台灣)
 Dansk
Dansk Slovenčina
 Türkçe
 Nederlands
 Magyar
 ไทย
ไทย हिन्दी
 Ελληνικά
 Tiếng Việt
 Lietuviškai
 Latviešu valoda
 Eesti
Eesti Română
 Norsk Bokmål
You can find the Mesh and Bake menu in the top toolbar of the Modeling workspace. Below are listed all of the functions in this menu:
Mesh Menu
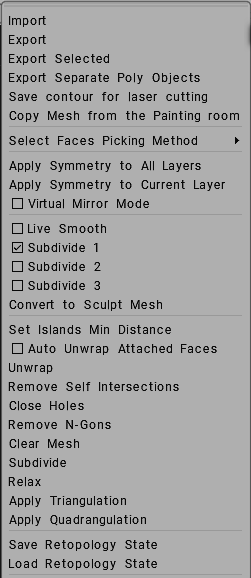
Import: Import an external mesh to continue creating topology started in another 3D modeling program.
Export: Exports a mesh to continue work in an external 3D application.
Export selected: Exports only the selected faces of yourmesh.
Export Separated Poly (Retopo) Objects: Exports each PolyGroup as a separate file. The name of each generated file will contain the group name.
Save Contour for laser cutting: Exports the connected boundary of a UV island to facilitate laser or CNC cutting.
Copy Mesh From Paint Room: Move mesh from the Paint room into the Modeling room. In this case, the objects will be colored; color will be used in baking and merging into the scene.
Select Faces Picking Method: Selects faces based on the following options, Triangles, Quadrangles, N-Gons, and Stars, and Improve Quad Topology.
Apply symmetry to all layers: Makes all symmetrical operations permanent for all PolyGroups allowing them to be “Baked” into the Paint Room and “Unwrapped” in the UV Room.
Apply symmetry to the current layer: Makes only the selected PolyGroup permanently symmetrically for Merging and Unwrapping.
Virtual mirror mode: This option is applicable only if symmetry is enabled. In this mode, you should create topology only on one side of the symmetry. The opposite side will be shown as in the mirror without the actual creation of polygons. You need only work on one side of the mesh.
Virtual mirror should work for you, whether you have deleted half of your model or not. Even though things might not look perfectly symmetrical in the editing process, using "Apply symmetry..." from the "Retopo" menu should rectify that and produce perfectly mirrored geometry.After you finish, you may “Apply symmetry” to make the symmetrical topology permanent. If this mode is turned off, polygons will be automatically created on both sides of the symmetry.
To make it always work, you have to select the layer and click the “select all faces of this layer” button. That way, the “apply symmetry” always works perfectly.
Working w/ Symmetry (Retopo/UVs): This video continues the Introduction to working with Symmetry, focusing on the Modeling Room and UVs).
Live Smooth provides the user with a subdivided, higher polygon version in these Rooms, that adapts on the fly to all changes made to the low poly mesh. Click on live smooth and notice in the sculpt tree panel you immediately get a new subdivided version of the model.
Live Smooth is just for preview purposes, of how polygon model would look like if subdivided. It functions as a preview of the Modeling/Retopo mesh, enabling smooth editing, which can be permanently applied by unlinking it from the low-poly mesh.
Live Smooth toolset wasn’t designed to have Sculpt mesh changes drive changes to the Modeling/Retopo meshes, but the other way around, instead.
You have a feature in the Sculpt Room to make Retopo Meshes conform to changes in the Sculpt Workspace. That is called Conform Retopo Mesh, and you can check/uncheck it in the Toolbar (just above the viewport) in the Sculpt Workspace. It is sort of the reverse of Live Smooth.
When you are working with Live Smooth, the concept is to make changes to the Modeling/Retopo meshes and you can see the changes applied in the subdivided (yes triangles) Live Smooth/Sculpt Mesh. Treat the Sculpt mesh, in this scenario, as just a preview of the Subdivided Modeling mesh and nothing more.

If you are done making changes to/manipulating the low poly Modeling mesh, and want to switch to making changes to the Sculpt Mesh, go to the MESH menu in the Modeling Room > click Unlink Sculpt Mesh. That breaks the link between the low poly mesh and the high poly mesh, but leaves both intact in their respective workspaces. Next, check Conform Retopo Mesh in the toolbar, and proceed to make your sculpting edits.
Subdivide with CC levels 1, 2, 3: Choose the subdivision level and see the changes in the viewport.
Convert to Sculpt Mesh: Copy the 3D Polygonal Object in Polygroup and send it to the Sculpt Tree.
Set Islands Min Distance: Set Islands Min Distance.
Auto unwrap attached faces: Check this option to create UVs automatically. Auto-unwrap faces that were created nearby to the already unwrapped islands. Unwrapping will be performed each time when you switch new tool.
Unwrap: Fit all islands onto the UV map. It is the same command found in the “UV Tools” section of the Tool Panel.
Close holes: A valuable option that attempts to repair holes in imported meshes, especially dense scanned meshes.
Remove N-Gons: Remove N-Gons
Clear mesh: Clears the whole mesh from the selected PolyGroup.
Subdivide: Subdivides the whole mesh, using one iteration, from the current PolyGroup.
Catmull-Clark subdivision in retopo room. Two commands are “Subdivide selected” and “Subdivide the whole group”.
Relax: Relaxes the mesh to aid in snapping to the reference surface, for the currently selected PolyGroup.
Apply Triangulation: Triangulation of all visible mesh as an entire.
Apply Quadrangulation: Quadrangulation all visible mesh as an entire.
Save Retopology State: Store the retopology state in a separate file.
Load Retopology State: Restore the retopology state from a separate file.
Tutorials
Live Smooth: This video is a quick demonstration of the Live Smooth feature in 3DCoat’s Retopo & Modeling workspaces. It provides the user with a subdivided, higher polygon version in these workspaces, that adapts on the fly to all changes made to the low poly mesh.
Low-Poly Modeling with Live Smooth: this video demonstrates fully supported Low-Poly Modeling (a dedicated room and functionality) with Live Smooth in 3DCoat 2021. The toolset shown is part of the 3DCoat 2021 release expected in Q4 2020. To access it, simply go to the MESH menu (in the Retopo or Modeling Workspaces) and check SCULPT MESH. 1 level of Subdivision is the default, but you can change it, in the menu items below SCULPT MESH.