• Slovenčina
  • Dokumentácia 3DCoat
  • Chapters
    • Úvod do 3DCoat
    • Začíname
    • Rozhranie a navigácia
    • Komponenty Brush
    • Pracovné priestory Miestnosti
    • Scripting a Core API
    • Otázky/Odpovede
    • licensing
    • Školenia
  • Pilgway
  • Products
    • 3DCoat
    • 3DCoatTextura
    • 3DCoatPrint
    • PBRLibrary
  • Blog Posts
  • Store
  • Slovenčina Slovenčina
    • English English
    • Українська Українська
    • Español Español
    • Deutsch Deutsch
    • Français Français
    • 日本語 日本語
    • Русский Русский
    • 한국어 한국어
    • Polski Polski
    • 中文 (中国) 中文 (中国)
    • Português Português
    • Italiano Italiano
    • Suomi Suomi
    • Svenska Svenska
    • 中文 (台灣) 中文 (台灣)
    • Dansk Dansk
    • Türkçe Türkçe
    • Nederlands Nederlands
    • Magyar Magyar
    • ไทย ไทย
    • हिन्दी हिन्दी
    • Ελληνικά Ελληνικά
    • Tiếng Việt Tiếng Việt
    • Lietuviškai Lietuviškai
    • Latviešu valoda Latviešu valoda
    • Eesti Eesti
    • Čeština Čeština
    • Română Română
    • Norsk Bokmål Norsk Bokmål
  • Creating 3D Character Using 3DCoat
Expand All Collapse All
  • Úvod do 3DCoat
  • Začíname
    • System requirements
    • Why 3DCoat is Unique?
    • Aktivácia 3DCoat
    • Chyba pri spustení
      • Startup error Mac
    • Color management
    • Upgrading permanent license
    • Linux Setup
      • Linux initial setup per-user installation
      • Linux initial setup for system
      • Tablet setup
      • To GTK3 from GTK2
    • Štruktúra priečinkov
      • Custom documents folder
    • Rôzne formy „rozlíšenia“
    • Tablet on Window
    • Import & Export
    • Applinks v 3DCoat
      • Odkaz na aplikáciu Blender
        • Blender with the Applink in Linux
      • Blender 4.2/3/4/5 applink
      • Max Applink
      • Houdini applink
      • Lightwave uplink
  • Navigation
    • Otvorenie dialógového okna (ponuka rýchleho spustenia)
    • Navigačný panel
    • Fotoaparát a navigácia
      • Customize Navigation as Blender
    • Viewport Navigation Gizmo
    • Left tool panel
    •  Activity Bar
    • Navigácia pomocou zariadení 3DConnexion
      • How to compile Spacenavd on non Ubuntu distro
    • Stylus doesn’t work in sculpting
    • Klávesové skratky
  • Rozhranie a navigácia
    • Ponuka Súbor
    • Menu Upraviť
      • Calculate Curvature
      • Calculate Occlusion
      • Light Baking Tool
      • Predvoľby
    • Zobraziť menu
    • Symetria
    • Textures
    • Calculate
    • Menu Vrstvy
    • Menu zmrazenia
    • Hide
    • Bake
    • Krivky 2022
      • Menu Krivky
      • Curves Properties RMB
      • Vyplňte sieťovou vrstvou
      • Scale of imported curves
    • Menu systému Windows
      • Vyskakovacie panely systému Windows s kartami
      • Posúvače
    • Scripts
    • Addons
    • Capture
    • Ponuka Pomoc
    • Prispôsobenie
    • Upravte alebo vytvorte novú miestnosť
  • Komponenty Brush
    • Vrchná lišta Brush
    • Štetce na všeobecné použitie
      • Vytvárajte štetce a nálepky
      • Vytváranie alfy zo súčasného sochárstva
      • Vytvorte Brush z 3D objektu
      • Create brushes based on Curves
      • Load photoshop .abr brushes
    • Ťahy
      • Vyskakovacie menu Krivky
    • Možnosti Brush
    • Obmedzovač podmienok
    • Panel pásov
    • Panel šablón
    • Inteligentné materiály
      • Pridajte nové obrázky alebo materiály
      • Pripojte inteligentný materiál k vrstve
      • Import Quixel Material
    • Ako vytvoriť predvoľby pre Brush
  • Pracovné priestory Miestnosti
    • Painting
      • Painting textúr a režimy
        • Painting na Per-Pixel
        • Displacement Painting (Micro-Vertex)
        • Ptex Painting
        • Povrchové Painting (Polypainting)
      • Import do Painting
        • Initial CC subdivision
        • UV Set smoothing
        • Sharp (hard) edge
        • Zamknúť Normály
        • Načítať nové rozloženie UV po zmenách modelu
        • DAZ Genesis models into 3DCoat
      • Ponuky pracovného priestoru Painting
        • Edit menu
        • Menu textúry
          • Nástroje na Baking textúr
        • Skryť
        • Menu pre Bake Paint
        • Výber farieb
      • Horná lišta pre Painting
      • Panel Vrstvy
        • Panel miešania
        • Layer and Clipping Masks
      • Nástroje na Painting
      • Nepriehľadnosť – transparentnosť
      • Vylaďte pracovný priestor
        • Súprava nástrojov Tweak
        • Export z Tweak Room
      • Panel náhľadu masky/materiálu
      • Export z miestnosti na Painting
    • Pracovný priestor UV
      • Horná UV lišta
      • UV Ľavý panel nástrojov
      • Panel náhľadu UV
      • Príklad pracovného postupu UV
      • Import do UV miestnosti
      • Vývoz z UV miestnosti
    • Retopológia
      • Import do miestnosti Retopo
      • Menu Retopo Mesh a Menu pečenia
        • Režim virtuálneho zrkadla
      • Bake menu
        • Treat Poly Groups as Paint Objects
        • Baking guide
      • Horná lišta
        • Vyberte geometriu
      • Ľavý panel nástrojov v miestnosti retopológie
        • Celkový účel a funkcia
        • Pridať geometriu
          • Nástroj ťahy v Retopológii
        • Retopo Tweak Tools
        • UV nástroje
        • Príkazy pre miestnosť retopológie
      • AUTORETOPO
        • Autopo guide
      • Poly skupiny
    • Sculpt
      • Sculpt Layer
      • Vyrezávať strom
      • Možnosti Sculpt Brush
      • Top Bar
      • Motor Brush
      • Podmenu Geometria
      • Vystrihnite ponuku „Kliknite pravým tlačidlom myši“.
      • Shaders
      • Voxel režim
        • Čisté vyrezávanie Voxel
        • Hustota a rozlíšenie
        • Hlinený motor
        • Nástroje Voxel
        • Povrchové nástroje na voxeloch
        • Nástroje na úpravu Voxel
        • Objemové Painting
        • Nástroje Voxel objektov
      • Povrchový režim
        • Povrchové nástroje
        • Vlastné nástroje pre povrch
        • Nástroje na úpravu povrchu
        • Povrchové Painting
        • Nástroje povrchových objektov
        • Viacúrovňové rozlíšenie
          • Multires tools
          • Multires adjust
          • Multires commands
      • Vytvarujte krivky
        • Spline krivky
        • Splines model creation
      • Vektorové posunutie
      • Nástroje na transformáciu povrchu
        • Nástroje na transformáciu Voxel
        • Instancer
        • Move
        • Pose
        • Fit
        • Reproject
        • Surface Array
      • Voxel Primitives & Import Tools
      • Živé boolovské hodnoty
      • Príkazy pre miestnosť Sculpt
      • Import do Sculpt Room
      • Export z miestnosti Sculpt Room
    • Vykresliť
      • Comparison of different roughness values
      • Funkcie panela vykresľovania
      • Gramofón
      • Falošné osvetlenie - bez PBR-
    • Factures
      • Pracovný tok
    • Najjednoduchšie
    • Modelovanie
      • Mesh Menu
      • Ľavý panel nástrojov v Modelárni
        • Pridať geometriu
          • Vybraný
        • Tweak
        • Smart Hybrid
        • UV
          • Príkazy
        • Celá sieťovina
      • Príklad loftového povrchu od Fluffy
      • Blockout od Poeboi
      • Import Zbrush Polygroups for UV mapping
    • Kitbash - Rýchla tvorba 3D modelov
      • Create kitbash
      • Left tool panel Kitbash
    • 3DPrint
    • Photogrammetry
      • How to install Reality Capture
      • Reality Capture doesn’t show up ?
    • Sieťka do miestnosti NURBS
    • Nodes
      • Sculpt shaders Nodes Library
  • Scripting a Core API
    • Scripting
    • Core API
    • Python API
  • Bezplatná 3DCoatPrint

DAZ Genesis models into 3DCoat

988 views 0

Written by Carlos
June 13, 2024

3DCoat version 2024.22 and above add a new option “Edit->Prefs->Tools->Don’t group vertices per objects in OBJ files (like ZB)” for better compatibility when you need to keep the vertex order in OBJ files.
Anyway, 3DCoat preserved vertices order, but in some case it is not enough, and vertices should not be grouped.
In this case you need his option.

For texture painting


To export DAZ figures on 3DC for painting, you need first to follow some steps to get it working without issues.

On DAZ you need to export G3 figures or G8 figures without eyelashes.
G8 has its eyelashes as a separate piece of geometry and when you export that out the eyelashes actually gets merged with the face and that causes issues with painting.
But with G3 there is not separate piece of geometry over here for separate eyelashes. 

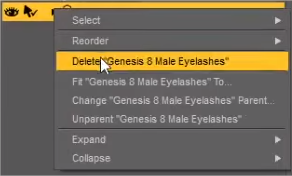
If you like to use G8 figures before exporting the model remember to delete eyelashes pressing RMB over the model layer and select Delete G8 eyelashes.

Remember to export the base mesh without SubDiv.

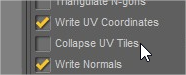
– To export the model without textures be ready that Collapse UV tiles and and Write surfaces are not enabled.

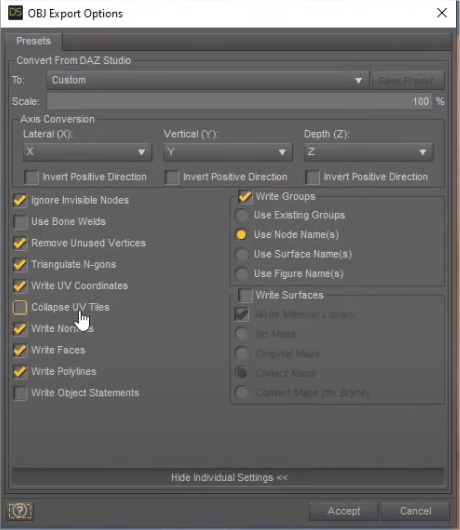
– To export the model with textures be ready that Collapse UV tiles is not enabled and Write surfaces is enabled.

Preserve uDim tiles


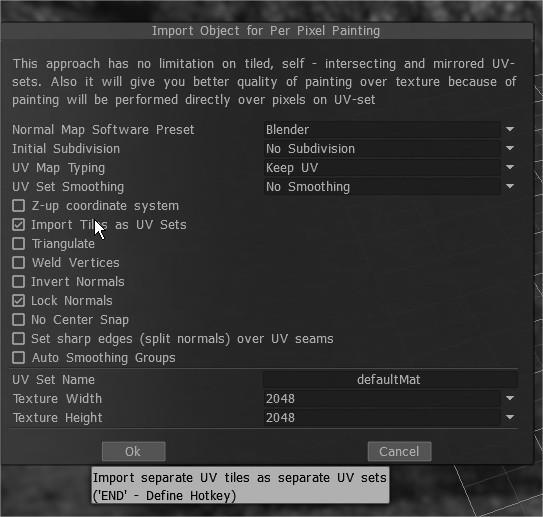
As Genesis3 uses UDIM tiling, you need to import with UV tiles support on 3DC.
This option, paint DAZ characters with UDIM workflow allows you to paint seamlessly anywhere on your character with no limitations, and to avoid the old method of paint objects layers on by one.

So import the Daz figure Turning on Import Tiles as UVset.

The model is imported into 3DCoat with all the udims uv layouts preserved.

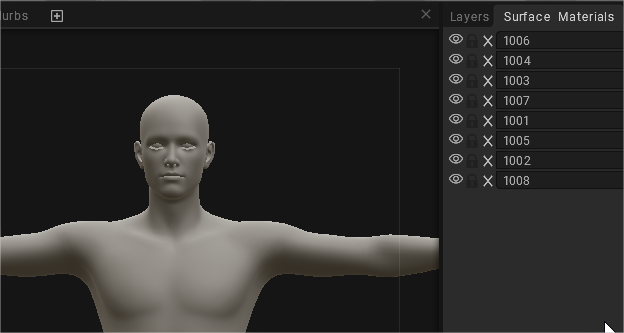
with the model objects zones

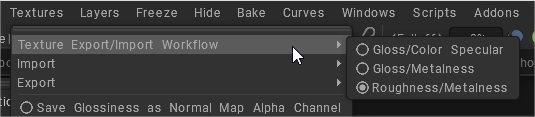
Iray shader use both types of shader mixing:

  • PBR Metallicity/Roughness
  • PBR Specular/Glossiness

To select the correct workflow select it on Textures Menu.

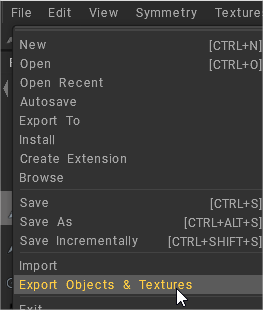
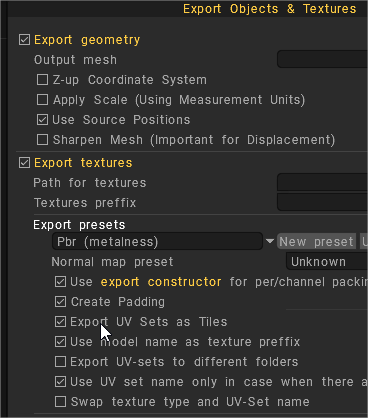
Once you finished painting, export the texture maps from File > Export Objects and Textures.

Remember on export panel turn ON Export UVsets as tiles.

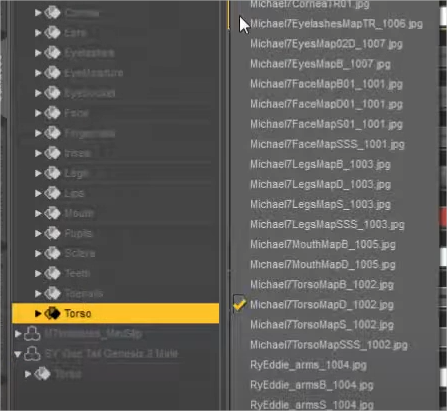
After export all the texture maps to a folder, on DAZ locate every model surface and press image icon to load the new texture map.

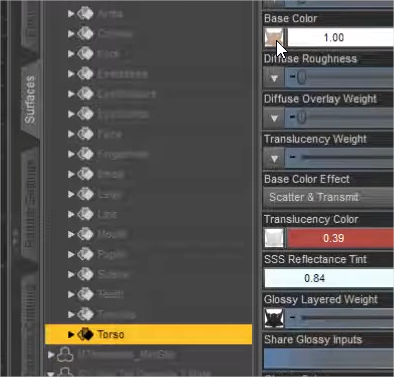
Browse an go to the folder where you exported that maps from 3DCoat.

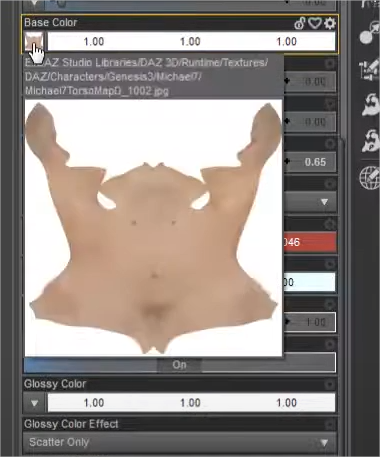
You also have to do every map that DAZ figure have selecting it after upload into DAZ.

For Genesis 2 models


For Genesis 2 models there’s an option in your DAZ obj export dialogue to collapse the UVs, which is an alternative to previous suggestion.

It would also give you a collapsed set of UVs to import into Genesis within DAZ Studio, provided you export the base mesh -without SubDiv-.

Creating Morph Targets


This video covers the updated process of creating Morph Targets or Blend Shapes in 3DCoat, with the purpose of exporting to a major 3D Animation application.

UV tile support and usage of multiple UV


This videos covers (in more detail) the addition of UV tile support and usage of multiple UV:

Tags:daz

Was this helpful?

Yes  No
Related Articles
  • Surface Array
  • Top Bar
  • Curves Properties RMB
  • Left tool panel Kitbash
  • Create kitbash
  • Color management
Previously
Načítať nové rozloženie UV po zmenách modelu
Up Next
Ponuky pracovného priestoru Painting
AI:
Hi! How can I help you?
Attention: This is a beta version of AI chat. Some answers may be wrong. See full version of AI chat