 Español
  English
 Українська
 Deutsch
 Français
 日本語
日本語 Русский
 한국어
한국어 Polski
 中文 (中国)
 Português
 Italiano
 Suomi
Suomi Svenska
 中文 (台灣)
 Dansk
Dansk Slovenčina
 Türkçe
 Nederlands
 Magyar
 ไทย
ไทย हिन्दी
 Ελληνικά
 Tiếng Việt
 Lietuviškai
 Latviešu valoda
 Eesti
Eesti Čeština
 Română
 Norsk Bokmål
Esculpir bisel: cree el bisel a lo largo de la curva.

Primero, debe colocar la curva (o varias curvas) alrededor de los bordes donde necesita colocar el bisel. Ajuste el radio de la pluma para definir el radio del bisel. El radio del bisel puede variar de un punto a otro. Puede escalar todo el radio de bisel más tarde usando el control deslizante “Escala de radio de bisel”. Ajuste la forma del bisel en la ventana si es necesario. Seleccione las curvas y presione el botón “Hacer bisel sobre curvas”. El bisel se creará alrededor de las curvas seleccionadas.
– Cada punto de la curva puede obtener su radio, definido al hacer clic para agregar un punto a la curva; este radio se utilizará para el bisel.
– Si no se selecciona ninguna de las curvas, todas las curvas visibles se utilizarán para el bisel.
– Si el nivel de detalle no es suficiente, presione Deshacer, luego “Subdividir borde”, luego vuelva a hacer el bisel.
– El bisel se crea sobre el volumen actual, así que seleccione el volumen actual correcto.
– El bisel no cambia la densidad/topología, por lo que es solo la deformación de la superficie. Por lo tanto, se hornea a la capa actual, puede ocultar/ajustar el bisel con la opacidad de la profundidad de la capa.
Herramienta de bisel en 3DCoat 2022
Cortar : corta secciones poligonales o con forma de spline de una escultura a través del volumen.
Ruido: le permite generar ruido de procedimiento en una capa completa de Sculpt o en una selección enmascarada.
cerrar agujero
– Reconstruir: Reconstruye Malla localmente, debajo del pincel, generalmente para reparar fallas en la malla.
– Médico de malla
– Arcilla Limpia
Rellenar agujeros: Rellena agujeros en la malla, con la opción de adoptar los contornos de la malla circundante.
Eliminaciones de polígonos: pinta un área con una máscara en tu escultura para eliminar los polígonos afectados en el área enmascarada.
Angulador: esta herramienta crea áreas más nítidas dentro del área seleccionada. Seleccione el área con congelación y presione aplicar. La superficie dentro del área se aproximará para prolongar (extrapolar) la dirección de la superficie en el borde de la selección.
Disolver: esta herramienta actúa como si estuviera suavizando un área seleccionada un número infinito de veces. Puede disolver incluso grandes detalles con esta herramienta. Utilice la opción “Conservar superficie” para suavizar los detalles pero conservar el flujo general de la superficie (siempre que sea posible).
Subdividir: subdividir la superficie con el método de subdivisión Loop. Seleccione un área para subdividir y use las Opciones de herramienta.
- Subdividir el área congelada.
- Subdividir el área no congelada.
- Subdividir toda la malla.
—- Medir: Haga clic para agregar puntos. Use SHIFT para alinear líneas horizontal, vertical o diagonalmente. Presione ESC para detener la creación de la guía de medidas. Un nuevo clic iniciará una nueva guía. Haga clic en líneas y puntos para dividir líneas o arrastrar puntos. Las guías de medida se pueden utilizar en otras herramientas como marcadores visuales o guías de ajuste.
Haga doble clic para borrar el punto. Mueva los puntos cercanos para borrar el punto capturado. Use CTRL para evitar el ajuste a puntos o líneas existentes, por ejemplo, cuando necesite comenzar una nueva línea desde un punto o línea existente.
Medir : al hacer clic y arrastrar con el “LMB”, puede medir desde el principio hasta el final de su trazo, lo que le permite esculpir a escala con mayor precisión.
Herramienta de medición: este video cubre la herramienta de medición completamente reconstruida/rediseñada en la versión 4.5.
Soportes de impresión 3D: las estructuras de soporte de impresión 3D no forman parte del modelo. Se utilizan para soportar partes del modelo durante la impresión. Esto significa que una vez que finaliza la impresión, tiene la tarea adicional de eliminar las estructuras antes de que el modelo esté listo para usar.
Esta es una herramienta de creación de soportes específica para la impresión 3D, donde las porciones extendidas de un modelo necesitan elementos de soporte para brindar un resultado de impresión adecuado.
Vox Slice: esta herramienta permite visualizar el modelo en tiempo real con un plano de corte interactivo. Es una forma de inspeccionar MRI y otros datos de escaneo. Es una forma interesante de asegurarse de que no haya agujeros en los datos escaneados u otras mallas importadas y permite una forma rápida de asegurarse de que tiene una buena import.
Extruir caras:
Puente:
Selección rápida: elija el objeto de esculpir actual. Haga clic en el objeto para elegir el objeto actual. Otra forma es usar la tecla de acceso rápido ‘H’ en cualquier otra herramienta para seleccionar el objeto actual. A veces, cuando tiene más de un objeto en VoxTree, puede resultar un poco engorroso saber qué capa tiene qué objeto. Con la herramienta Seleccionar, puede seleccionar visualmente el objeto (y, por lo tanto, la capa VoxTree) simplemente haciendo clic en el que desea trabajar.
Bajorrelieve
Esto mira el volumen existente de un objeto y lo extruye para crear un nuevo volumen basado en la posición del gizmo. El área en la base (esfera) del gizmo desde la punta es el área que se verá afectada. Es ideal para crear monedas y joyas. Esta herramienta crea detalles de “media altura” en un lado del plano y luego extruye esos detalles en una dirección particular. Conicidad direccional o aplastamiento en el extremo de la flecha de la herramienta cuando el coeficiente se configura por encima o por debajo de 1. El extremo de la bola de la herramienta siempre extruye puntos de forma de alto perfil a la posición y dirección de la bola
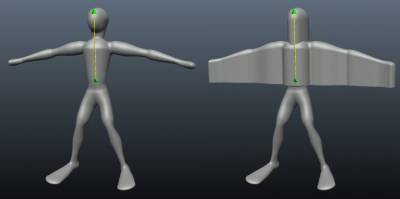
Socavaduras Use esta herramienta para preparar un objeto esculpido para fines de moldeado (donde las socavaduras no son deseables) y elimine las socavaduras para el moldeado.
Esta herramienta elimina áreas invisibles si mira el objeto desde alguna dirección y su opuesto.
El modelo puede cortarse con una máquina CNC o moldearse si elimina las socavaduras. Presione Aplicar o ENTER después de elegir una dirección.
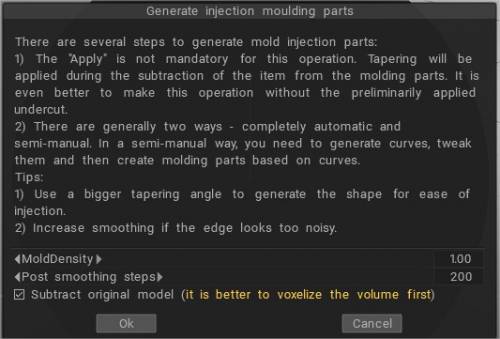
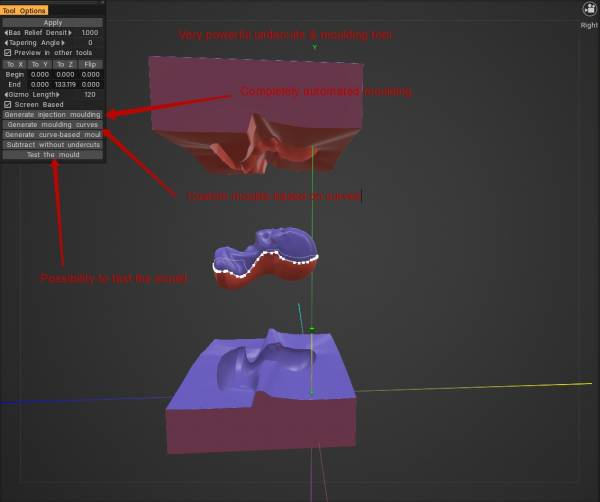
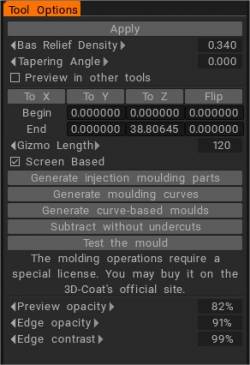
La versión 2022 tiene muescas y herramientas de moldeo mucho mejores (en un módulo adicional especial)
Tutorial
Sugerencia rápida: Uso de VoxHide como herramienta de enmascaramiento : este video demuestra cómo la herramienta VoxHide se puede usar como herramienta de enmascaramiento en lugar de un Brush congelado, que solo funciona en el modo Superficie.
Inversión de selecciones de Voxel con la herramienta Cortar y ocultar : este video es una demostración rápida del uso de la herramienta Cortar y ocultar. Principalmente mostrando cómo invertir una selección usando las teclas de acceso rápido asociadas pero poco conocidas.