 Português
  English
 Українська
 Español
 Deutsch
 Français
 日本語
日本語 Русский
 한국어
한국어 Polski
 中文 (中国)
 Italiano
 Suomi
Suomi Svenska
 中文 (台灣)
 Dansk
Dansk Slovenčina
 Türkçe
 Nederlands
 Magyar
 ไทย
ไทย हिन्दी
 Ελληνικά
 Tiếng Việt
 Lietuviškai
 Latviešu valoda
 Eesti
Eesti Čeština
 Română
 Norsk Bokmål
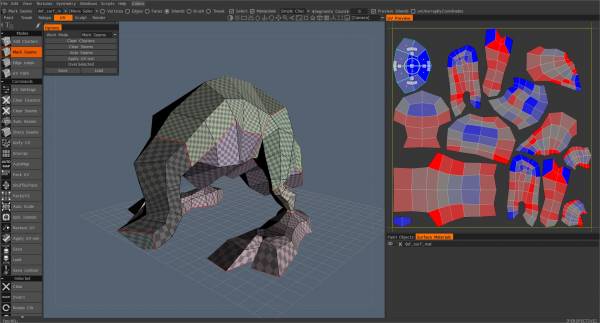
Se você importou uma malha para UV mapping ou se precisa alterar ou editar seus mapas UV , a sala UV está disponível com um arsenal completo de ferramentas para modificar seus mapas UV . O mapa UV de uma malha é como os padrões de papel usados para cortar o tecido para as roupas do seu modelo. Como acontece com qualquer peça de roupa decente, você deve tentar não fazer seu padrão com muitas peças pequenas e mantê-lo o mais grande possível. A sala UV fornece as ferramentas precisas de que você precisa para criar um mapa UV equilibrado.
Como uma amostra de papel, cada peça de roupa é separada das outras e projetada economicamente para abrir espaço para as demais. As ferramentas e recursos da sala UV são projetados principalmente para posicionar, dimensionar e alinhar todas as peças do padrão. Como você pode mudar de ideia sobre a colocação de costuras de padrão, todas as ferramentas na sala Retopo que lidam com o UV mapping também estão na sala UV . Também existem ferramentas para ajudá-los a evitar o alongamento de peças de amostra – e como todas as peças são compactadas no espaço de todo o mapa UV .
Como um modelo pode ter uma variedade de aplicações, é possível que você precise de mapas diferentes. Com o 3DCoat, você pode criar e modificar quantos mapas UV diferentes precisar para cada projeto.
Depois de concluir seus mapas e colocar seu modelo na Sala de Pintura, você pode usar o Editor UV de Textura para colocar detalhes e rótulos que requerem precisão que é difícil de alcançar pintando no próprio 3D Viewport. Use o Texture UV Editor para pintar e posicionar detalhes precisos diretamente no mapa UV usando todas as ferramentas disponíveis na Paint Room.
O 3DCoat também oferece suporte à criação e edição de vários mapas UV (uDims) em uma única malha, mas observe que os polígonos não podem ser compartilhados entre os layouts de mapas UV .
Depois de finalizar sua topologia e estar pronto para começar a texturizar seu modelo (Baking sua malha na Sala de Pintura), a “Sala UV ” fica disponível com um arsenal completo de ferramentas para modificar seus próprios “Mapas UV ”.
O espaço de trabalho UV funciona com objetos de pintura.
Se você deseja mapear UV um objeto Retopo , você pode fazê-lo a partir do Retopo Workspace .
Um Objeto Retopo deve ter um Mapa UV antes de Baking para um Objeto Paint. Dito isso, observe que as ferramentas UV em ambas as salas são exatamente as mesmas, e esta página contém todas as informações de UV Unwrapping.
O UV Workspace fornece as ferramentas precisas para produzir um Mapa UV “balanceado”. O mapa UV de um modelo é como o padrão de papel usado para recortar o tecido para as roupas do seu modelo (texturas).
Como acontece com qualquer roupa decente, você deve tentar evitar fazer seu padrão com dezenas de peças pequenas, mas, em vez disso, uma boa peça de roupa tenta manter todas as peças componentes tão grandes quanto possível e o mais próximo do mesmo tamanho possível.
Como um padrão de papel, cada parte da “roupa” é separada das outras e disposta de forma econômica para dar lugar a todas as outras. As ferramentas e funções do UV Room são projetadas principalmente para lidar com o posicionamento, dimensionamento e orientação de todas as peças do “padrão”.
Como você pode mudar de ideia em relação ao posicionamento de costuras de “padrão”, muitas ferramentas encontradas no Retopo Workspace que lidam com o UV Mapping também são encontradas no UV Workspace.
Também estão presentes ferramentas que ajudam a evitar o “alongamento” das peças do “padrão” e como todas as peças são “empacotadas” no espaço do mapa geral.
Uma vez que um modelo pode ter uma variedade de usos e pode ser visto de vários ângulos, você pode achar necessário ter mapas diferentes, cada um para seu propósito exclusivo em sua produção final.
O 3DCoat permite que você crie e modifique quantos Mapas UV você precisar para qualquer projeto.
Depois de concluir seus mapas e colocar seu modelo na Sala de Pintura, você pode usar o Editor UV de Textura para colocar detalhes e rótulos que requerem precisão que é difícil de alcançar pintando em 3D Viewport.
Para desembrulhar um Objeto (Pintura ou Retopo), primeiro ele deve ter Costuras UV . Ao marcar e ter costuras UV , o 3DCoat saberá onde cortar a malha e colocá-la plana para aplicação de textura por meios 3D e 2D (Sala de pintura do 3DCoat, Photoshop, etc.).
Use o Editor UV de Textura para Pintar e posicionar detalhes precisos diretamente no Mapa UV utilizando todas as ferramentas disponíveis na Sala de Pintura.
Mover-se para frente e para trás entre o UV Workspace e o Paint Workspace permite que você faça todos os ajustes de Seam e Island para obter o conjunto ideal de mapas de textura prontos para export para o aplicativo externo de sua escolha.
O UV Workspace é uma duplicação e uma extensão das ferramentas disponíveis no Retopo Workspace , feitas para trabalhar com UV Maps uma vez que seu modelo tenha sido “cozido” no Paint Workspace . O que você produzir no UV Workspace representará os mapas permanentes que você usará para export para aplicativos de terceiros.
Sala Retopo e Sala UV
Muitos especialistas em 3D usam apenas as partes do 3DCoat que os ajudam a realizar trabalhos muito específicos, como criar mapas UV ou nova topologia. O UV Workspace do 3DCoat fornece um conjunto muito poderoso de ferramentas específicas para realizar todo tipo de alteração UV para modelos e mapas existentes.
No 3DCoat, o Retopo Room e o UV Room estão intimamente ligados e, na maioria das vezes, são usados juntos para produzir mapas UV finais.
Ao alterar um mapa UV existente, pequenas alterações na topologia do modelo às vezes são desejáveis, esses ajustes são feitos primeiro no Retopo Room, seguidos por desembrulhar a malha modificada e trazer o novo mapa para o UV Room para colocação e empacotamento final da ilha.
A qualquer momento do processo de UV Mapping , novas costuras podem ser colocadas e novos mapas criados, que variam daqueles layouts feitos na Sala Retopo .
Antes de desempacotar, você pode especificar qual algoritmo de desempacotamento deseja usar. Há o desempacotamento LSCM mais antigo e o desempacotamento ABF++ mais recente. Quando você marca uma nova costura, o 3DCoat desembrulha novos clusters em tempo real e mostra a visualização dos clusters desembrulhados imediatamente para que você possa ver o grau de distorção de cada peça. Ter esta função conveniente ajuda a evitar que você esqueça a localização de qualquer costura ou cluster.
Tutoriais
Início rápido: ferramentas de embalagem UV
Os fundamentos do UV Mapping : Este tutorial cobre os fundamentos do desdobramento de textura, também conhecido como UV mapping, o processo de envolver uma imagem de textura 2D em um objeto 3D.
Como trocar UVs : Este vídeo cobre um método fácil no 3DCoat, para modificar os UVs de um modelo depois de fazer algum trabalho de pintura de textura…sem penalidade.
Trabalhando com Simetria (Retopo/ UVs) : Este vídeo continua a Introdução ao trabalho com Simetria, com foco no Retopo Room e UVs).