• Русский
  • Документация 3DCoat
  • Chapters
    • Введение в 3DCoat
    • Начиная
    • Интерфейс и навигация
    • Компоненты Brush
    • Рабочие помещения
    • Scripting и Core API
    • Вопросы и Ответы
    • licensing
    • Учебные пособия
  • Pilgway
  • Products
    • 3DCoat
    • 3DCoatTextura
    • 3DCoatPrint
    • PBRLibrary
  • Blog Posts
  • Store
  • Русский Русский
    • English English
    • Українська Українська
    • Español Español
    • Deutsch Deutsch
    • Français Français
    • 日本語 日本語
    • 한국어 한국어
    • Polski Polski
    • 中文 (中国) 中文 (中国)
    • Português Português
    • Italiano Italiano
    • Suomi Suomi
    • Svenska Svenska
    • 中文 (台灣) 中文 (台灣)
    • Dansk Dansk
    • Slovenčina Slovenčina
    • Türkçe Türkçe
    • Nederlands Nederlands
    • Magyar Magyar
    • ไทย ไทย
    • हिन्दी हिन्दी
    • Ελληνικά Ελληνικά
    • Tiếng Việt Tiếng Việt
    • Lietuviškai Lietuviškai
    • Latviešu valoda Latviešu valoda
    • Eesti Eesti
    • Čeština Čeština
    • Română Română
    • Norsk Bokmål Norsk Bokmål
  • Creating 3D Character Using 3DCoat
Expand All Collapse All
  • Введение в 3DCoat
  • Начиная
    • System requirements
    • Why 3DCoat is Unique?
    • Активация 3DCoat
    • Ошибка запуска
      • Startup error Mac
    • Color management
    • Upgrading permanent license
    • Linux Setup
      • Linux initial setup per-user installation
      • Linux initial setup for system
      • Tablet setup
      • To GTK3 from GTK2
    • Структура папок
      • Custom documents folder
    • Различные формы «резолюции»
    • Tablet on Window
    • Import и Export
    • Applinks в 3DCoat
      • Ссылка на приложение Blender
        • Blender with the Applink in Linux
      • Blender 4.2/3/4/5 applink
      • Max Applink
      • Houdini applink
      • Lightwave uplink
  • Navigation
    • Открытие диалогового окна (меню быстрого запуска)
    • Панель навигации
    • Камера и навигация
      • Customize Navigation as Blender
    • Viewport Navigation Gizmo
    • Left tool panel
    •  Activity Bar
    • Навигация с использованием устройств 3DConnexion
      • How to compile Spacenavd on non Ubuntu distro
    • Stylus doesn’t work in sculpting
    • Горячие клавиши
  • Интерфейс и навигация
    • Меню «Файл»
    • Меню редактирования
      • Calculate Curvature
      • Calculate Occlusion
      • Light Baking Tool
      • Настройки
    • Меню просмотра
    • Симметрия
    • Textures
    • Calculate
    • Меню слоев
    • Меню стоп-кадра
    • Hide
    • Bake
    • Кривые 2022
      • Меню кривых
      • Curves Properties RMB
      • Заполнить слоем сетки
      • Scale of imported curves
    • Меню Windows
      • Всплывающие панели Windows с вкладками
      • Слайдеры
    • Scripts
    • Addons
    • Capture
    • Меню справки
    • Настройка
    • Изменить или создать новую комнату
  • Компоненты Brush
    • Верхняя панель Brush
    • Кисти общего назначения
      • Создание кистей и декалей
      • Делаем альфу из текущего скульпта
      • Создайте Brush из 3D-объекта
      • Create brushes based on Curves
      • Load photoshop .abr brushes
    • Удары
      • Всплывающее меню кривых
    • Параметры Brush
    • Условия Ограничитель
    • Панель полос
    • Панель трафаретов
    • Умные материалы
      • Добавляйте новые изображения или материалы
      • Прикрепите смарт-материал к слою
      • Import Quixel Material
    • Как создать пресеты для Brush
  • Рабочие помещения
    • Painting
      • Painting текстур и режимы
        • Per-Pixel Painting
        • Painting смещения (Micro-Vertex)
        • Ptex Painting
        • Painting поверхности (полиокраска)
      • Импорт в комнату Painting
        • Initial CC subdivision
        • UV Set smoothing
        • Sharp (hard) edge
        • Блокировка нормалей
        • Загрузить новый UV макет после изменения модели
        • DAZ Genesis models into 3DCoat
      • Меню рабочей области Painting
        • Edit menu
        • Меню текстур
          • Инструменты для Baking текстуры
        • Скрывать
        • Меню для Bake Paint
        • Выбор цвета
      • Верхняя планка для Painting
      • Панель слоев
        • Панель смешивания
        • Layer and Clipping Masks
      • Инструменты для Painting
      • Непрозрачность - Прозрачность
      • Настройка рабочего пространства
        • Набор инструментов настройки
        • Экспорт из Tweak Room
      • Панель предварительного просмотра маски/материала
      • Экспорт из студии Painting
    • UV рабочее пространство
      • UV верхняя полоса
      • UV Левая панель инструментов
      • Панель предварительного просмотра UV
      • Пример рабочего процесса UV
      • Импорт в UV комнату
      • Экспорт из UV комнаты
    • Ретопология
      • Импорт в комнату Retopo
      • Сетчатое меню Retopo и меню выпечки
        • Режим виртуального зеркала
      • Bake menu
        • Treat Poly Groups as Paint Objects
        • Baking guide
      • Верхняя панель
        • Выберите геометрию
      • Левая панель инструментов в комнате ретопологии
        • Общая цель и функция
        • Добавить геометрию
          • Инструмент «Штрихи» в ретопологии
        • Инструменты настройки Retopo
        • UV инструменты
        • Команды для комнаты ретопологии
      • АВТОРЕТОПО
        • Autopo guide
      • Полигруппы
    • Лепить
      • Sculpt Layer
      • Скульптурное дерево
      • Параметры скульптурной Brush
      • Top Bar
      • Brush двигатель
      • Подменю геометрии
      • Скульптурное меню «Правый клик»
      • Шейдеры
      • Voxel режим
        • Чистая Voxel скульптура
        • Плотность и разрешение
        • Глиняный двигатель
        • Voxel инструменты
        • Поверхностные инструменты на вокселах
        • Инструменты настройки Voxel
        • Объемная Painting
        • Инструменты Voxel объектов
      • Поверхностный режим
        • Инструменты поверхности
        • Пользовательские инструменты поверхности
        • Инструменты настройки поверхности
        • Painting поверхности
        • Инструменты для работы с поверхностными объектами
        • Многоуровневое разрешение
          • Multires tools
          • Multires adjust
          • Multires commands
      • Скульптурные кривые
        • Сплайн-кривые
        • Splines model creation
      • Смещение вектора
      • Инструменты преобразования поверхности
        • Инструменты преобразования Voxel
        • Instancer
        • Move
        • Pose
        • Fit
        • Reproject
        • Surface Array
      • Voxel примитивы и инструменты Import
      • Живые логические значения
      • Команды для скульптурной комнаты
      • Import в Sculpt Room
      • Экспорт из Sculpt Room
    • Оказывать
      • Comparison of different roughness values
      • Функции панели рендеринга
      • Проигрыватель
      • Поддельное освещение - без PBR-
    • Factures
      • Рабочий процесс
    • Самый простой
    • Моделирование
      • Mesh Menu
      • Левая панель инструментов в комнате моделирования
        • Добавить геометрию
          • Выбрано
        • Твик
        • Smart Hybrid
        • UV
          • Команды
        • Вся сетка
      • Пример лофтовой поверхности от Fluffy
      • Блокаут от Poeboi
      • Import Zbrush Polygroups for UV mapping
    • Kitbash - Быстрое создание 3D моделей
      • Create kitbash
      • Left tool panel Kitbash
    • 3DPrint
    • Photogrammetry
      • How to install Reality Capture
      • Reality Capture doesn’t show up ?
    • Сетка для комнаты NURBS
    • Nodes
      • Библиотека узлов скульпт-шейдеров
  • Scripting и Core API
    • Scripting
    • Core API
    • API Python
  • Бесплатный 3DCoatPrint

Splines model creation

851 views 0

Written by Carlos
March 5, 2024

The model to be used seamlessly over the spline should consist of 3 objects, named as Top, Bottom, and Middle.
The Middle object is the one that will be constantly tiled along the curve.
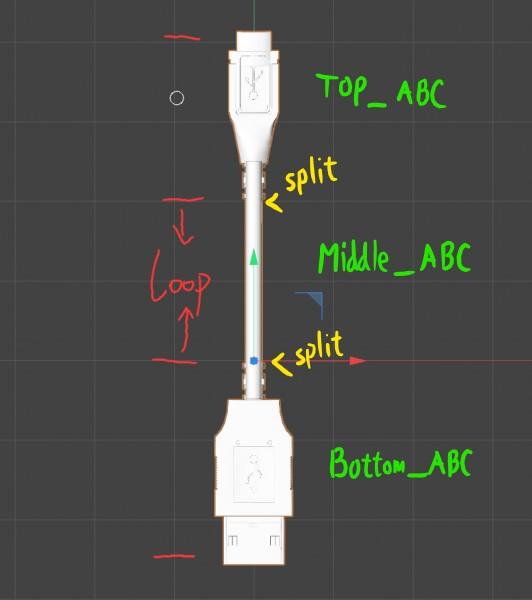
It has vertices approximately in the range [0..1] along Y-axis.

Look at the loop part. To create a spline model with three parts LOOP must begin at 0,0,0 Global Space coordinates.


Top and bottom of the Middle object should be open and opposite vertices positions should differ exactly by 1 along Y.

Here’s an example of the Middle object:

There may be several objects named “Middle_anything”. They should get identical open edges, but in the middle the geometry may be different. 3DCoat will use random middle objects to place them along the curve. 

The Top object is placed exactly over the Middle object and has an approximate [1..2] range of Y-coordinate. This object is open at the bottom, the vertices should get exactly the same values as on the Middle top vertices.

An example of the Top object, marked red: 

The Bottom object is placed exactly under the Middle object and has an approximate [-1..0] range of Y-coordinate. This object is open at the top, the vertices should get exactly the same values as on the Middle bottom vertices.

Here’s an example of the Bottom object, marked red: 

The whole curve will be tiled with Middle sections, the first section is Bottom, the last one is Top.

If the curve is closed, only the Middle sections will be used.

Open edges will be welded with nearby sections, so if you made everything correctly, the whole object will be closed.

So, the final model looks like this:

And this is how it looks in 3DCoat

If the middle part of the model does not repeat, check the following

1. Is the object named as follows?
– Top_@@@
– Middle_@@@
– Bottom_@@@

2. Is the connection part of the object ‘Open edge’?
– Spline guidelines say that the top-middle-bottom part should be an open edge

3. This is just in case, but have you actually registered and tested it instead of a preview in the creation stage?
– It does not seem to be repeated in the preview, but if you follow steps 1 and 2 properly, the result will be repeated middle-parts normally.

Tags:splines model

Was this helpful?

Yes  No
Related Articles
  • Surface Array
  • Top Bar
  • Curves Properties RMB
  • Left tool panel Kitbash
  • Create kitbash
  • Color management
Previously
Сплайн-кривые
Up Next
Смещение вектора
AI:
Hi! How can I help you?
Attention: This is a beta version of AI chat. Some answers may be wrong. See full version of AI chat