• Slovenčina
  • Dokumentácia 3DCoat
  • Chapters
    • Úvod do 3DCoat
    • Začíname
    • Rozhranie a navigácia
    • Komponenty Brush
    • Pracovné priestory Miestnosti
    • Scripting a Core API
    • Otázky/Odpovede
    • licensing
    • Školenia
  • Pilgway
  • Products
    • 3DCoat
    • 3DCoatTextura
    • 3DCoatPrint
    • PBRLibrary
  • Blog Posts
  • Store
  • Slovenčina Slovenčina
    • English English
    • Українська Українська
    • Español Español
    • Deutsch Deutsch
    • Français Français
    • 日本語 日本語
    • Русский Русский
    • 한국어 한국어
    • Polski Polski
    • 中文 (中国) 中文 (中国)
    • Português Português
    • Italiano Italiano
    • Suomi Suomi
    • Svenska Svenska
    • 中文 (台灣) 中文 (台灣)
    • Dansk Dansk
    • Türkçe Türkçe
    • Nederlands Nederlands
    • Magyar Magyar
    • ไทย ไทย
    • हिन्दी हिन्दी
    • Ελληνικά Ελληνικά
    • Tiếng Việt Tiếng Việt
    • Lietuviškai Lietuviškai
    • Latviešu valoda Latviešu valoda
    • Eesti Eesti
    • Čeština Čeština
    • Română Română
    • Norsk Bokmål Norsk Bokmål
  • Creating 3D Character Using 3DCoat
Expand All Collapse All
  • Úvod do 3DCoat
  • Začíname
    • System requirements
    • Why 3DCoat is Unique?
    • Aktivácia 3DCoat
    • Chyba pri spustení
      • Startup error Mac
    • Color management
    • Upgrading permanent license
    • Linux Setup
      • Linux initial setup per-user installation
      • Linux initial setup for system
      • Tablet setup
      • To GTK3 from GTK2
    • Štruktúra priečinkov
      • Custom documents folder
    • Rôzne formy „rozlíšenia“
    • Tablet on Window
    • Import & Export
    • Applinks v 3DCoat
      • Odkaz na aplikáciu Blender
        • Blender with the Applink in Linux
      • Blender 4.2/3/4/5 applink
      • Max Applink
      • Houdini applink
      • Lightwave uplink
  • Navigation
    • Otvorenie dialógového okna (ponuka rýchleho spustenia)
    • Navigačný panel
    • Fotoaparát a navigácia
      • Customize Navigation as Blender
    • Viewport Navigation Gizmo
    • Left tool panel
    •  Activity Bar
    • Navigácia pomocou zariadení 3DConnexion
      • How to compile Spacenavd on non Ubuntu distro
    • Stylus doesn’t work in sculpting
    • Klávesové skratky
  • Rozhranie a navigácia
    • Ponuka Súbor
    • Menu Upraviť
      • Calculate Curvature
      • Calculate Occlusion
      • Light Baking Tool
      • Predvoľby
    • Zobraziť menu
    • Symetria
    • Textures
    • Calculate
    • Menu Vrstvy
    • Menu zmrazenia
    • Hide
    • Bake
    • Krivky 2022
      • Menu Krivky
      • Curves Properties RMB
      • Vyplňte sieťovou vrstvou
      • Scale of imported curves
    • Menu systému Windows
      • Vyskakovacie panely systému Windows s kartami
      • Posúvače
    • Scripts
    • Addons
    • Capture
    • Ponuka Pomoc
    • Prispôsobenie
    • Upravte alebo vytvorte novú miestnosť
  • Komponenty Brush
    • Vrchná lišta Brush
    • Štetce na všeobecné použitie
      • Vytvárajte štetce a nálepky
      • Vytváranie alfy zo súčasného sochárstva
      • Vytvorte Brush z 3D objektu
      • Create brushes based on Curves
      • Load photoshop .abr brushes
    • Ťahy
      • Vyskakovacie menu Krivky
    • Možnosti Brush
    • Obmedzovač podmienok
    • Panel pásov
    • Panel šablón
    • Inteligentné materiály
      • Pridajte nové obrázky alebo materiály
      • Pripojte inteligentný materiál k vrstve
      • Import Quixel Material
    • Ako vytvoriť predvoľby pre Brush
  • Pracovné priestory Miestnosti
    • Painting
      • Painting textúr a režimy
        • Painting na Per-Pixel
        • Displacement Painting (Micro-Vertex)
        • Ptex Painting
        • Povrchové Painting (Polypainting)
      • Import do Painting
        • Initial CC subdivision
        • UV Set smoothing
        • Sharp (hard) edge
        • Zamknúť Normály
        • Načítať nové rozloženie UV po zmenách modelu
        • DAZ Genesis models into 3DCoat
      • Ponuky pracovného priestoru Painting
        • Edit menu
        • Menu textúry
          • Nástroje na Baking textúr
        • Skryť
        • Menu pre Bake Paint
        • Výber farieb
      • Horná lišta pre Painting
      • Panel Vrstvy
        • Panel miešania
        • Layer and Clipping Masks
      • Nástroje na Painting
      • Nepriehľadnosť – transparentnosť
      • Vylaďte pracovný priestor
        • Súprava nástrojov Tweak
        • Export z Tweak Room
      • Panel náhľadu masky/materiálu
      • Export z miestnosti na Painting
    • Pracovný priestor UV
      • Horná UV lišta
      • UV Ľavý panel nástrojov
      • Panel náhľadu UV
      • Príklad pracovného postupu UV
      • Import do UV miestnosti
      • Vývoz z UV miestnosti
    • Retopológia
      • Import do miestnosti Retopo
      • Menu Retopo Mesh a Menu pečenia
        • Režim virtuálneho zrkadla
      • Bake menu
        • Treat Poly Groups as Paint Objects
        • Baking guide
      • Horná lišta
        • Vyberte geometriu
      • Ľavý panel nástrojov v miestnosti retopológie
        • Celkový účel a funkcia
        • Pridať geometriu
          • Nástroj ťahy v Retopológii
        • Retopo Tweak Tools
        • UV nástroje
        • Príkazy pre miestnosť retopológie
      • AUTORETOPO
        • Autopo guide
      • Poly skupiny
    • Sculpt
      • Sculpt Layer
      • Vyrezávať strom
      • Možnosti Sculpt Brush
      • Top Bar
      • Motor Brush
      • Podmenu Geometria
      • Vystrihnite ponuku „Kliknite pravým tlačidlom myši“.
      • Shaders
      • Voxel režim
        • Čisté vyrezávanie Voxel
        • Hustota a rozlíšenie
        • Hlinený motor
        • Nástroje Voxel
        • Povrchové nástroje na voxeloch
        • Nástroje na úpravu Voxel
        • Objemové Painting
        • Nástroje Voxel objektov
      • Povrchový režim
        • Povrchové nástroje
        • Vlastné nástroje pre povrch
        • Nástroje na úpravu povrchu
        • Povrchové Painting
        • Nástroje povrchových objektov
        • Viacúrovňové rozlíšenie
          • Multires tools
          • Multires adjust
          • Multires commands
      • Vytvarujte krivky
        • Spline krivky
        • Splines model creation
      • Vektorové posunutie
      • Nástroje na transformáciu povrchu
        • Nástroje na transformáciu Voxel
        • Instancer
        • Move
        • Pose
        • Fit
        • Reproject
        • Surface Array
      • Voxel Primitives & Import Tools
      • Živé boolovské hodnoty
      • Príkazy pre miestnosť Sculpt
      • Import do Sculpt Room
      • Export z miestnosti Sculpt Room
    • Vykresliť
      • Comparison of different roughness values
      • Funkcie panela vykresľovania
      • Gramofón
      • Falošné osvetlenie - bez PBR-
    • Factures
      • Pracovný tok
    • Najjednoduchšie
    • Modelovanie
      • Mesh Menu
      • Ľavý panel nástrojov v Modelárni
        • Pridať geometriu
          • Vybraný
        • Tweak
        • Smart Hybrid
        • UV
          • Príkazy
        • Celá sieťovina
      • Príklad loftového povrchu od Fluffy
      • Blockout od Poeboi
      • Import Zbrush Polygroups for UV mapping
    • Kitbash - Rýchla tvorba 3D modelov
      • Create kitbash
      • Left tool panel Kitbash
    • 3DPrint
    • Photogrammetry
      • How to install Reality Capture
      • Reality Capture doesn’t show up ?
    • Sieťka do miestnosti NURBS
    • Nodes
      • Sculpt shaders Nodes Library
  • Scripting a Core API
    • Scripting
    • Core API
    • Python API
  • Bezplatná 3DCoatPrint

Calculate Occlusion

1778 views 1

Written by Carlos
March 8, 2024

This baker runs a routine that calculates “Ambient Occlusion” (global illumination) based on tracing a number of light rays surrounding an object.
Use this to simulate “real world” ambient lighting situations. It may take a long time to complete. This tool calculates the global illumination from many spot lights distributed over.

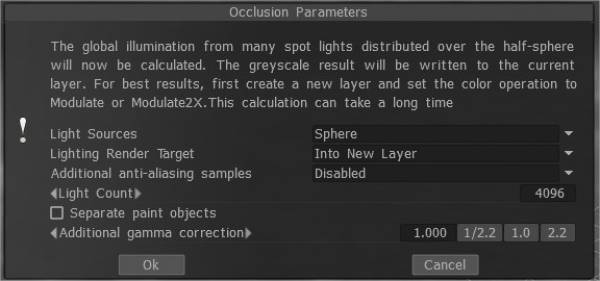
The grey scale results will be written to the current layer. So it is better to create a new layer and set color operation “Modulate” or “Modulate2X”.

An occlusion calculation tool is specially optimized for high polygons (several million), it is fast but you know that it still needs some time in such high polygons.

Light sources (distribution of lights)


  • 1) over the hemisphere
  • 2) over the sphere
  • 3) over hemisphere + sphere

Lighting render target: You must choose a layer to which the occlusion calculation is placed. You can choose to add a new layer automatically or overwrite the current layer. In the first case, you do not forget to delete a new layer for light calculation. Also, a new color option, “To time,” is installed for a new layer. In the case of rendering the former layer, all its color information will be deleted.

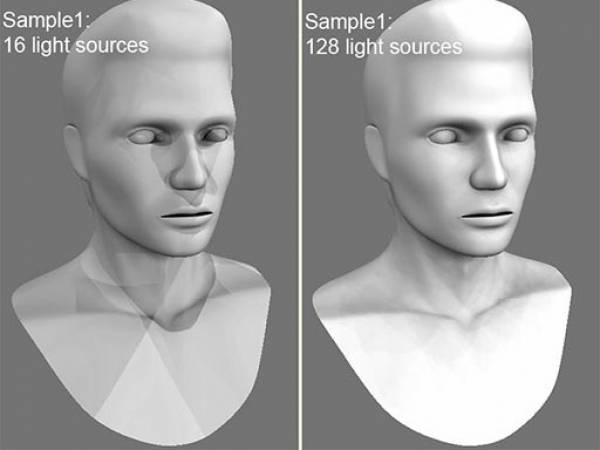
Lights count: The more lights, the longer the calculation. The more light sources there are the better the quality of lighting and the longer its calculation.
The maximum value is 256, and the minimum value is 16.

Additional anti-aliasing samples: Amount of post-smoothing steps after occlusion calculation. The calculation will be used the texture several times bigger. This allows you to get rid of some artifacts if there are too small UV islands or long pixels.
Warning: this function will slow down the calculation and consume more RAM and VRAM.

Separate paint objects: Explode the object on parts to avoid wrong AO contact projections.

Tutorials


AO Baking w/ OpenGL & Normal Map utilization: This video covers two major new improvements to AO baking in OpenGL acceleration and Normal Map utilization.

Tags:occlusion map

Was this helpful?

1 Yes  3 No
Related Articles
  • Surface Array
  • Top Bar
  • Curves Properties RMB
  • Left tool panel Kitbash
  • Create kitbash
  • Color management
Previously
Calculate Curvature
Up Next
Light Baking Tool
AI:
Hi! How can I help you?
Attention: This is a beta version of AI chat. Some answers may be wrong. See full version of AI chat