 Italiano
  English
 Українська
 Español
 Deutsch
 Français
 日本語
日本語 Русский
 한국어
한국어 Polski
 中文 (中国)
 Português
 Suomi
Suomi Svenska
 中文 (台灣)
 Dansk
Dansk Slovenčina
 Türkçe
 Nederlands
 Magyar
 ไทย
ไทย हिन्दी
 Ελληνικά
 Tiếng Việt
 Lietuviškai
 Latviešu valoda
 Eesti
Eesti Čeština
 Română
 Norsk Bokmål
L’alfa controlla la forma del pennello. Alpha è una mappa di intensità in scala di grigi.
Usa il tasto “T” per accedere rapidamente al pannello dei pennelli.
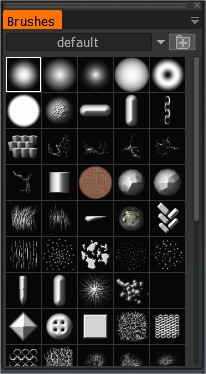
Questo è un elenco di pennelli all’interno di 3DC. Puoi aggiungere i tuoi pennelli in formato TGA, PSD o ABR (il formato penna utilizzato in Adobe Photoshop). Premi sull’icona “Cartella” per aggiungerla. Il pennello aggiunto apparirà nell’elenco dei pennelli disponibili.
Puoi anche usare un modello 3D come pennello.
Un pennello può essere colorato, purché l’immagine contenga un canale alfa. In questo caso, il canale alfa verrà utilizzato come maschera per la profondità.
Vernice sequenza
Seleziona più pennelli contemporaneamente (MAIUSC + LMB) e dipingi in sequenza. Utilizzando CTRL o MAIUSC per selezionare più penne, vedrai diverse penne selezionate nell’anteprima, queste verranno utilizzate in modo casuale.

Raggio Brush
Per modificare il raggio Brush , utilizzare i tasti “[” e “]” o la rotellina del mouse (a condizione che le regolazioni corrispondenti siano state effettuate nel menu Preferenze).
Profondità Pressione
Per modificare la profondità, premi “—” e “+” o la rotellina del mouse (a condizione che le regolazioni corrispondenti siano state apportate nel menu Preferenze). Puoi fare lo stesso usando i cursori nel pannello superiore della penna.
Liscio
Innanzitutto, premi MAIUSC e disegna di nuovo. Vedrai che la superficie viene levigata.
Cambia l’intensità della levigatura usando il cursore “Smoothing”.
Linee rette
Innanzitutto, tieni premuto LMB, quindi premi MAIUSC e disegna di nuovo. Quindi sei in grado di disegnare linee molto dritte, proprio come in Photoshop. Fare clic su CTRL e disegnare: le cavità vengono disegnate.
Ruota un Brush

Puoi vedere la linea rossa che ruota sul cursore Brush quando si preme “(” o “)”. Se scegli una forma Brush asimmetrica, questa rotazione mostra l’orientamento Brush .
È possibile utilizzare i tasti di scelta rapida “(” e “)” o la rotellina del mouse (sotto le impostazioni corrispondenti nel menu Preferenze) per ruotare la penna in senso antiorario o orario di conseguenza. I parametri di rotazione vanno da 1 a 360 gradi.
Il pannello Brush (o Alfa) consente di selezionare immagini che possono essere utilizzate per creare diversi profili di pennello.
Si tratta di “profili” che interessano sia la profondità di applicazione del Brush che la forma delle “setole”.
Tuttavia, in 3DCoat, sono costituiti da quattro canali di pittura e ogni “Brush” include 4 livelli che si dispongono in Color-Transparency, HeightMap, Specular e EraseMask.
L’ordine di questi livelli nell’editor esterno è importante. Guardando ognuno di questi individualmente:
- Colore/Trasparenza
- Altezza/Profondità
- Speculare
- Cancella maschera
Quindi ogni Brush può dipingere più canali contemporaneamente se lo desideri. Rendendoli meno di un “Alfa” e più di una punta di pennello per immagini multicanale. Manteniamo il termine “Alpha” per mantenere i termini standard del settore.
Gli alfa Brush possono anche essere costruiti da file di oggetti 3D, estraendo la mappa dell’altezza in base alla vista del modello.
Scegli un Brush che ti piace dall’elenco delle icone. Premi sull’icona “Cartella” per aggiungerne altre.
Puoi aggiungere i tuoi pennelli in formato TGA, PSD o ABR (il formato utilizzato in Adobe Photoshop).
Il Brush aggiunto apparirà nell’elenco dei pennelli disponibili. Puoi anche usare un modello 3D come penna.
Un pennello può essere colorato, purché l’immagine contenga un canale alfa. In questo caso, il canale alfa verrà utilizzato come maschera per la profondità. Usa CTRL o MAIUSC per selezionare diversi pennelli, vedrai diversi pennelli selezionati nell’anteprima, questi verranno usati in modo casuale.
Opzioni Brush
Facendo clic con il pulsante destro del mouse su qualsiasi Brush alfa non selezionato si richiama un elenco completo di funzioni di modifica alfa.
Opzioni Brush Apre il pannello “Opzioni Brush “.
Elimina Brush: elimina il Brush selezionato.
Salva in PSD/TIF: salva l’alfa Brush selezionato in uno dei due formati di file.
.PSD è più intuitivo, mentre .TIF è più preciso, offrendoti più canali per salvare e manipolare altrove.
.TIF può contenere sette canali: RGB, alfa, altezza, speculare e “Cancella maschera”.
Carica da PSD/TIF: sostituisce l’alfa su cui è stato fatto clic con il pulsante destro del mouse con un formato a tua scelta, salvato nei formati .psd o .tif.
Modifica nell’editor esterno: crea una connessione “live” tra 3DCoat e l’editor esterno specificato nella sezione “Preferenze” (l’editor predefinito è Photoshop).
Selezionando questa opzione si apre l’editor specificato e tutte le modifiche apportate e salvate dall’editor vengono caricate automaticamente in 3DCoat.
Modifica come TIF a 16 bit: consente di salvare in formato a 16 bit anziché a 8 bit. L’utilizzo di questa opzione fa sì che il Brush venga salvato come file .psd, consentendone il ricaricamento automatico ogni volta che viene modificato e salvato nell’editor esterno.
Menu a tendina Brush
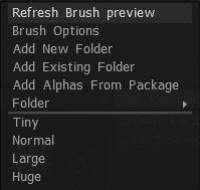
Sul lato destro della scheda, vedrai una freccia rivolta verso il basso. Questo apre una serie di funzioni che consentono di visualizzare e modificare le impostazioni Brush correnti, aggiungere e creare nuove cartelle Brush , aggiungere anche “pacchetti” Brush e scegliere una dimensione di visualizzazione per il Brush.
– Facendo clic su questo, ci saranno molte altre opzioni avanzate:
Aggiorna anteprima Brush : aggiorna l’icona Alpha.
Pannello Opzioni Brush : Apre il Pannello Opzioni Pennello.
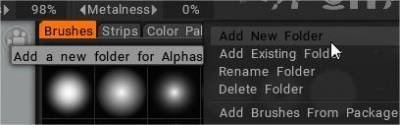
Aggiungi nuova cartella: consente di scegliere una cartella predefinita di forme alfa da aggiungere all’elenco “Cartella”.
Questa opzione ti consentirà di copiare il Brush (su cui fai clic con il pulsante destro del mouse) in una cartella denominata nell'”Elenco cartelle” che hai definito in precedenza. Tutti i nomi “Nuova cartella” che hai definito appariranno qui.
Aggiungi Cartella Esistente: Permette di scegliere un solo pennello da una cartella, aggiungendo così tutti i pennelli presenti nella cartella da inserire nella cartella, ora con il nome del file prescelto, che viene poi inserito nell’elenco di selezione “Cartella” .
Aggiungi immagini da una cartella esistente: verrà creata una nuova cartella Pennelli/strisce con lo stesso nome. Selezionare almeno un file per aggiungere automaticamente tutti i file dalla cartella all’elenco.
Aggiungi pennelli dal pacchetto: aggiunge i pennelli che sono stati impacchettati in un formato di file “Penpack”.
Se vuoi creare il tuo pacchetto e condividere i tuoi pennelli personalizzati, usa RMB e usa il comando create .penpack.
Cartella: seleziona una cartella con i pennelli. Un elenco di selezione di tutte le cartelle a cui hai abilitato l’accesso a 3DCoat . Le icone di questa cartella scelta saranno visibili nel “Pannello pennelli”.
Dimensione icona: puoi anche modificare la dimensione delle icone nella dimensione specificata.
Piccolo: Imposta l’icona alfa su una dimensione molto piccola.
Normale: Imposta l’icona alfa impostata sulla dimensione predefinita, come si vede quando il programma si apre per la prima volta.
Grande: imposta l’icona alfa su una dimensione maggiore di quella predefinita.
Enorme: imposta l’icona alfa su una dimensione maggiore.
Replica di oggetti sulla superficie del modello : questo video inizia una dimostrazione di varie tecniche che è possibile utilizzare per creare un oggetto in 3DCoat e generare un Brush alfa 3D da esso o replicarne le istanze lungo la superficie di un altro oggetto.
Bake Your Rock Brush Usando 3DCoat Y Export : in questo video, Anton Tenitsky mostra come export un photoscan alla massima qualità da utilizzare come nuovo pennello per la modellazione sculpt.
Come import file .abr
Premi su tre punti orizzontali nell’angolo in alto a destra del pannello Brush e seleziona Aggiungi nuova cartella.
(Oppure premere il simbolo più).

All’interno di quella cartella, premi il simbolo più

Selezionare l’opzione Apri file texture, selezionare il file .abr.

Puoi anche trascinare e rilasciare il file nella finestra e viene visualizzata una finestra di dialogo popup con le opzioni import .
Tutorial
Creazione Brush : in questo video, tratterò la creazione e l’importazione di file di immagine PSD da Photoshop e file di oggetti 3D come pennelli. Di Javis Jones.
Creazione di curve Brush personalizzate e spostamento pennello Brush : questa dimostrazione video illustra due nuove funzionalità di 3DCoat. Compresa la possibilità di creare il proprio pennello alfa utilizzando un Curve Profile Editor e quindi il nuovo Move Stamp Brush (nell’E-Panel). Ciò ti consente di visualizzare in anteprima il risultato ma di spostarlo sul modello fino a quando non sei soddisfatto del posizionamento.
Supporto alfa Brush quadrato : questo video mostra il supporto per alfa del pennello quadrato in 3DCoat. Quando si caricano immagini/pennelli alfa per la prima volta, non sono necessari passaggi aggiuntivi. Questo video si concentra su come ottenere pallet di spazzole caricati in precedenza per utilizzare il nuovo supporto.
Accesso tramite tasti di scelta rapida a pennelli e pannelli : questo video dimostra la possibilità di utilizzare i tasti di scelta rapida per portare pannelli e pallet direttamente sul cursore e come impedire a 3DCoat di passare a pacchetti di pennelli diversi quando si sceglie un pennello o uno strumento diverso.