 Português
  English
 Українська
 Español
 Deutsch
 Français
 日本語
日本語 Русский
 한국어
한국어 Polski
 中文 (中国)
 Italiano
 Suomi
Suomi Svenska
 中文 (台灣)
 Dansk
Dansk Slovenčina
 Türkçe
 Nederlands
 Magyar
 ไทย
ไทย हिन्दी
 Ελληνικά
 Tiếng Việt
 Lietuviškai
 Latviešu valoda
 Eesti
Eesti Čeština
 Română
 Norsk Bokmål
O 3DCoat possui um conjunto muito intuitivo e abrangente de controles e atalhos de teclado para ajudá-lo a lidar com seu espaço de trabalho e cenas 3D.
Tentamos integrar as convenções de navegação mais comuns usadas nos aplicativos 3D mais comuns e criamos maneiras de adaptá-las a quase tudo.
Navegação na viewport e atribuição de teclas de atalho
* Controles de câmera e navegação de viewport : por Anton Tenitsky.
Movimentos de câmera
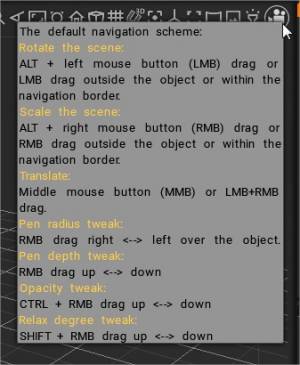
Comuns a todas as salas são os métodos padrão para exibir sua cena e modelos individuais em 3D Viewport. Se você mantiver pressionada a tecla ALT/OPTION na janela de exibição 3D e arrastar o LMB, a câmera girará em torno da cena. Se você mantiver pressionada a tecla SHIFT, a câmera passará para o próximo nível de caixa.
Se você mantiver pressionada a tecla ALT/OPTION, clicar e segurá-la e, em seguida, arrastar o RMB, a exibição será ampliada ou reduzida dependendo da direção do movimento. Ao mesmo tempo, mantendo pressionado o botão ALT/OPTION e arrastando o MBB, os modos de exibição. Como quase todos os dispositivos de entrada usam a navegação por “mouse” como base para definir o uso:
- Quando não estiver usando nenhum dos modos de ferramenta do painel “E”, arrastar em um espaço vazio na viewport enquanto mantém pressionado o botão esquerdo do mouse irá girar a câmera (sua visão) ao redor da cena.
- Quando as ferramentas do painel “E” estiverem sendo usadas (ou algumas ferramentas específicas do Voxel ), adicione o modificador de tecla “Alt/Option” para obter o mesmo efeito. Em geral, quando arrastar à esquerda na viewport NÃO gira sua visualização; ativar o modificador de tecla “Alt/Option” resolverá isso.
- Manter pressionada a tecla “Shift” encaixará a visualização em intervalos rotacionais regulares.
- Arrastar em um espaço vazio na viewport enquanto mantém pressionado o botão direito do mouse aumentará ou diminuirá o zoom da visualização, dependendo da direção do movimento.
- Arrastar em um espaço vazio na viewport enquanto mantém pressionado o botão do meio do mouse ou o botão da roda de rolagem fará com que a visualização seja panorâmica.
Configurações da câmera (menu suspenso)
Um clique na seta suspensa “Câmera” no canto superior direito da interface mostrará algumas opções para sua câmera, bem como o uso de predefinições ou personalização da navegação no próprio 3D Coat . Você também pode criar atalhos para a posição/rotação da câmera para uso posterior. Esses atalhos de câmera também salvam todos os tipos de grade 2D, carimbo ou configurações de posição/rotação/dimensionamento do modelo, facilitando o uso e a reutilização de ferramentas com resultados repetíveis quando necessário.
Você pode definir um ponto de pivô para a navegação rotacional de sua câmera pressionando “F”.
- Navegação personalizada: escolha entre os estilos de navegação: 3DCoat, setas 3DCoat , Maya ou estilo Zbrush .
Por padrão, o estilo 3DCoat é definido. Com o estilo de navegação 3DCoat , você pode girar sua cena movendo o mouse com LMB pressionado na área vazia. Da mesma forma, você pode ampliar sua cena com RMB e pan com MMB. Se você não quiser mover o cursor para o lado, sempre poderá usar ALT+LMB, RMB ou MMB para navegar na cena.
- Personalizar a navegação: Abre um painel que permite a personalização total de todos os comandos de navegação. Você pode personalizar a navegação de acordo com suas próprias preferências.
—-
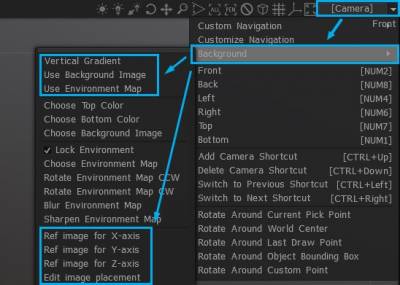
Há também um conjunto de opções para personalizar o plano de fundo. Essas opções são em sua maioria auto-explicativas. Os que não são, no entanto, são detalhados abaixo:
Plano de fundo: um conjunto de opções que permite definir uma variedade de planos de fundo de exibição como referências visuais. O plano de fundo da viewport preenche o plano de fundo da viewport 3D (e se estende para preencher, se necessário). Selecione Usar imagem de fundo e escolha sua imagem na caixa de diálogo de abertura. A imagem padrão é um campo estelar. As imagens de referência podem ser usadas para cada eixo de exibição, X, Y e Z. Você pode editar o posicionamento da imagem para cada plano de imagem em cada eixo com um widget Transformar. Você pode editar a posição, escala, rotação e opacidade da vista.
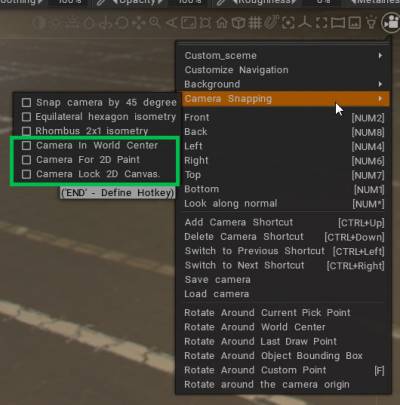
Captura de câmera:
Painel de Navegação Atualizado, novo comportamento. Novos modos de encaixe da câmera:
Pontos de pivô
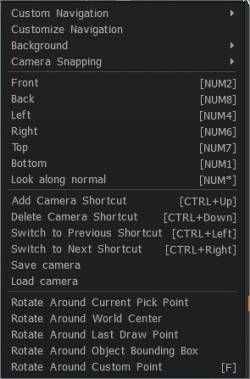
Há várias opções para definir um ponto de pivô para a rotação da cena. Escolha o que é mais adequado para você. Você pode especificar um ponto de pivô para a navegação rotacional de sua câmera (centro do mundo, ponto de escolha, etc.).
- Rotate Around…: Esses comandos definem o ponto de pivô para a câmera de visualização.
Armazenar posições da câmera
As outras opções permitem excluir e alternar essas posições de câmera armazenadas.
- Adicionar atalho de câmera: As informações sobre a posição da câmera e o posicionamento atual do material serão armazenadas. Ele pode ser usado para renderização de sequência de quadros.
- Excluir atalho da câmera: exclui o último atalho usado ou adicionado.
- Alternar para o atalho anterior: Alternar para a câmera anterior e atalho de material.
- Mudar para o próximo atalho: Mude para a próxima câmera e atalho de material.
Painel de Navegação
O painel de navegação está localizado no canto superior direito da viewport. Este painel dá acesso às funções de navegação da viewport, todas as configurações da câmera e funções de foco, posicionamento da luz da viewport e configurações de intensidade.
Da esquerda para a direita, estas são as funções de cada ícone:

- Ajuste o contraste da iluminação ambiente: É melhor aumentar o contraste para uma escultura confortável.
Clique duas vezes para alternar entre os dois modos:
- O contraste é máximo, ambiente bloqueado. É bom para esculpir.
- O contraste é mínimo; o ambiente está desbloqueado. É bom para renderizar, pintar e estimar visualmente o resultado.
- Ajustar a intensidade da luz: mantendo LMB pressionado sobre este controle e movendo o mouse, ajuste a intensidade da luz primária.
Existem várias dicas para melhorar sua experiência de escultura.
Há um ícone de contraste no canto superior direito. Use-o para aumentar o contraste da iluminação. A imagem fisicamente correta corresponde ao contraste 0, mas um contraste maior é mais conveniente para esculpir.
– Use o ambiente Camera→Background→Lock para bloquear o panorama. Isso torna os detalhes esculpidos muito mais visíveis.
– Use shaders PBR sempre que possível e ajuste a cavidade para deixar os detalhes bem visíveis. Você pode usar shaders MatCap, mas não os recomendamos porque apenas shaders PBR garantem cozimento exato e boa pintura colorida.
– Em vez de aumentar manualmente o contraste e alternar o bloqueio do panorama, você pode clicar duas vezes no ícone de contraste.
Use Visualizar→Panorama em tons de cinza para visualizar as cores sobre o modelo “COMO ESTÁ” sem luzes coloridas.
- Ajustar ângulo de luz: Ajuste o ângulo de luz mantendo o LMB pressionado sobre este controle e movendo o mouse.
- Blur Environment: Arraste para desfocar/acentuar a textura do ambiente no fundo da viewport.
- Rotação do trackball : alterne entre dois modos de rotação – rotação em torno do eixo vertical ou rotação livre.
- Girar a câmera: segurando LMB e movendo o mouse. Para girar a câmera sem este controle, use ALT+LMB (ou LMB pressionado em um espaço vazio). Arrastando com o botão esquerdo do mouse para ajustar a visão do usuário girando a câmera principal ao redor do objeto em foco.
- Mover a câmera: segurando Alt+LMB e movendo o mouse. Arrastando com o botão esquerdo do mouse, arraste a visão do usuário movendo a câmera principal para a direita, esquerda, para cima e para baixo.
- Zoom Camera: Segurando LMB e movendo o mouse. Para dimensionar a cena sem esse controle, use ALT+RMB (ou RMB pressionado em um espaço vazio). Arrastando o botão esquerdo do mouse para a direita ou esquerda para aproximar ou afastar a câmera principal do objeto focalizado.
- Variar o campo de visão: RMB para redefini-lo para o valor padrão.
- Enquadre a vista: coloque a cena ou o objeto atual (na sala Sculpt) no centro da viewport e dimensione-o para ajustá-lo a todos os objetos visíveis.
- Foco no pincel: Foque a câmera na superfície sob o pincel. O raio do pincel determinará a distância até a superfície.
- Redefinir a câmera para a posição padrão: alterne para a configuração padrão.
- Alternar perspectiva/projeção ortogonal: você pode escolher entre uma perspectiva e uma visualização ortogonal.
- Grade: Mostrar grade 3D.
- Encaixe o cursor na projeção da grade 3D na tela : Se várias grades estiverem visíveis, será escolhida a mais girada em direção à tela. Recomenda-se usá-lo em projeção ortogonal. As posições e tamanhos dos dispositivos e primitivos serão ajustados para posições discretas no espaço.
- Alterne para a visualização ortogonal e encaixe: na visualização exata mais próxima em correspondência com as configurações “Câmera > Ajuste da câmera”.
- Mostrar/Ocultar Eixo
- Alternar para o modo tela cheia
- Mapa do ambiente : Textura do mapa do ambiente usado para iluminar a cena. Clique no botão para abrir um mini pop-up e escolha um mapa de ambiente diferente.
- Mostrar/ocultar imagens de referência Este vídeo demonstra o uso de imagens de referência. Tanto como planos de imagem na janela de visualização quanto uso do seletor de imagens como uma imagem de referência estática na interface do usuário.
- Viewport Projector : Você pode projetar qualquer textura em toda a cena, semelhante ao projetor. Isto é apenas para referência, não influencia nenhuma cor ou propriedades do material.
- O Projetor pode ser aplicado utilizando as faces traseiras culling + fading (opcional).
Dica de mapa de ambiente (por Psmith): A única coisa aceitável para 3DCoat para imagens panorâmicas (através do “+” na parte inferior do menu suspenso “Mapa de ambiente”) são imagens panorâmicas esféricas no formato .exr.
As etapas para adicionar seus próprios mapas de ambiente panorâmicos esféricos HDR ao 3DCoat (para escultura e renderização) são as seguintes:
- 1) Obtenha uma imagem panorâmica esférica (online ou em outro lugar) nos formatos de imagem HDRI: (.exr, .hdr)
- 2) Depois que o 3DCoat estiver aberto e em execução (trabalhando na sala Sculpt, por exemplo) – clique no ícone à esquerda do ícone da câmera no canto superior direito da viewport.
- 3) Clique no “+” na parte inferior da coluna de miniaturas e selecione sua imagem panorâmica esférica que está no formato .exr ou .hdr – e espere o 3D-Coat carregá-la. Diga “OK” para a caixa de diálogo 3D-Coat que aparece.
- 4) Ajuste a “Exposição” e o “Contraste” da imagem agora exibida no Viewport – usando os ícones da linha de controles no canto superior direito do Viewport.
Navegação usando uma mesa digitalizadora
A navegação na viewport 3D é realmente intuitiva e confortável ao usar uma caneta; o controle e a navegação do mouse são os mesmos para uma caneta e para o mouse mencionado acima.
- Toque e arraste fora do modelo (no espaço vazio) para girar a visualização da câmera.
- Toque e arraste para a direita ou para a esquerda com o botão “Right Mouse” pressionado (no espaço vazio) para deslocar a visualização.
- Passe o mouse sobre o espaço vazio com o botão “Right Mouse” pressionado e arraste para ampliar a visualização.
Os ajustes de Brush são igualmente intuitivos:
- Passe o mouse sobre o modelo e arraste para a direita ou para a esquerda com o botão atribuído a RMB pressionado para alterar o tamanho do Brush.
- Passe o mouse sobre o modelo e arraste para cima ou para baixo com o RMB pressionado para ajustar a profundidade do Brush.
Imagens de fundo
Existem dois tipos diferentes de Fundos: aqueles que simplesmente preenchem o fundo da viewport 3D (e se estendem para preencher, se necessário) e aqueles que são configurados manualmente para uso como imagens de referência de escultura ou pintura.
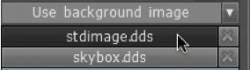
Viewport Background: Selecione Use background image e escolha sua imagem na caixa de diálogo de abertura. A imagem padrão é um campo estelar.
Ou, se desejar atribuir uma imagem ao plano de fundo da interface, você pode atribuir uma do seu disco rígido.
Abra o menu superior e abra Editar → Preferências. Role para baixo, localize a opção Tipo de plano de fundo e clique na seta suspensa para selecionar Usar imagem de plano de fundo.
Por padrão, você verá um pano de fundo que se parece com um campo de estrelas. Você pode, é claro, escolher seu próprio arquivo clicando no campo do solicitante do arquivo.
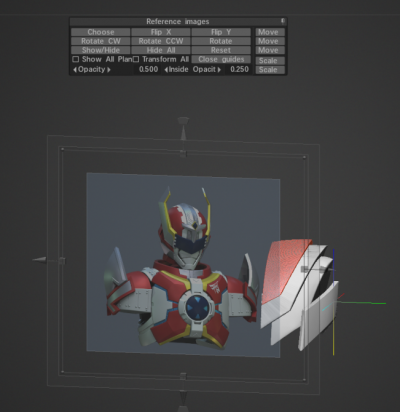
Imagens de Referência da Janela de Visualização
Às vezes, você precisará criar um modelo que esteja em conformidade com as especificações exatas.
É aqui que colocar esses tipos de imagens de referência é útil. As imagens de referência podem ser colocadas em qualquer eixo de sua escolha X, Y ou Z. Você pode até atribuir uma imagem diferente a cada eixo para que possa ter uma visão de sua arte, independentemente do eixo a partir do qual você trabalha.
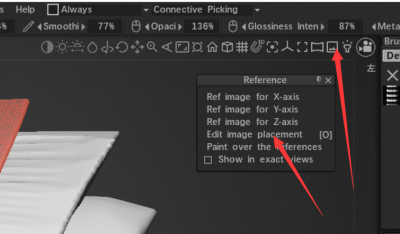
Clique na seta ao lado dos controles da câmera e selecione Plano de fundo → Escolher imagem de referência.
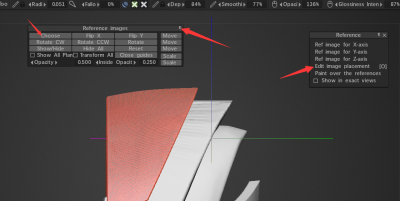
Depois de clicar no menu, você navegará em seu disco rígido em busca de uma imagem para usar ao longo do eixo Z. A imagem selecionada aparecerá na janela principal do 3DCoat. Além disso, aparecerá um menu pop-up com ferramentas de posicionamento e dimensionamento.
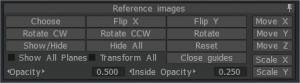
Use as ferramentas ao longo de sua imagem ou o menu pop-up Imagens de referência para redimensionar, reposicionar ou mostrar e ocultar a imagem.
Você pode até alterar a opacidade da imagem, para facilitar o foco em suas tarefas de modelagem.
Vamos dar uma olhada em como atribuir imagens a qualquer eixo.
Escolher imagens de referência : As três opções inferiores permitem escolher três imagens separadas – 1 para cada eixo de visualização, X, Y e Z.
Editar posicionamento da imagem: quando selecionada, esta opção fornece a cada plano de imagem em cada eixo um widget Transformar e configurações de caixa de diálogo que o acompanham para ajustar sua posição, escala, rotação e opacidade da visualização.
Notas para usar planos de imagem : este vídeo adiciona notas adicionais a serem consideradas ao usar planos de imagem de referência.
Usando imagens de referência : este vídeo demonstra o uso de imagens de referência. Tanto como planos de imagem na janela de visualização ou uso do seletor de imagens como uma imagem de referência estática na interface do usuário.
Referência e papéis de parede
O fundo do Visualizador preenche o fundo do Visualizador 3D. Selecione Usar imagem de fundo e selecione sua imagem na caixa de diálogo que se abre. A imagem padrão é um campo de estrelas. As imagens de referência podem ser usadas para cada eixo de exibição X, Y e Z. Você pode editar o posicionamento da imagem para cada plano de imagem em cada eixo com um widget de transformação. Você pode editar a posição, escala, rotação e opacidade da exibição.
* Viewport Shading, Background Swap, Reference Planes : por Anton Tenitsky.
Perguntas frequentes
Quando arrastei uma imagem de referência para o 3DCoat, recebi alguns controles de menu, mas não parece haver uma maneira de recuperá-los. Então, como ajusto as imagens de referência?
* clique aqui para ocultar o dispositivo cruzado.
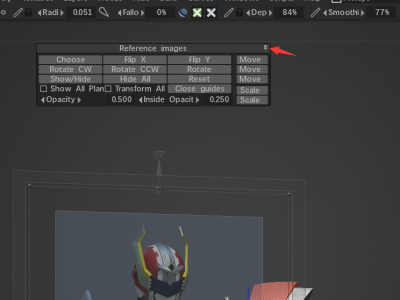
Obrigado, Nick-LF.
Câmera e navegação personalizada
As teclas de atalho das visualizações ortográficas são frontal, traseira, esquerda, direita, superior e inferior e olhar ao longo das normais .
NumPad 2 Frontal
NumPad 8 Voltar
NumPad 4 Esquerda
NumPad 6 Direito
NumPad 7 superior
NumPad 1 Inferior
Ctrl+Seta para cima Adicionar atalho de câmera
Ctrl+Seta para baixo Excluir atalho da câmera
Ctrl+Seta para a esquerda Alternar para o atalho anterior
Ctrl+Seta para a direita Alternar para o próximo atalho
Personalize sua experiência 3DCoat
Você pode atribuir atalhos de um ou vários botões para praticamente qualquer função ou ferramenta 3DCoat diretamente na interface do usuário. Basta pressionar a tecla END enquanto move o mouse sobre qualquer elemento, seguido pelo atalho de teclado de sua escolha.
Se você achar que está usando recursos raros ou nunca específicos e obscuros do aplicativo, selecione Personalizar interface do usuário no menu Editar e desative todos os itens que não deseja mais exibir na interface do usuário para evitar confusão indesejada.
Use a opção Editar/Preferências para personalizar o esquema de cores e a aparência de toda a interface 3DCoat .
Tutoriais
Como alterar a velocidade do zoom da câmera : Você aprenderá como alterar a velocidade da câmera de visualização dentro do 3DCoat. Por Christoph Werner.
Dica rápida: Centros de rotação da câmera : Este vídeo de dica rápida demonstra os 2 Centros de rotação da câmera que o usuário do 3DCoat deve conhecer, pois são mais benéficos em determinados cenários.
Botão de alternância de rotação de navegação e ícone de imagem de referência : Este vídeo demonstra adições recentes à barra de navegação em 3DCoat.
Opções de mapa de ambiente HDR : este vídeo aborda várias novas opções para visualizar e utilizar um mapa de ambiente HDR dentro de uma cena para iluminação e plano de fundo.