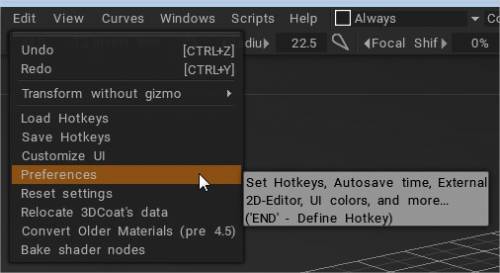
This Panel opens up a detailed dialog of settings that allow you to customize 3DCoat.
We’ll give you a general overview of the categories and choices available.
General
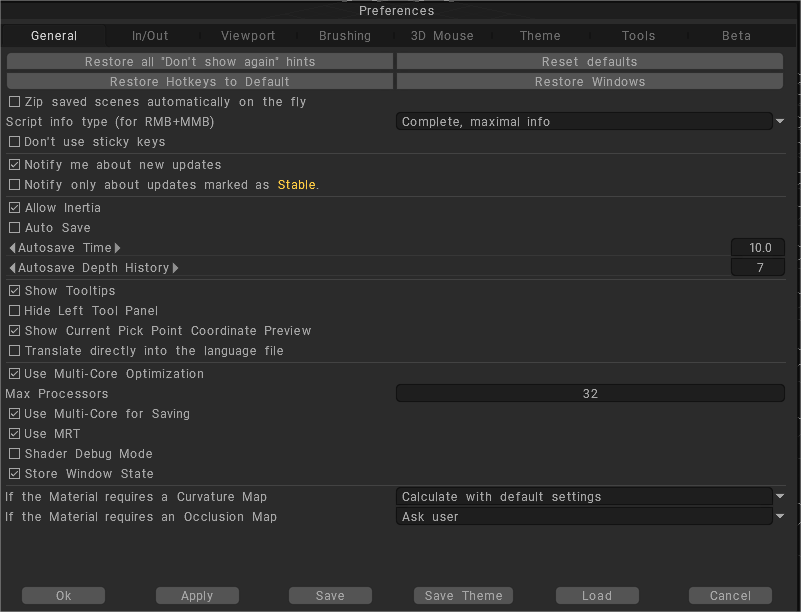
At the top of this dialog are four constant options which allow you to return 3DCoat to its “factory” default settings:
Restore all “Don’t show again” hints: Specify which kind of hints you want to see displayed and where you want them displayed.
Reset Hotkeys: Restore all settings to their default state.
Restore Hotkeys to Default: Reset hotkeys to the state they were distributed with.
Restore Windows & their locations: Restore all windows to their default positions and size.
Zip saved scenes automatically on the fly: This options allows to preserve disk space. At first, 3B scene will be saved as is. Then it will be gradually zipped, it will be done on background without interruption of your job. After successfully zipping the scene file will be replaced with the zipped one.
Don’t use sticky keys: Disable the sticky keys mechanics.
Notify me about new updates:
Notify only about updates marked as stable:
Allow inertia: Allows you to use your scroll wheel to gain velocity in the tool and dialog scrolling in the same way the scroll wheel works in a web browser, for example.
Auto Save: Switch autosave on/off and set autosave time to adjust time intervals and depth history. The auto-saving file has the name autosave.3b, which is located in the folder User Data.
Autosave Depth History: Amount of autosave files to be sequentially stored.
Show Tooltips: Allows you to show or hide popup tooltips near your mouse cursor.
Hide Left Tool Panel: You can hide left tool panels if you prefer to use the “space” menu.
Show Current Pick Point Coordinate Preview.
Translate directly into the language file: In case if you want to help with translation to your native language there are two options. First, default is to translate ID and then send it to us via the web form. Another option: you may translate the whole language file locally and then send it to us (to support@pilgway.com). Enable this option, translate, ensure that your ID-s appear in UI.
Pay attention that the file InstallFolder/data/Languages/YourLanguage.xml will be modified, modification of the file in the install folder requires running 3DCoat “as administrator”.
Use Multi-Core Optimization: Set your preferences to correspond to your system hardware.
Max Processors: Number of Processors to use with 3DCoat.
Use Multi-Core for saving.
Use MRT: Use multiple render targets to speed up real-time normal map updates.
Shader Debug Mode: Shader debug mode allows you to see errors while shaders are compiling. Off by default.
Store Windows state:
Options in Preferences for AO/Curvature layers: If the material requires a Curvature/Occlusion map you can select: Calculate with default settings values, Ask user with dialog or Don’t calculate skipping calculation.
Import and Export
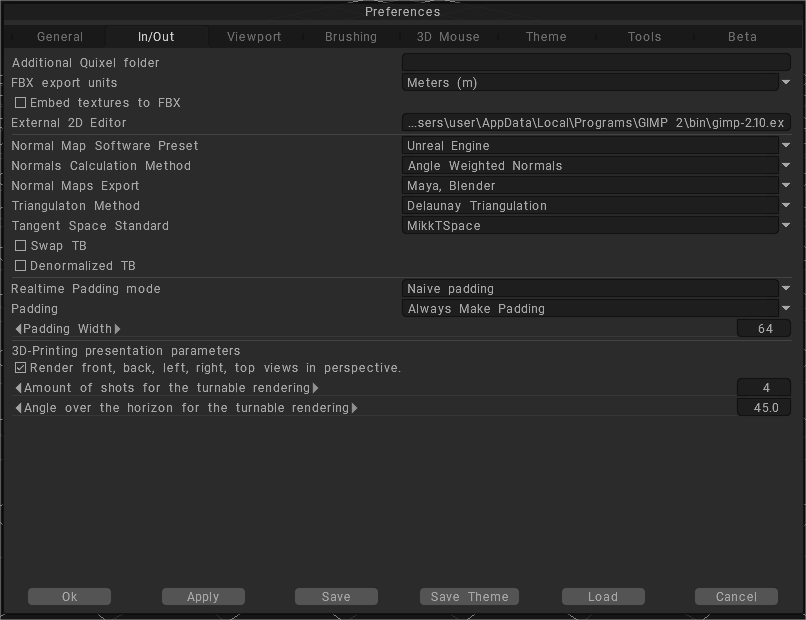
Additional Quixel folder: On startup, “3DCoat” checks “Downloads” and “Additional Quixel folder” for new Quixel materials as zip archives and already extracted folders.
FBX export units: Units meaning in the FBX. Meters mean scale 1:100, Centimeters 1:1, Millimeters – 10:1. This is applied to FBX export only.
Embed textures to FBX: When you export FBX, textures will be embedded directly into the FBX file.
External 2D Editor: This path will be used to specify which external ‘Paint” application you wish to use (i.e., Photoshop) to edit 2D images.
This editor should be able to edit PSD files, so usually, it is Adobe Photoshop or Gimp.
This editor will be called on “Edit” menu > “Sync Layers with Ext. Editor, Edit All Layers in Ext. Editor & Edit Projections in Ext. Editor”.
When importing a PSD file into Clip Studio Paint, Affinity Photo or Krita; the layer order can sometimes be disrupted, meaning the layers may not appear in the same sequence as they did in Photoshop, potentially placing layers on top of each other that were originally below.
This is a known issue that can occur due to slight differences in how the software handles layer hierarchy.
Normal Map Software Preset: Use this array of options to precisely specify the way you want your Normal Maps to be dealt with, internally and externally, in 3rd party apps. There is a list of suggested parameters for each software.
When comparing OpenGL and DirectX, the key difference regarding Y-direction normals is that OpenGL interprets the Y-axis as “up” from the bottom (Y+) while DirectX interprets it as “up” from the top (Y-), meaning the green channel of a normal map will be inverted between the two systems when used interchangeably; essentially, OpenGL considers the first pixel at the bottom of the texture, whereas DirectX considers it at the top.
Normals Calculation Method:
Choose how the normals of the mesh for painting will be calculated.
- 3DCoat Normals: Vertex normals will be calculated as weighted average between nearby faces. Weight is proportional to nearby face frustum square.
- Maya Normals: Vertex normals will be calculated as in Maya. In this case normal is average of nearby faces normals regardless on the face square.
- Angle Weighted Normals: Tangent space is important to render normal maps correctly. If you are using incorrect tangent space seams will be visible on baked model in your modeling software. So you need to choose method that is well compatible with your modeling software after exporting from 3DCoat. Difference is not too visible on organic models but may affect baking hardsurface models essentially.
- Square weight normals: refers to a method in 3D graphics where the vertex normals (the direction perpendicular to a surface at a vertex) of a mesh are calculated by giving equal weight to the normals of all the faces that share that vertex, essentially treating each face as having the same influence on the final normal, creating a more “squared-off” appearance on sharp edges of a model, particularly useful when dealing with low-polygon meshes.
- Maya 2013+ : Angled & Square Weighted:
Normal maps export: Select the standard of normal maps exporting: 3D-Max or Maya.
“Maya, Blender” corresponds to the “OpenGL” way normal map and “3DS-Max, LW” is “DirectX” normal map.
Triangulation Method: triangulation method is important for the compatibility of normal maps. If the triangulation method does not correspond to your modeling software and you will bake normal maps – cross-like artifacts may appear on quads.
Tangent Space Standard: Tangent space is important to render normal maps correctly. If you use incorrect tangent space, seams will be visible on the baked model in your modeling software. So you need to choose the method that is well compatible with your modeling software after exporting from 3DCoat.
The difference is not too visible on organic models but may essentially affect baking hard surface models.
All that options for tangent space are same on usual meshes. Difference begins when you have some special features on the mesh. For example, stretched UV-s, different UV scale on neighbor faces, sharp edge smoothed with normalmap.
Difference well visible if you try to bake high-poly object with flat face over very low-poly mesh. Say, very highpoly cube over lowpoly.
Mikk Tangent space normal maps are 90% of the time the best option. Unlike world and object space normal maps, your model will be able to deform and the normal direction will remain correct.
You should bake your normal map using the same tangent space as the rendering program. The most used tangent space is Mikk, so you should use it when possible.
(All presets was done 3-4 years ago, so possibly method in Unity changed since that time).
Swap TB: Invert normal direction. It flip the sculpted details, but not the baked ones.
Denormalized TB: Denormalized Texture Baking means resetting the length of each normal in the map to 1. It affect the auto-padding that exists outside of the UV islands.
All that options for tangent space are same on usual meshes. Difference begins when you have some special features on the mesh. For example, stretched UV-s, different UV scale on neighbor faces, sharp edge smoothed with normalmap. Difference well visible if you try to bake high-poly object with flat face over very low-poly mesh.
Realtime Padding mode: There are several methods for padding (dilatation).

– The first one linearly interpolates color between pixels from the opposite island.
– The second one Takes the nearest pixel from the opposite island.
– Third one, the naive, takes the nearest pixel from the current island.
Padding: When you export textures, you will be asked if you need a border around the texture clusters (padding). This option allows you to answer the question automatically.
Padding width: Padding width is used when texture exporting.
When you choose a preset, then changing settings doesn’t matter, the preset settings override the export settings that are on Preferences.
So things may change from one preset to another even if the exported normal map type is the same, because Triangulation method, Normals Calculation Method or the Tangent space may be different from one preset to another and these three settings are included in every preset, plus some presets have settings set for Swap TB and Denormalized TB, which changes things too.
3D-Printing presentation parameters
Render front, back, left, right, and top views in perspective.
Amount of shots for the turntable rendering:
Angle over the horizon for the turntable rendering:
Viewport
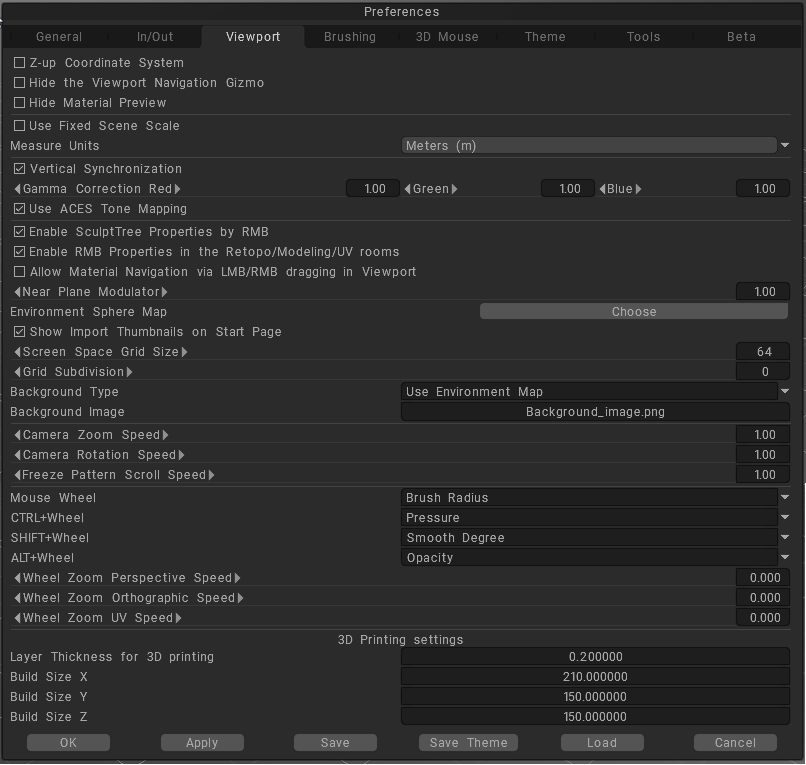
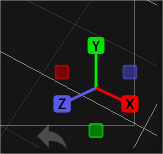
Z-up coordinate system: Z-up-based coordinate system for compatibility with Rhino, 3DS-Max, and other applications with Z-axis up.
The world coordinates change between applications: in Unreal, 3D Studio Max, Blender the Z axis is up, while in Maya, Modo, and Cinema 4D, Y is up.
Hide the view gizmo: Hide the view gizmo located at the bottom right side of the viewport
Hide material preview: Use this option to hide the material preview window show when you select any Smart Material.
Use Fixed Scene Scale: If you use a fixed scene scale, the object will always be opened with this scale except for scenes saved previously. This may be problematic in cases when objects are too huge or too small. It is recommended to keep scaled object size in the range of 10-300.
Fixed Scene Scale: The scene scale to import objects.
Measure Units: They are just visual marks for units. No actual scaling is performed in dependence on units.
Vertical synchronization:
Gamma Correction: Red/Green/Blue.
Use ACES tonemapping: Use ACES tone mapping.
Enable SculptTree Properties by RMB: Enable or disable the RMB properties window in Sculpt room. The window may be disabled as well by assigning a hotkey in the Windows→Popups→Trigger volume properties window.
Enable RMB Properties in the Retopo/Modeling/UV rooms:
Allow material navigation via LMB/RMB dragging in the viewport: Allow material navigation via LMB/RMB dragging in the viewport.
Near plane modulator: Allows you to set how close the Viewport Camera can get to an object. It Tweaks a camera near the plane to be able to move closer to the surface.
The Near Plane Modulator in 3DCoat is a feature that helps in adjusting the near clipping plane of the camera. This is particularly useful when working with very small or very large objects, as it allows you to control the minimum distance at which objects are rendered in the viewport.
By adjusting the near plane, you can prevent clipping issues where parts of your model might disappear when zooming in too closely.
Environment sphere map: Specify which spherical image will be used in rendering any environmental effects.
Show import thumbnails on the start page:
Screen Space Grid Size: Set the grid size in pixels.
Grid Subdivision: This value represents the number of subdivisions in the screen grid. Use zero for none.
Background Type: Scene background style.
Background Image: Image to be used as a background.
Camera Zoom Speed: Determines Camera Zoom Speed.
Camera Rotation Speed: Determines Camera Rotation Speed.
Freeze pattern Scroll Speed: Freeze pattern scroll speed. Change the pattern used to indicate frozen areas in the freeze menu.
Mouse Wheel: Select which parameter to change with the mouse wheel.
To have the ability to scroll with the middle mouse button set “Mouse Wheel” to “Zoom In”.
Make sure the bottom 3 setting that say “Wheel Zoom… Speed” are set to 1. If the zoom is not going the direction you want change it to -1.
Ctrl+Wheel: Select which parameter to change with ctrl+mouse wheel.
Shift+Wheel: Select which parameter to change with shift+ mouse wheel.
Alt+Wheel: Select which parameter to change with alt+mouse wheel.
Wheel Zoom Perspective Speed: Determines Wheel Zoom Perspective Speed.
Wheel Zoom Orthographic Speed: Determines Wheel Zoom Orthographic Speed.
Wheel Zoom UV Speed: Determines Wheel Zoom UV Speed.
3D Printing settings
Layer Thickness for 3D printing: Layer thickness for 3D-printing export.
Build Size: on X,Y,Z.
Brushing
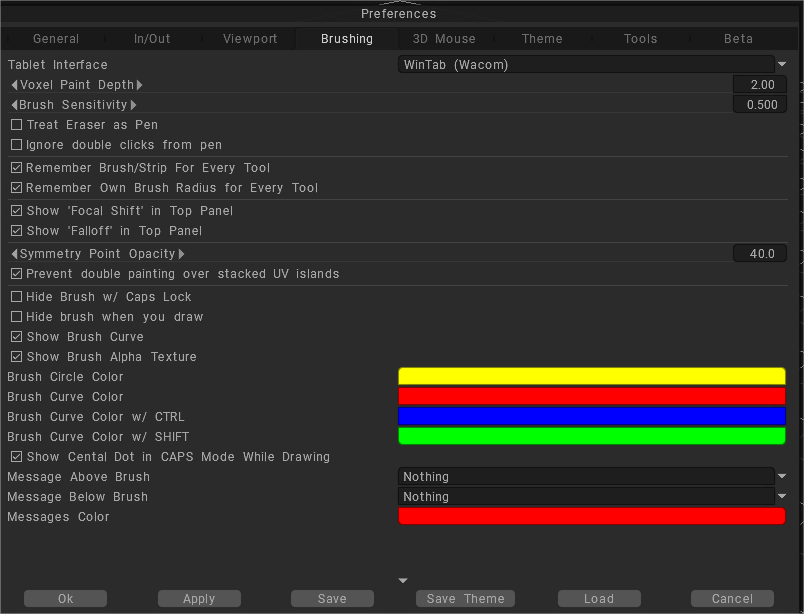
Tablet Interface: Let you select Wintab or Tablet PC. (Uncheck the “Use Windows Ink” check box under the Win tablet properties.)
Voxel paint depth: The depth of the voxel painting. Be careful with a big depth of the color penetration, it may cause artifacts (penetration to another side of the object, noisy color spots over the noisy surfaces). So, we recommend low paint depth for noisy surfaces. Pay attention, the bigger depth leads to slower performance.
Brush Sensitivity: Adjust Pen sensitivity if you are using a digital pen.
Treat eraser as a pen.
Ignore double clicks from pen: allows to start strokes with pen double tap.
Remember Brush/Strip For Every Tool: Specify whether you wish 3DCoat to remember prior settings each time you use that Brush.
Remember Own Brush Radius for Every Tool: Specify whether you wish 3DCoat to remember prior settings each time you use that Brush.
Top Panel Display Brush Preferences: If you are limited in screen space, or you don’t often use Brush Falloff or Focal Shift, you can choose to hide the ‘Focal shift’ and Falloff slider in the top panel.
- Show Focal shift in the top panel: Show the “Focal shift” slider in the top panel.
- Show Falloff in the top panel: Show the “Falloff” slider in the top panel.
Symmetry Point Opacity.
Prevent double painting over stacked UV islands: This option is important if you have stacked or mirrored UV islands. If the option is enabled, the point on the UV map may be painted only once per stroke.
It is helpful if stacked islands have no boundary with each other (for example, body – one island, arms and legs – other mirrored islands). If you enable symmetry and this option, arms and legs will not be painted twice.
But if mirrored islands have a common boundary between them, enabling this option will lead to artifacts near the common edges because the same pixel is present on both sides of the edge.
Hide Brush w/ Caps Lock: If this option is checked brush will be hidden constantly in CAPS LOCK mode; otherwise, it will be hidden only while drawing, but you do have the option to right click to preview temporarily.
Hide Brush When Stroking: If this option is checked brush will be hidden when drawing.
Show Brush Curve: this is the curve profile that you see on the interior of the brush preview. Its primary purpose is to visually indicate the depth level of your brush currently but you can instead just rely on the depth parameter in the toolbar.
Show Brush Alpha Texture: hide the inner brush Alpha preview if we find that too obtrusive or distracting.
Brush Circle Color:
Brush Curve Color:
Brush Curve Color w/ CTRL:
Brush Curve Color w/ SHIFT:
Show Central Dot in CAPS Mode While Drawing: refers to the option hide brush with caps lock on in place of the brush preview it’s just revealing a small dot indicating where your cursor is.
Message Above Brush:
Message Below Brush:
Messages Color: Color of the messages below or above the brush.
Compact interface: Toggle compact/full interface. TAB hotkey.
3D Mouse
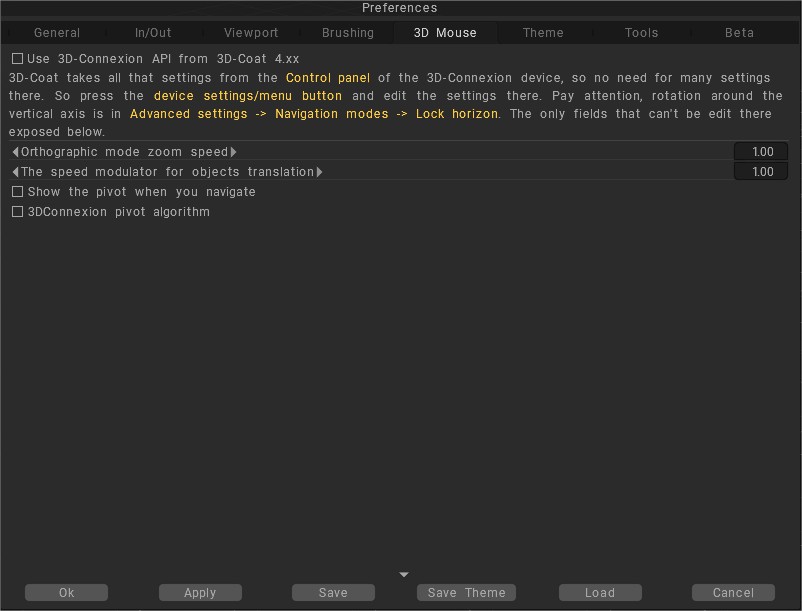
3DCoat support 3D Space Navigator from 3DConnexion. You can find all of the options to control your 3D mouse here. If you own one of these devices, use these settings to obtain the precise kind of control you need.
3DCoat takes all that settings from the Control panel of the 3D-Connexion device, so there is no need for many settings there. So press the device settings/menu button and edit the settings there. Pay attention, rotation around the vertical axis is in Advanced settings → Navigation modes → Lock horizon.
The only fields that can’t be edited there are exposed below.
Use 3D-Connexion API from 3D-Coat 4.xx: Use older version of 3D-Connexion API. It is not recommended because in some cases it may lead to additional lags if you use wireless devices (mouse, pen, keyboard). But if the new API does not work for you – please use older one.
Orthographic mode zoom speed
The speed modulator for object translation: The additional speed modulator for the translation when the object manipulation mode with the 3D mouse is turned on.
Show the pivot when you navigate:
3DConnexion pivot algorithm: Use the default 3DConnextion pivot picking algorithm – pick the pivot around the center of the viewport.
3dconnexion Support: This video demonstrates the benefits of using a 3dconnexion device, especially the flagship version, SpaceMouse Enterprise, in 3DCoat. It allows the user to navigate along six different axes simultaneously while working smoothly. This doubles productivity as the user does not have to stop, navigate, and resume, working constantly, all with the same working hand.
It also reduces repetitive-action stress on the work hand by sharing the workload across both hands. It also keeps the user’s hands off their keyboard and their focus on their model.
Theme
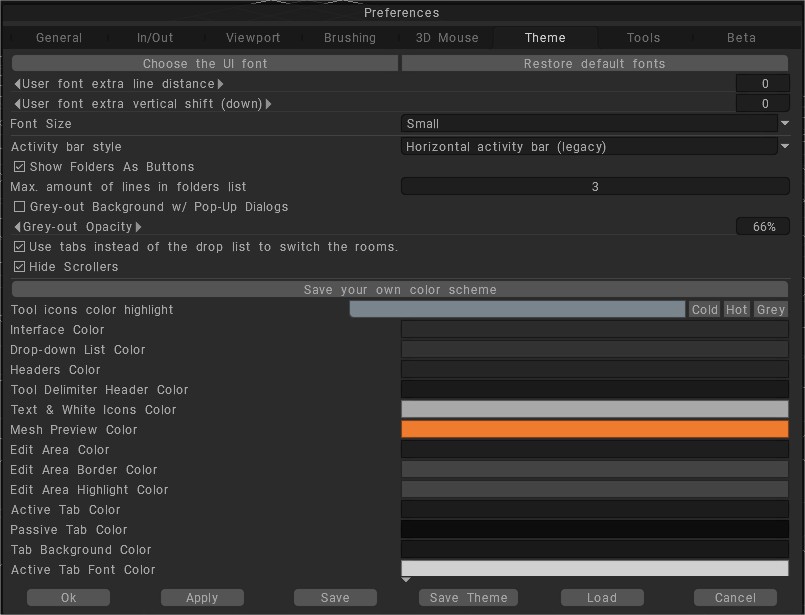
Choose the UI font / Restore default fonts
User font extra line distance: The additional space between lines in UI. Useful if you are using custom fonts and want to adjust the visual appearance of the fonts.
User font extra vertical shift (down): Shift the font up and down a bit for a better visual appearance. Usually helpful if custom fonts are used.
Font Size: UI Display Scaling.
Activity bar style: Select vertical, Horizontal location or Hide.
Show Folders As Buttons
Max. amount of lines in folders list: Maximal amount of lines in folders list used for items lists like brushes, stencils, presets, etc.
How to customize the font type and interface colors by Rygaard
In this video, he will show you how to customize the font type and the interface colors in 3DCoat.
Grey-out Background w/ Pop-Up Dialogs:
Grey-out Opacity: Grey-out Opacity reduces the opacity of the grey-out effect over the viewport, when a dialog pop-up appears.
Use tabs instead of the drop list: In 3DCoat2023, the box type room switching from V2021 can now be switched to the familiar tab type in the V4 era in the environment setting.
Hide Scrollers: Hide Scrollers bar.
Save your own color scheme: Press the button, then enter the name of the color scheme, it will appear in Windows > UI color theme, and the theme file is written to the “Docs/3DCoat/UserPrefs/UI_Color_Themes/TheMeName.json”. If the theme with this name exists, it will be overwritten.
Change colors to personalize your theme
All of the options of Interface Theme and Layout in these sections of the Preferences let you precisely design the look and layout of the entire interface. No two people like the same things, so these settings have been provided to let you set the “Look & Feel” of 3DCoat exactly the way you prefer.
The UI is fully customizable. By default, there are three UI themes present upon installation.
They are “Dark,” “Grey,” and “Light.”
You can change a UI by going to Edit–>Preferences–>Load; you will be directed to a folder named “OptionsPresets” there are 3 .xml files in it, each of which corresponds to a theme, to load the themes, simply select one .xml file and click Open.
You can edit many more parts of the UI, create your own UI theme, and save it as a .xml file.
After all, these are done, save the .xml file, and all the UI & hotkeys and other customized information are stored in it.
You can load it anytime or share it with your friends. Simply press the button Save in the Preferences panel.
You can even change the icons of the tools to your own, go to the installation folder of 3DCoat, in the path textures\icons, you will find the source PSD files of the icons, they are “baseicons.psd” and “SmallIcons.psd”; open the PSD file in Photoshop and draw your own icons.
When finished, save them as DDS format, keep the name and replace the original “baseicons.dds” and “SmallIcons.dds”.
Next time you start 3DCoat, it will load the new icons.
Tools

– Retopo/Modelling
Auto-select edges when faces are deleted (Select/Faces): When you delete selected faces, the bounding edges will be selected. Turn it off if you don’t need edges selection.
Move only the selected group of faces:
Hide the gizmo When CTRL/SHIFT pressed in Retopo->Select&transform:
– Sculpt
Show density near the volume’s name:
Show polycount near the volume’s name:
Skip the question about layer Downgrade/Restore: When you click on cache/uncache from the VoxTree, you will be asked if you really need it. If this option is turned on, the question will not appear.
Use single material for the Sculpt export: If it is set, then File->Export scene will export the mesh with multiple objects but a single material.
Allow Proxy mode (the legacy tool) for Multi-Resolution, instead of Newer Levels-Based System: It is an inactive preventing contradiction between proxy or procedural objects with multiresolution. The old method of caching/proxy mode is disabled by default.
Subtraction shell:
Use soft-booleans for voxels:
Voxels soft boolean radious:
Open the model
Skip the “Smooth All” dialog in the Sculpt room: If this option is turned ON, the “Smooth all” dialog will not appear. Smoothing will be performed just once.
Use QWER for switching gizmo modes: Use it to turn on/off using the QWER for switching gizmo modes.
Move only the selected group of faces.
Show Entire Circle of the Screen Space Rotation Gizmo: Activate this if the gizmo of Select/Transform is not always totally available (as you can see in the picture), where arrows show where you can interact with the gizmo and when not.
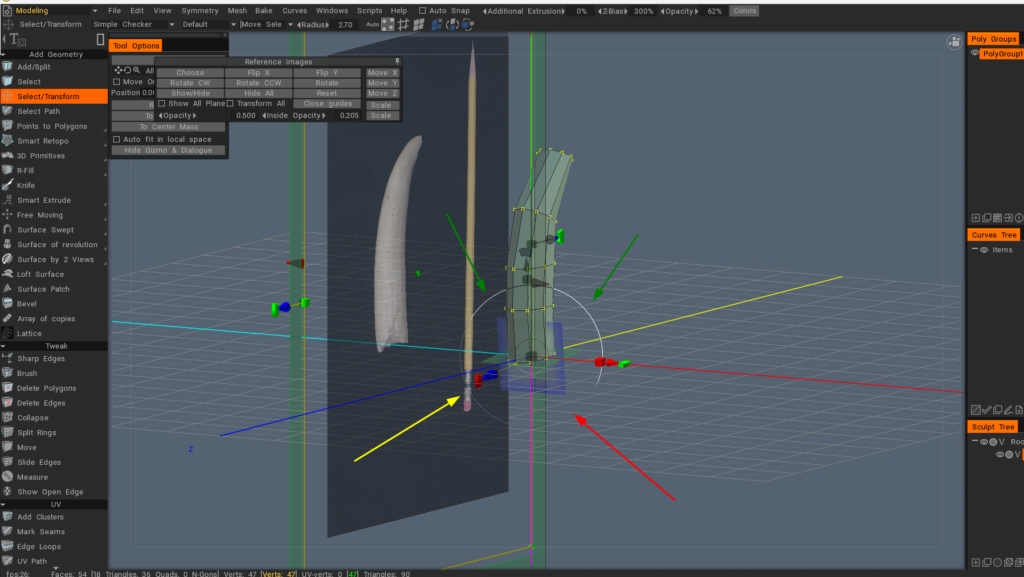
– General
Use RGB cavity as the default cavity calculation method: The new RGB cavity was introduced as a possible default calculation method. In this case, the multi-range cavity will be calculated on the GPU, and additional control in UI of conditions/smart materials will appear – the “Cavity width”.
It allows for variation in the cavity width/smoothing in real time, which is very important for realistic PBR texturing.
Cavity width (using the RGB cavity) may be used for smart materials for each layer separately. Each material layer has its own cavity width settings. It allows for much better effects for “aging” materials, like several differently “aged” layers of paint.
RGB cavity is a multi-range cavity texture, each channel corresponds to a different cavity scale. B is the local cavity, G is a middle-range cavity, and R is the far-range cavity. Bakes curvature with radius 1, 20, and 100 to RGB channels, respectively.
If you already have the old cavity layer in the scene, you need to delete it to use this feature. This is a very significant feature for the PBR painting over the texture/mesh.
If the RGB cavity is enabled by default and you are loading the scene with the old-style cavity layer, the Coat will warn you that it is better to re-calculate the cavity to get better control.
E-mode angle step: This is the angle step if you press ALT+CTRL in the rectangle/lasso/ellipse E-mode (E is the default hotkey to trigger the panel).
E-mode array and Rounding hotkeys: you may chose what keys combination will be used for E-mode arrays and shape rounding: NONE/CTRL/SHIFT, 0..9, R
Show memory info: free + pointers count: It is helpful if you hunt for memory leaks and investigate memory usage.
Don’t group vertices per objects in OBJ files (like ZB): This option may help when you need to keep vertices order unchanged in single heap. Even if 3DCoat tries to keep the vertex order unchanged, sometimes this is not enough. In this case, enable this option.
Beta
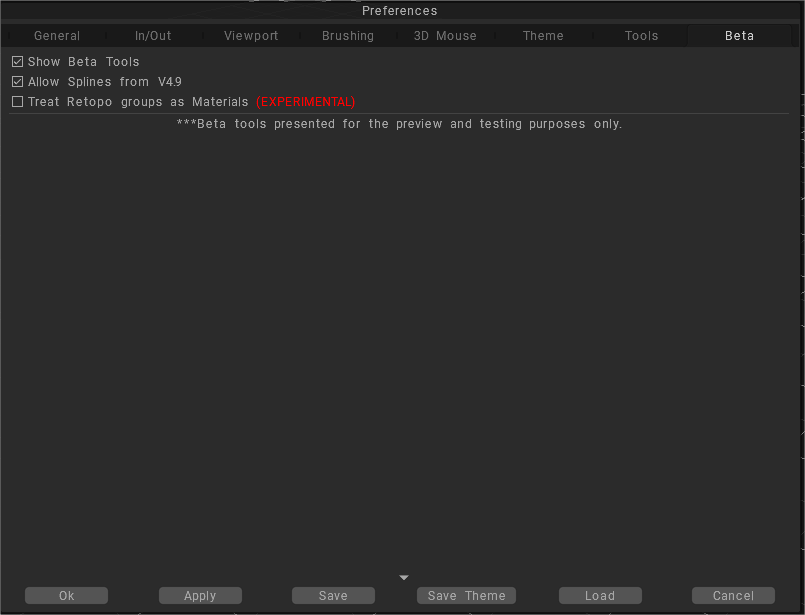
ShowBetaTools: We recommend that you always enable this option since 3DCoat is constantly improving with bug fixes and other updates. Seeing and using the beta tools and functions allows you to experience any new fixes and to get an advanced look at features that will not be present until the next major release of 3DCoat.
Allow splines from V4.9: Enable the old version of splines in the E-panel. The new version of splines will be available as well.
Treat retopo groups as materials (EXPERIMENTAL): Treat the retopo groups as materials instead of objects. Use this option at your own risk, it is not usual 3DCoat’s workflow. By default, retopo groups will be baked as objects.
Beta tools are presented for preview and testing purposes only. They make an essential part of 3DCoat 2022. They may be disabled in V4.9xx after the release of 3DCoat 2025.
Tutorials
Default Grey UI Theme: This video is a very quick demonstration of a new Grey Default color theme option in 3DCoat, as well as showing where users can further customize the theme.
 Español
  English
 Українська
 Deutsch
 Français
 日本語
日本語 Русский
 한국어
한국어 Polski
 中文 (中国)
 Português
 Italiano
 Suomi
Suomi Svenska
 中文 (台灣)
 Dansk
Dansk Slovenčina
 Türkçe
 Nederlands
 Magyar
 ไทย
ไทย हिन्दी
 Ελληνικά
 Tiếng Việt
 Lietuviškai
 Latviešu valoda
 Eesti
Eesti Čeština
 Română
 Norsk Bokmål