Español
  English
 Українська
 Deutsch
 Français
 日本語
日本語 Русский
 한국어
한국어 Polski
 中文 (中国)
 Português
 Italiano
 Suomi
Suomi Svenska
 中文 (台灣)
 Dansk
Dansk Slovenčina
 Türkçe
 Nederlands
 Magyar
 ไทย
ไทย हिन्दी
 Ελληνικά
 Tiếng Việt
 Lietuviškai
 Latviešu valoda
 Eesti
Eesti Čeština
 Română
 Norsk Bokmål
Solo hay dos categorías de export que se pueden realizar mientras se trabaja en el espacio de trabajo de Painting :
1. Export del modelo poligonal como se define en el Retopo Workspace.
2. Export todas las Texturas pintadas creadas en el Área de trabajo de Painting .
Sin UVs no hay texturas para export.
Un diseño UV define cómo se envuelve una imagen 2D o un mapa de textura en una superficie 3D.
Los UVs generalmente solo se vuelven necesarios cuando comienza a pintar texturas o si desea bake mapas normales.
Todos los datos de Painting de textura están contenidos dentro de las diversas capas que se han creado en el espacio de trabajo de Painting .
Estos datos existen en forma de cinco mapas UV básicos que se crean al mismo tiempo que pinta esa información en su escultura.
Como es el caso cuando se exportan datos desde UV Workspace, se debe poner en un formato que otras aplicaciones entiendan.
Este formato es el de un Mapa UV . Se guardan mapas separados para cada una de las cinco categorías de textura que ha creado al pintar sobre su modelo:
Color difuso, Color de brillo, Intensidad emisiva, Información normal (sobresalto) e Información de desplazamiento.
Active el comando Export constructor para ver los ajustes preestablecidos de export
Exportación de un mapa de desplazamiento Un video paso a paso que muestra cómo traer un objeto con UV de baja poli y esculpir detalles adicionales en él, luego cómo bake un displacement map y verlo en el modelo de baja poli de Industry Tuts.
El desplazamiento se exporta usando la diferencia entre la posición de un vértice y su posición en la Capa 0.
Las posiciones de los vértices se tomarán de la Capa 0. Esta es la opción preferida para la export de baja cantidad de polígonos.
El desplazamiento siempre se basa en la Capa 0. Pero las posiciones de los vértices en el archivo OBJ exportado dependen de su elección. Es mejor usar tales combinaciones de casillas de verificación de export :
– serie 1:
[x] Usar posiciones de origen
[ ] Seleccionar posiciones de Layer0
[ ] Grueso…
Úselo si la capa 0 no está distorsionada.
– conjunto 2:
[ ] Usar posiciones de origen
[x] Seleccionar posiciones de Layer0
[x] Grueso…
Úselo si la Capa 0 está distorsionada. Seleccionar de la capa 0 guardará nuevas posiciones, grueso lo preparará para una mayor subdivisión.
Pero si la capa X normalmente no estuviera distorsionada, la export de desplazamiento no ayudaría. Debe volver a hornear la malla para obtener un desplazamiento normal o usar un desplazamiento vectorial.
Ejemplo de Export a Unreal por Digman
Configuración de 3DC: – La rugosidad/metalicidad se selecciona en el menú de texturas.
– Ver menú. GGX Burley 12 (Unreal4).
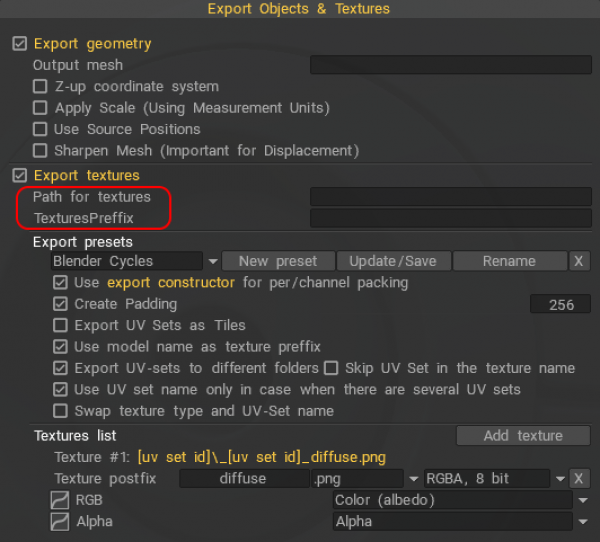
– Menú Archivo— Export objetos y texturas—- Panel Export Unreal5
(Unreal 4.27 o 5.) Seleccione los archivos fbx y textura para import. El normal map será importado correctamente por Unreal. No se necesita trabajo.
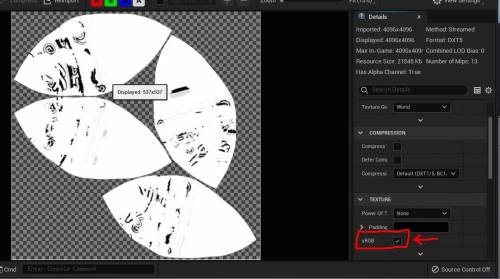
La metalicidad y rugosidad se importan como SRGB. Abra el editor de imágenes para cada imagen y anule la selección de Srgb. Guarda la imagen. Ahora serán mapas lineales y se renderizarán correctamente. Aparecerán como lineales en el editor de materiales.
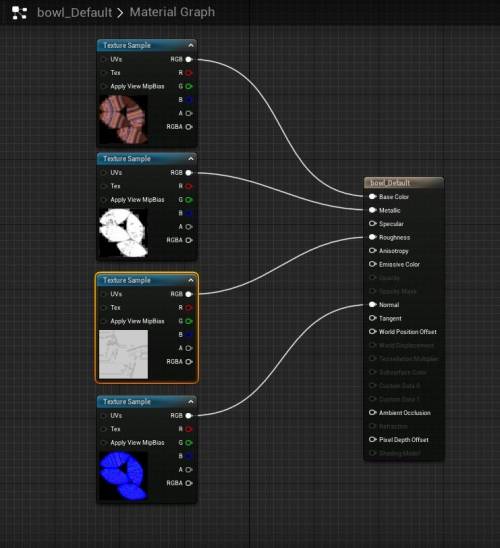
Debería tener un material predeterminado ya creado: haga doble clic en él para abrirlo.
Arrastre todos los archivos de textura al editor default_material e introdúzcalos en las ranuras correctas.
Aplicar y guardar.
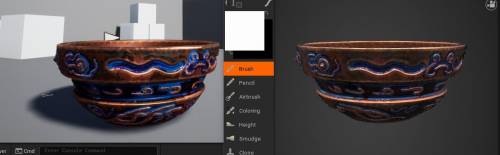
Última foto: Por supuesto, la iluminación es diferente en esta configuración simple. Los colores son correctos y la metalicidad y la aspereza coinciden estrechamente con 3DC. PBR reacciona correctamente a diferentes configuraciones de iluminación, por lo que la iluminación es diferente en la escena irreal y 3DC.