GPU-versnelling past stencils en textuurpatronen aan (beeldhouwen, texturen).
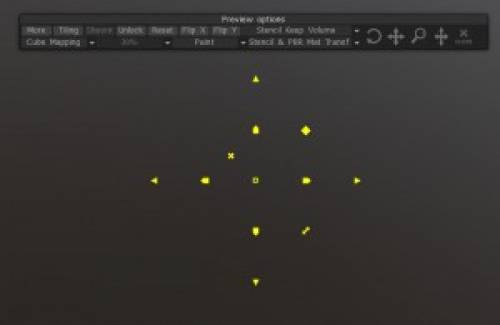
Als u masker/materiaal weergeeft in ten minste één van de kanalen (diepten en/of kleuren en/of glans, zie hieronder meer details hierover), verschijnt er bovenaan een nieuw paneel. Met het deelvenster Voorbeeldopties kunt u de voorbeeldparameters Maskers en materiaal als volgt aanpassen:
Hide/Show/Auto: Hide/show/auto-hide full-screen weergave van textuur. U kunt van modus wisselen met de sneltoets “H”.
Ontgrendelen/vergrendelen: hiermee kunt u automatisch schalen en texturen tijdens het schalen en verplaatsen van het model.
Flip X: Reflecteer maskerbeeld, spiegelachtig, over de horizontale as.
Flip Y: Reflecteer maskerbeeld, spiegelachtig, over de verticale as.
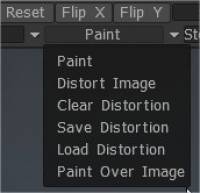
Paint: In deze modus kun je schilderen met je masker of materiaal.
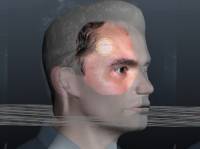
Afbeelding vervormen: in deze modus kunt u uw masker of materiaal rechtstreeks met uw penseel vervormen. Je kunt met deze functie heel uniek textuurwerk doen. Het is geweldig als je een afbeelding hebt die niet precies overeenkomt met de mesh. U kunt deze tool vervolgens gebruiken om de afbeelding zo vorm te geven dat deze nauwkeuriger bij de mesh past, zodat u kunt schilderen met een materiaal of masker. Zoals je op de afbeelding kunt zien, zijn de kaaklijn, neus en het silhouet van het hoofd gevormd met de vervormde afbeeldingsfunctie.
Resetten: Plaats de textuur in de oorspronkelijke positie.
Vervorming wissen/opslaan/laden: met deze opties kunt u uw vervormingen wissen, opslaan en laden.
Mapping Method: Er zijn enkele methoden die u hier kunt gebruiken.
Van Camera Cube Mapping. Vanuit Camera Lets projecteert u de methode door de viewport. Als het toepassingstype Cube Mapping is geselecteerd, wordt het materiaalvoorbeeld alleen op de pen weergegeven, in plaats van op volledig scherm (wanneer Van camera is geselecteerd). Aan de rechterkant is er een schuifregelaar die verantwoordelijk is voor transparantie bij het bekijken van de maskers/het materiaal.
De dekking van voorvertoning: op percentages gebaseerde dekkingsregelingen. Het toevoegen van een nieuw masker of materiaal gaat op precies dezelfde manier als met Penselen en Stroken.
Mapping-methode
Er zijn enkele methoden die u hier kunt gebruiken.
Van camera: Smart Material wordt op het object geprojecteerd vanuit de vooruitkijkende as van de camera.
Cube Mapping: Smart Material wordt op het object geprojecteerd met behulp van Cube mapping. Als het toepassingstype “cube mapping” is geselecteerd, wordt het materiaalvoorbeeld alleen op de pen weergegeven, in plaats van op volledig scherm (wanneer “Van camera” is geselecteerd).
Cilindrisch: Gebruik cilindrische mapping voor stencils/Smart Materials. Druk op Instellingen voor een uitgebreide set cilindrische mapping .
Sferisch: gebruik sferische mapping voor stencils/Smart Materials. Druk op Instellingen voor een uitgebreide set sferische mapping .
UV-Mapping:

Voorbeelddekking: aan de rechterkant is er een schuifregelaar die verantwoordelijk is voor transparantie bij het bekijken van de maskers/het materiaal.
Verf methode

Paint: In deze modus kun je schilderen met je materiaal of masker.
Afbeelding vervormen: in deze modus kunt u uw masker of materiaal rechtstreeks met uw penseel vervormen. Met deze functie kun je heel uniek textuurwerk doen. Het is geweldig om te gebruiken als je een afbeelding hebt die niet precies overeenkomt met de mesh.
Vervolgens kunt u dit gereedschap gebruiken om het zo vorm te geven dat het nauwkeuriger bij het gaas past, zodat u kunt schilderen met een materiaal of masker. Zoals je op de afbeelding kunt zien, zijn de kaaklijn, neus en het silhouet van het hoofd gevormd met de vervormde afbeeldingsfunctie.
Duidelijke vervorming: plaats textuur in de beginpositie.
Vervorming opslaan/laden: met deze opties kunt u uw vervormingen wissen, opslaan en laden. Elk spreekt voor zich.
Over afbeeldingen schilderen: over de afbeelding schilderen – druk op “E” om de streekmodus te kiezen. Gebruik CTRL om te wissen.
Pop-up voor slim materiaal en stencil

Wanneer u een van de Materials Stencils of beide tegelijk activeert, krijgt u een nieuw paneel op het scherm. Dit paneel bevat alle bewerkbare functies voor zowel slimme materialen als stencils. Laten we die nu bekijken.
Meer/Minder: onthult/verbergt meer opties voor het besturen van de Smart Materials of Stencil. Hiermee kunt u verschillende kleur-, licht-, etc. aanpassingen uitvoeren aan de Smart Materials of Stencil.
Tegels: Schakelt tegelen van het materiaal of sjabloon aan/uit.
Getoond/Verbergen/Auto: Schakelt de zichtbaarheid van de Smart Materials of Stencil.
Ontgrendelen/vergrendelen: Vergrendelt/ontgrendelt de bewerkbare functies van de Smart Materials of Stencil.
Reset: Reset alle bewerkbare parameters naar hun standaardstatus.
FlipX/Y: Draait de X- of Y-as van de Smart Materials of Stencil om.
Projectie Type
Schakel tussen verschillende projectietypes. U kunt een project van de camera, mapping, cilindrische mapping en sferische mapping gebruiken. Elk mapping heeft ook zijn opties.
Modus: u kunt wijzigen in welke modus u zich bevindt voor het materiaal of sjabloon. Deze modi zijn:
Verf: schildert door, met behulp van materiaal, stencils of beide.
Afbeelding vervormen: vervormt de afbeelding van de slimme materialen, het sjabloon of beide met behulp van een op penseel gebaseerd verplaatsingsgereedschap.
Vervorming wissen/opslaan/laden: voert de geselecteerde actie uit met eventuele vervormingen die u op het materiaal of sjabloon hebt aangebracht.
Paint Over Image: Hiermee kunt u 3DCoats-tekengereedschappen gebruiken op de Smart Materials of Stencil.
Gizmo transformeren

Hiermee kunt u de Smart Materials of Stencil transformeren door te verplaatsen, roteren en schalen. Je kunt ook squashen/strekken.
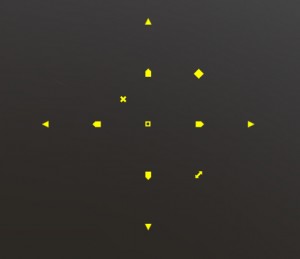
Er is ook een meer visuele Transform Gizmo die direct in de 3D Viewport werkt. Bij het activeren van een materiaal of sjabloon (en het 2D-raster), verschijnt er een gele cirkel in het midden van de slimme materialen of het sjabloon.
RMB Als u op de gele cirkel klikt, verschijnen er meer bedieningspictogrammen voor de Transform-gizmo.
U kunt rechtstreeks vanuit deze gizmo op een meer intuïtieve manier verplaatsen, roteren en schalen en ook het midden van uw gizmo uitlijnen voor geavanceerdere schilder- en beeldhouwtechnieken.
Tutorials
Verbeterde instellingen voor Cube Mapping : deze video demonstreert de implementatie door 3DCoat van Tri-Planar Mapping met behulp van het Cube Map-projectietype met slimme materialen of stencils.
2D Gizmo : Deze video demonstreert het gebruik van de nieuwe 2D Gizmo in 3DCoat V4. Het biedt meer opties en grotere precisie bij het manipuleren van een 2D-raster, materiaal of maskeroverlay. 3DCoat slaat de wijzigingen ook op wanneer een camerasnelkoppeling wordt gemaakt.
 Nederlands
  English
 Українська
 Español
 Deutsch
 Français
 日本語
日本語 Русский
 한국어
한국어 Polski
 中文 (中国)
 Português
 Italiano
 Suomi
Suomi Svenska
 中文 (台灣)
 Dansk
Dansk Slovenčina
 Türkçe
 Magyar
 ไทย
ไทย हिन्दी
 Ελληνικά
 Tiếng Việt
 Lietuviškai
 Latviešu valoda
 Eesti
Eesti Čeština
 Română
 Norsk Bokmål