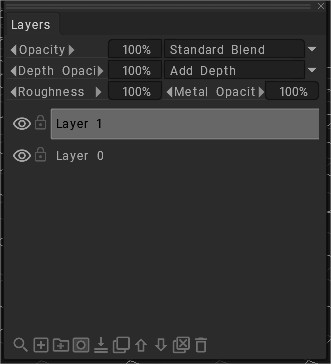
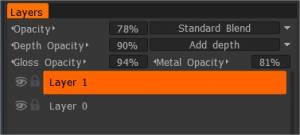
In the Paint Room, Layers are used much like you would in Photoshop or other painting applications, where aspects of each Layer can be controlled independently, such as blending modes and opacity but with additional control over how Depth painting affects the Layer in question.

In Sculpt room, instead of color information, it has deformation information per layer. So, for example, one layer could be for large sculpting deformations, and then another could be for fine details, etc.
To bake the sculpt-layer deformation, resampling the mesh should achieve that.
Layer Upper Commands

Opacity: Select values for opacity to apply color.
- Opacity Blending Mode: Select the method of color blending between the previous layer(s) color and the current color.
Depth Opacity: Select values for depth to apply normal maps.
- Depth Blending Mode: Select the depth blending mode here:
- Add Depth: Add the depth of the layer to the previous one. It is the standard blending mode.
- Subtract Depth: Subtract layer depth. This operation is the opposite of “Add depth”.
- Max. Depth: The maximum displacement will be chosen between the displacement of this layer and the sum of all previous layers.
- Magnify Depth: Magnify depth exponentially. Zero depth leaves the surface unchanged, positive values increase the amplitude of displacement, and negative values suppress it.
- Suppress Depth: Suppress depth exponentially. Zero depth leaves the surface unchanged, positive values suppress the amplitude of displacement, and negative values increase it.
Gloss Opacity: Select values for Gloss to apply Glossiness.
Metal Opacity: Select values for Metal to apply Metalness.
If you are working on Metalness/Roughness workflow, Gloss Opacity change to Roughness opacity.
Blending modes

Select the method of color blending between the previous layer(s) color and the current color.
- Pass-through: The blend mode is applicable only to groups. It makes the group act as if there is no group in terms of color mixing.
- Emissive Map: Change blending mode to use any map as emissive (Glow map.)
Individual layer icons
Layer visibility: Simply toggle the “Eyeball” icon to hide or show the Layer selected. Hold down the “Alt” key to hide every layer except the current layer.
Lock Texture: Locking texture allows locking color/depth texture over the layer regardless of its resolution. Texture in its current state will be saved to disk.
As soon as you change the resolution of the texture, the locked texture will be used instead of the current layer pixels resampling.
It is very important if you want to attach materials to layers and paint in low resolution. In this case, occlusion, cavity, and the normal map should be kept in the original resolution.
This function helps to keep important layers in the original resolution.
The layer is locked: It means that textures are attached to the layer and saved to disk as several files, one file per channel (if present) color, depth, specularity:
C:/Users/<username>/Documents/3DCoat/data/Temp/id10413/TextureCache/CurvatureMap_#####.
When you change the resolution of the texture/model that textures will be used instead of image resampling.
This is usually helpful for occlusion, cavity, and normal map. It is especially helpful if you want to paint in low resolution using attached materials.
As soon as you will increase the resolution of the textures over the mesh you will not lose the quality of attached textures, they will be taken from the disk instead of upsampling.
6 dots (up/down) icon: Click to select and move the current layer. Double-click to rename the layer.
Arrow Down Icon: Layer Blending. Go to the Blending tab.
Layer 0
– What is layer 0 in 3DCoat?
Think about layers as you think about Photoshop layers. Layer0 is like Background in PS.
About 3DCoat, think opacity as RBGA color alpha value. To get opacity variation (add semi-transparent mat etc.).
You only need to paint with an alpha value. then when you hide layer 0 now, you see semi-transparent or fully transparent with the layer color alpha value. Or you can set layer opacity, e.g., if you set layer one opacity value as 0.3, then hide “layer 0” now you should see 0.3 alpha color of the layer (semi-transparent).
The reason why 3DCoat keeps “layer 0” visible, it makes the user easy to color (overwrite layer 0) mesh. (layer 0 keep alpha as 1.0 (no transparent) and color perfect 0.5 0.5 0.5 RGB).
If there is no layer 0, you may not see any surface until you import the map or actually paint on the surface in another layer. It makes us difficult to paint.
After the painting or adding smart material with alpha value, hide layer 0, then export color (diffuse/albedo) map as RGBA (png, tiff, etc.). Then the exported color map keeps the alpha value.
or you can choose the option to export the “Black and white opacity” map with the RBG color map.
Use an alpha value of color or export as an opacity map (black and white) depending on which render application you may use. However, most of the render engines and shaders can use the alpha of color map correctly.
Layer0: avoid painting it for any purpose but transparency.
It contains mesh data and a “base coat” of paint for baking.
If you erase the paint, things still bake just fine. However, the transparent areas created will be baked as alpha/trans.
Also, if you hide Layer 0, it bakes fine and entirely with alpha/trans, whereas any other layer doesn’t contain color data.
Displacement is always based on Layer 0.
But the positions of vertices on exported OBJ file depend on your choice.
It is better to use such combinations of export checkboxes:
– set 1:
[x] Use source positions
[ ] Pick positions from Layer0
[ ] Coarse…
Use it if Layer 0 was not distorted.
– set 2:
[ ] Use source positions
[x] Pick positions from Layer0
[x] Coarse…
Use it if Layer 0 was distorted. Pick from layer 0 will save new positions, coarse will prepare it for further subdivision.
But if Layer X were not normally distorted, just displacement export would not help. You need to re-bake the mesh to get normal displacement or use vector displacement.
Layer Bottom Commands
Icons at the bottom of the panel are, in order, for the following functions:

Add new layer: Creates a new Paint Layer.
Create folder group: Add a new group folder.
Merge Down: Merge the current layer with the layer below.
Duplicate: Duplicate the selected Layer.
Shift Layer up: Move the layer upward.
Shift Layer down: Move the layer downward.
Delete All Unused Layers: Delete All Unused Layers.
Delete: Deletes the selected layer.
Layers RMB Menu
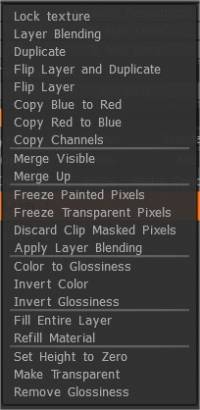
Right-clicking on a Layer name opens a menu of additional commands.

Lock Texture: Locking texture allows locking color/depth texture over the layer regardless of its resolution. Texture in its current state will be saved to disk. As soon as you change the resolution of the texture, the locked texture will be used instead of the current layer pixels resampling. It is very important if you want to attach materials to layers and paint in low resolution. In this case, occlusion, cavity, and the normal map should be kept in the original resolution. This function helps to keep important layers in the original resolution.
Layer Blending: Show properties of the current layer.
Duplicate: Duplicate Selected layer
Flip Layer and Duplicate: Duplicate the Layer and flip it using topological symmetry.
Flip Layer: Flip the Layer using topological symmetry.
Copy Blue to Red: This option copies the blue parts of the mesh to the red areas. Define the blue and red areas with the ‘Topological symmetry’ tool first.
Copy Red to Blue: This option copies the red parts of the mesh to the blue areas. Define the red and blue areas with the ‘Topological symmetry’ tool first.
Copy Channels: Copy any channel of one layer to any other channel of this or another layer.
Merge Visible: Merges all visible Layers together. This action is undoable.
Merge Down: Merge the current layer with the layer below. “Undo” is not available.
Merge Up: Merge this Layer and the upper Layer. “Undo” is not available.
Freeze Painted Pixels: Freeze only the painted areas on the current layer. Good for making quick masks of areas you don’t want to paint that have already been painted or invert after performing this function to mask only unpainted areas. The freeze value will be set equal to the Layer’s transparency.
Freeze Transparent Pixels: Freeze the transparent part of the Layer. It is important if you want to use the transparency mask of the current Layer on another Layer. Use CTRL +LMB on the Layer to perform the same action.
Discard Clip Masked Pixels: Discard any pixels that are hidden on the current layer, being masked by the clip mask layer.
Apply Blending: Apply blending and all effects to the current layer.
Color to Specular: Transforms color brightness to the specular channel.
Color to Glossiness: Transform color brightness to the Glossiness channel.
Invert Color: Inverts the colors on the selected layer.
Invert Glossiness: Inverts the Glossiness on the selected layer.
Fill entire layer: Fill the entire layer using the current material and color.
Refill Material: Re-fill non-transparent areas of this layer with current material. It is convenient to change the material used to fill the layer.
Set Height to Zero: Sets all heights on the current layer to 0.
Make Transparent: The Layer will become fully transparent. Removes all painting done on the selected layer and applies transparency to all pixels on that layer.
Remove Glossiness: Removes all Glossiness values on the selected layer and will be set to Zero.
Layers Shortcuts
Ctrl+Shift+N Add New Layer
Ctrl+Shift+Del Delete Layer
Del Erase Unfrozen
Insert Fill Unfrozen
Ctrl+Insert Fill by mask
Ctrl+Shift+D Duplicate Layer
Ctrl+Shift+E Merge Visible layers
Ctrl+E Merge Down
Ctrl+Insert Fill by mask
Tutorial
Paint Layer Groups: This video demonstrates the new Paint Layer Groups feature in 3DCoat’s Paint Workspace. The Layer Groups in 3DCoat are fully compatible with those in Photoshop.
Preserving Sculpt Layers (When Switching to Voxel Mode): This video demonstrates a method artists can use to preserve Sculpt Layers while switching from Surface mode to Voxel mode… which would otherwise nullify the Sculpt Layer information.
The model is provided courtesy of Leigh Bamforth and his Scary Monsters Doom 3 redone project.
 Tiếng Việt
  English
 Українська
 Español
 Deutsch
 Français
 日本語
日本語 Русский
 한국어
한국어 Polski
 中文 (中国)
 Português
 Italiano
 Suomi
Suomi Svenska
 中文 (台灣)
 Dansk
Dansk Slovenčina
 Türkçe
 Nederlands
 Magyar
 ไทย
ไทย हिन्दी
 Ελληνικά
 Lietuviškai
 Latviešu valoda
 Eesti
Eesti Čeština
 Română
 Norsk Bokmål