 Русский
  English
 Українська
 Español
 Deutsch
 Français
 日本語
日本語 한국어
한국어 Polski
 中文 (中国)
 Português
 Italiano
 Suomi
Suomi Svenska
 中文 (台灣)
 Dansk
Dansk Slovenčina
 Türkçe
 Nederlands
 Magyar
 ไทย
ไทย हिन्दी
 Ελληνικά
 Tiếng Việt
 Lietuviškai
 Latviešu valoda
 Eesti
Eesti Čeština
 Română
 Norsk Bokmål
Рабочая область Sculpt содержит один из самых больших наборов функций среди всех рабочих областей 3DCoat . Многие из них поначалу могут показаться неясными и трудными для понимания. Этот раздел прояснит это.
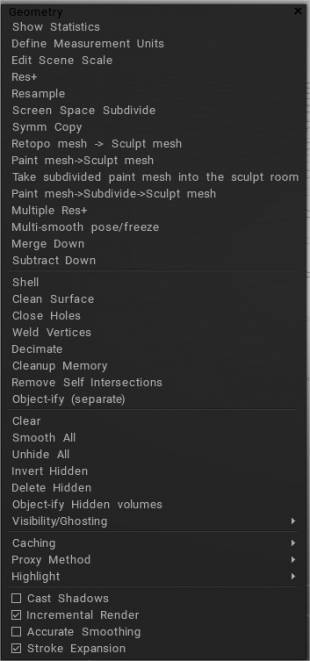
Меню геометрии содержит большинство этих функций, включая очистку поверхности, создание прокси-версий, повторную выборку разрешения вокселей, прореживание вокселей, управление памятью и многое другое.
Основные команды
Как и у большинства других основных вкладок (или комнат, как их еще называют), здесь есть сопутствующее меню. Мы уже рассмотрели большинство этих опций в предыдущих разделах. Любые повторяющиеся функции здесь только для вашего удобства. Давайте посмотрим на них:
Показать статистику: показать малоизвестную статистику текущего слоя, статистику сцены, такую как объем, площадь, размеры, количество отверстий и т. д.
Определить единицы измерения: определите единицы измерения в реальном масштабе и плотность плотности вокселей по этой оси.
Редактировать масштаб сцены: позволяет изменить композицию сцены, изменив ее общее положение и масштаб по глобальной оси. Вы можете отредактировать масштаб сцены, определенный, когда вы импортировали сетку в Sculpt room и нажали «Да».
Res+: увеличивает разрешение текущего объекта. Увеличение разрешения фактически удвоит количество вокселей текущего слоя объекта. Это позволяет слою иметь гораздо больше деталей при более высоком разрешении. Вы можете просмотреть разрешение слоя в VoxTree непосредственно перед именем слоя. Если у него есть только имя, то вы будете знать, что оно имеет базовое разрешение и не было увеличено.
Resample: разрешить обновление или понижение разрешения текущего слоя.
Разделение экранного пространства: разделение поверхности, видимой на экране, таким образом, что треугольники имеют приблизительно заданный размер в пикселях в экранном пространстве.
Симметричная копия : Симметричная копия. Для работы этой функции должна быть активна симметрия. Этот инструмент использует самую последнюю окрашенную сторону объекта в качестве источника и копирует исходные элементы на другую сторону. Если вы лепили на одной стороне объемного объекта, вы можете использовать этот значок, чтобы скопировать все это на другую сторону объекта. Он работает на любой оси, если у вас включена симметрия вдоль предпочтительной оси.
Сетка Retopo > Скульптурная сетка: Получить объект из рабочей области Retopo .
Paint mesh > Sculpt mesh: Get Object From Paint Workspace.
Возьмите разделенную сетку краски в комнату для лепки: .
Paint mesh > Subdivide > Sculpt mesh: Get Object From Paint Workspace ранее разделила.
Множественное разрешение+:
Мульти-гладкая поза/заморозка:
Объединить вниз: Объедините этот слой с первым видимым слоем под ним.
Вычесть вниз: вычтите этот слой из первого видимого слоя под ним.
Paint mesh > Subdivide > Sculpt mesh: Get Object From Paint Workspace ранее разделила.
Поверхностные команды
Доступно только для слоев скульптинга, находящихся в настоящее время в поверхностном режиме.
Оболочка: создает полую оболочку или оболочку заданной толщины из текущего воксельного слоя.
Чистая поверхность: повторно оптимизирует структуру сетки поверхности.
Закрыть дыры: исцеляет любые дыры, обнаруженные на поверхности. Очень полезно для исправления импортированных отсканированных сеток.
Weld vertices: соединяет любые вершины, занимающие одну и ту же точку в пространстве.
Decimate: выполняет оптимизированное сокращение полигонов для текущего слоя.
Очистка памяти: оптимизирует выделение памяти сетки.
Удалить самопересечения: когда две сетки пересекаются, эта команда извлечет пересекающуюся поверхность из текущего и назначенного слоя, поместив эту пересекающуюся часть на свой слой, оставив исходные слои нетронутыми.
Объективировать : отделить несвязанные части. Любые несвязанные объекты, найденные на том же слое, будут удалены из этого слоя и помещены на свои слои.
Основные команды
Clear: Эта команда очищает текущий слой в VoxTree от всех вокселей. Это полезно, когда вы хотите сохранить имя и разрешение текущего слоя, но не воксели. Это очистит слой выбранного объекта в VoxTree от всех вокселей. Он работает так же, как инструмент «Очистить» на левой панели инструментов в разделе «Команды».
Smooth all: эта команда равномерно сглаживает (или расслабляет) все воксели текущего выбранного слоя объекта в VoxTree. Равномерно сгладит (или расслабит) все воксели выбранного слоя объекта в VoxTree.
Показать все: показывает все скрытые воксели.
Инвертировать скрытые: инвертировать все скрытые воксели.
Удалить скрытое: Удаляет все части сетки, которые в данный момент скрыты.
Объективировать скрытое: отделить скрытую часть. Создает новый слой в VoxTree и помещает ранее скрытые воксели во вновь созданный слой.
Visibility/Ghosting : выбор скрытых и призрачных слоев вокселей.
- Параметры видимости и ореолов : в этом видео обновлены параметры видимости и ореолов.
- Unghost_all:
- Ghost_all:
- Invert_ghosted:
- Изолировать:
- Переключить видимость: переключить видимость текущего тома.
- Изолировать ореолы:
- Переключить ореол:
Расширенные команды
Кэширование
Переключить режим прокси : включает/выключает режим прокси.
- Uncache visible Volumes: восстановит воксельный скульпт высокого разрешения, ранее кэшированный в режиме воксельной поверхности. (Это избыточная функция). Переключение режима прокси или значок указанной функции приведет к тому же результату).
- Кэшировать видимые объемы: кэширует текущий воксельный скульпт высокого разрешения. (Это избыточная функция) с использованием режима Toggle proxy или масштаба значков.
- Очистить все кеши: очищает всю информацию кеша из памяти, тем самым освобождая ее для других задач. Это не может быть отменено.
Proxy Method : выбирает разрешение прокси-сетки и степень понижения сетки (вы можете понизить ее с 2x, 4x и 8x).
Подсветка : включает подсветку; если он включен для выбранного вами объекта VoxTree, он будет выделен другим цветом. Это переключатель для выделения; если этот параметр включен, выбранный в данный момент объектный слой будет выделен другим цветом. При выключении видимых изменений не будет.
Дополнительные команды
Отбрасывать тени: включает отбрасывание теней на основе глобального освещения внутри области просмотра. Это чисто эстетическое.
Инкрементный рендеринг: визуализирует только те части объекта, которые изменились с момента предыдущего рендеринга, что значительно повышает производительность. Этот параметр отключен, когда тени включены, поскольку тени являются динамическими и изменяют внешний вид визуализируемого объекта. Эта опция будет рендерить только те части объекта, которые изменились с момента вашего последнего рендеринга, что значительно повышает производительность. Этот параметр отключается при включении теней, поскольку тени являются динамическими и изменяют внешний вид объекта для рендеринга.
Точное сглаживание: обеспечивает более точное сглаживание за счет снижения производительности. Это обеспечивает более точное сглаживание за счет снижения производительности.
Расширение Stroke : (Увеличивать при движении пера). Если этот параметр включен, выполняются только соответствующие операции, если только перо не находится в движении.
Показать объекты Retopo в комнате Sculpt.
Полезно, когда вам нужна ссылка. Используйте retopo сетку для инструментов Paint2D, Sphere или Snake в комнате Sculpt. Добавлена кнопка, показывающая полигональную сетку в комнате Sculpt.
Это удобно использовать в качестве ссылки:
Меню юаней
Это меню имеет множество функций, уникальных для Sculpt Room, и доступ к нему можно получить, только щелкнув ПКМ по объекту в VoxTree или непосредственно по объекту в окне 3D-просмотра. Давайте посмотрим на эти функции.
Показать все скрытые тома
Если какие-либо объекты VoxTree скрыты, эта команда сделает их видимыми.
Показать скрытые тома в поддереве
Если какие-либо дочерние объекты VoxTree скрыты от объекта, по которому вы щелкаете ПКМ, вызов этой команды отобразит их.
Удалить
Удаляет объект VoxTree.
Добавить ребенка
Создает дочерний объект VoxTree.
Переименовать
Переименовывает объект.
Уменьшить объекты в 2 раза
Это уменьшает размер объектов, но также увеличивает плотность в два раза.
Увеличить объект в 2 раза
Это увеличивает размер объектов, но также уменьшает плотность в два раза.
В глобальное пространство
Устанавливает пространство объектов VoxTree в мировое пространство на 0 по осям X, Y и Z.
К единому пространству
Преобразуйте масштаб вдоль оси и сделайте ось ортогональной, чтобы сделать пространство однородным.
ресамплинг
Эта функция позволяет изменить количество полигонов всего выбранного объекта. С помощью этой функции вы даже можете указать точное количество полигонов.
Радиальный массив
Позволяет радиально дублировать геометрию в объекте VoxTree с любым количеством срезов в массиве. Геометрия останется в том же объекте VoxTree, в котором она была изначально. Геометрию также можно создать как экземпляры своих объектов в VoxTree вместо оригинала, включив «Экземпляр» на панели «Параметры инструмента». Рассмотрим параметры инструмента.
По X/Y/Z: выравнивает гизмо Rod Transform по указанной оси.
Начало/Конец: позволяет указать точные численные координаты начала и конца гизмо преобразования стержня.
Длина гизмо: числовое значение длины гизмо преобразования стержня.
На основе экрана: устанавливает размер гизмо относительно области просмотра.
Счетчик массива: количество радиальных срезов массива.
Экземпляр: создавайте экземпляры объектов VoxTree вместо дублирования геометрии в один и тот же объект.
Выдавливание: Выполните выдавливание объекта.
Сгущать
Эта функция позволяет утолщать объект VoxTree. Удобно для импортированных объектов, которые имеют открытые участки (не водонепроницаемые).
Закрыть отверстия в поверхности
Закрывает любые дыры, которые могут быть в текущем объекте VoxTree.
Объективировать Отключено
Создает объект в VoxTree для каждой отдельной части геометрии и помещает геометрию в эти объекты.
Сохранить объем как 3B
Сохраняет текущий объект VoxTree как собственный файл .3B.
Сохранить том с поддеревом как 3B
Сохраняет текущий объект VoxTree и его дочерние объекты в виде файла .3B.
Import файла 3B
Импортирует другой файл 3B в текущую сцену.
Изменить настройки шейдера
Он позволяет редактировать текущий шейдер выбранного объекта VoxTree.
Import
В этом меню находятся две функции.
Import облака точек: при выборе файла предлагается выбрать источник облака точек на диске, а затем активируется инструмент «Import» .
Import объекта: предлагает с помощью селектора файлов выбрать файл сетки на диске, а затем активирует инструмент Import .
Export
В этом меню находятся различные функции экспорта.
Export сцены: экспортирует файл с несколькими объектами. Каждый объект в вашей сцене будет меш-объектом в экспортированном файле.
Export выбранный объект: экспортирует в файл только выбранный объект.
Save to Meshes Panel: Сохраняет пресет-файл на диск и автоматически помещает его на панель Meshes.
Сохранить на панели сплайнов: Сохраняет файл предустановки на диск и автоматически помещает его на панель сплайнов.
Export в UE5.
Export в UE5 как…
Отредактируйте скрипт UE5.
AUTOPO
Запускает процедуру Auto Retopology для создания автоматически сгенерированной сетки с автоматически сгенерированными UV картами с использованием собственного метода развертывания 3DCoat GUUV или другого алгоритма развертывания. Вы можете указать направляющие для краевых петель и даже закрасить области, где вы хотите увеличить полигональную плотность. Вы также можете указать жесткие параметры.
Узнайте больше об AUTOPO , нажав на название выше или прочитав это руководство .
Retopo через децимацию
Retopo через децимацию, видимые объекты
Трансформировать
Активирует инструмент преобразования для объекта.
Привязать к земле
Если объект находится выше или ниже 0 по оси Y, эта команда установит самую нижнюю точку объекта на 0 по оси Y.
Лежать на земле
Подобно функции «Привязать к земле», перемещая самую нижнюю точку объекта на 0 по оси Y, он также будет вращать объект, когда центральная масса не опирается на землю. Представьте себе объект, который физически падает и падает на землю.
Клон
Содержит все функции клонирования/дублирования. давайте посмотрим на каждую из этих функций.
Клонировать экземпляр: создает экземпляр объекта. Он использует меньше памяти, чем дублирование.
Клонировать: Дублирует объект. Объект будет в памяти.
Экземпляр с симметрией: создает экземпляры в плоскости симметрии, которая у вас активна в данный момент.
Clone & Degrade: Дублирует объект и уменьшает разрешение наполовину.
Clone Space Density: Дублирует плотность (или разрешение) объекта и все преобразования (перемещения, повороты и масштабирование), но не дублирует содержимое объекта.
Отразить: позволяет перевернуть объект по осям X, Y и Z. Это меню также содержит команду для отражения нормалей полигонов меша.
Комбинировать с детьми
Объединяет текущий слой со всеми его дочерними слоями.
Запекание цвета из видимых объемов
Запекает цвета вершин из других объектов VoxTree в текущий. Если объект находится в Voxel режиме, он будет автоматически преобразован в поверхностный режим.
Объединить видимые
Объединяет все видимые объекты VoxTree в один объект.
Объединить поддерево
Объединяет все дочерние элементы выбранного слоя, но не выбранного слоя.
Копировать и объединить с
Дублирует объект и добавляет полигоны к другому объекту.
Слиться с
Аддитивная логическая операция. Добавляет полигоны из выбранного объекта к другому объекту и удаляет текущий объект из VoxTree.
Вычесть из
Вычитающая логическая операция. Удаляет полигоны из выбранного объекта из другого объекта и удаляет текущий объект из VoxTree.
Пересекаться с
Логическая операция пересечения. Он сохраняет только полигоны текущего объекта там, где они перекрывают другой объект. Выбранный объект удаляется из VoxTree.
Удалить пересечение с
Логическая операция пересечения, похожая на Intersect With, но полная противоположность ей. Удаляет только те полигоны текущего объекта, где они перекрываются с другим объектом. Все объекты сохраняются (не удаляются).
Разделить с
Разделенная логическая операция. Разделяет только те полигоны текущего объекта, где они перекрывают другой объект, и создает новый объект в VoxTree для полигонов, которые были отделены от оригинала.
Изменить родителя
Назначьте или измените родителя выбранного объекта на другой объект в VoxTree.
Учебники
Прореживание MultiRes : в этом видео рассказывается о новом методе сокращения полигонов (прореживании) в наборе инструментов/рабочем процессе Multi-Res.