 Čeština
  English
 Українська
 Español
 Deutsch
 Français
 日本語
日本語 Русский
 한국어
한국어 Polski
 中文 (中国)
 Português
 Italiano
 Suomi
Suomi Svenska
 中文 (台灣)
 Dansk
Dansk Slovenčina
 Türkçe
 Nederlands
 Magyar
 ไทย
ไทย हिन्दी
 Ελληνικά
 Tiếng Việt
 Lietuviškai
 Latviešu valoda
 Eesti
Eesti Română
 Norsk Bokmål

Zpět: klávesová zkratka Ctrl+Z
Znovu: klávesová zkratka Ctrl+Y
Transformace bez Gizmo:
Tyto položky nabídky jsou určeny pro přiřazení klávesových zkratek pro transformaci objektů bez tohoto Gizmo.
1) Stiskněte KONEC nad požadovanou položkou nabídky a přiřaďte klávesovou zkratku.
2) Stiskněte tuto klávesovou zkratku a transformujte objekt.
3) Stiskněte MEZERNÍK pro zadání číselných hodnot (pokud se jedná o jednorozměrnou transformaci).
4) Pro diskrétní transformaci stiskněte SHIFT, CTRL nebo CTRL+SHIFT .
5) Pro zrušení transformace stiskněte ESC nebo RMB .
6) Stisknutím LMB dokončete transformaci.
Při transformaci objektů pomocí této metody, přehled editačního menu, ve kterém se dozvíte o hlavních editačních funkcích a nastavení scény, můžete použít klávesové zkratky (bez ohledu na to, jak jsou přiřazeny v 3D-Coat)
W – Aktivace bezplatného překladu.
E – Aktivace volného otáčení.
R – Aktivace bezplatného škálování.
X, Y (nebo C), Z – Působí podél osy pro posun, rotaci nebo změnu měřítka v závislosti na aktuálním režimu.
– Pokud jste v režimu překladu:
X, pak Y nebo SHIFT Z , nebo ZZ – pohyb objektu v rovině XY.
Y, pak Z nebo SHIFT X, nebo XX – pohyb objektu v rovině YZ.
Z, pak X nebo SHIFT Y, nebo YY – pohyb objektu v rovině ZX.
F – Vyberte nový střed transformace.
Vypočítejte okluzi
Calculate Occlusion : Spustí rutinu, která vypočítá „Ambient Occlusion“ (globální osvětlení) na základě sledování množství světelných paprsků obklopujících objekt. Použijte to k simulaci „skutečných“ situací okolního osvětlení. Dokončení může trvat dlouho. Tento nástroj vypočítává globální osvětlení z mnoha bodových světel rozmístěných po polokouli. Výsledky stupňů šedi budou zapsány do aktuální vrstvy. Je tedy lepší vytvořit novou vrstvu a nastavit barevnou operaci „Modulate“ nebo „Modulate2X“. Nástroj pro výpočet okluze je speciálně optimalizován pro vysoké polygony (několik milionů), je rychlý, ale víte, že v takto vysokých polygonech potřebuje ještě nějaký čas.
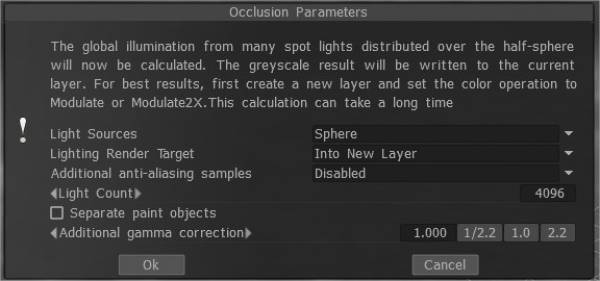
– Světelné zdroje (rozložení světel):
- 1) přes polokouli
- 2) přes kouli
- 3) nad polokoulí + koulí
– Cíl vykreslení osvětlení: Musíte vybrat vrstvu, do které se umístí výpočet okluze. Můžete se rozhodnout přidat novou vrstvu automaticky nebo přepsat aktuální vrstvu. V prvním případě nezapomeňte smazat novou vrstvu pro výpočet světla. Pro novou vrstvu je také nainstalována nová možnost barvy „Do času“. V případě vykreslení předchozí vrstvy budou všechny její barevné informace vymazány.
– Počet světel: Čím více světel, tím delší je výpočet. Čím více světelných zdrojů je, tím lepší je kvalita osvětlení a delší jeho výpočet. Maximální hodnota je 256 a minimální hodnota je 16. – Další vzorky vyhlazování: Počet kroků po vyhlazení po výpočtu okluze. Při výpočtu bude použita textura několikanásobně větší. To vám umožní zbavit se některých artefaktů, pokud jsou příliš malé UV ostrůvky nebo dlouhé pixely.
Upozornění: tato funkce zpomalí výpočet a spotřebuje více RAM a VRAM.
Oddělte objekty barvy: Rozložte objekt na části, abyste se vyhnuli nesprávným výstupkům AO kontaktu.
AO Baking w/ OpenGL & Normal Map utilisation : Toto video popisuje dvě hlavní nová vylepšení AO pečení v akceleraci OpenGL a využití Normal Map.
Upravit
Vypočítat zakřivení
Vypočítat zakřivení: Vrstva zakřivení je vyžadována pro použití dutiny/zakřivení jako podmínky pro materiály nebo podmíněné lakování. Příkaz aktualizuje vrstvu dutiny/zakřivení pomocí aktuálního posunutí a normal map.
Věnujte pozornost tomu, že zakřivení se skládá ze dvou složek.
- První je lokální zakřivení, které umožňuje detekovat malé detaily a škrábance.
- Druhým je zakřivení na dlouhé vzdálenosti, které plynule plyne a umožňuje detekovat velké detaily.
Nastavte intenzitu pro oba typy zakřivení.
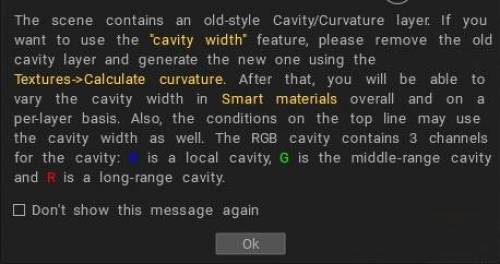
Počínaje 3DCoat 2021.53 byla dutina RGB zavedena jako výchozí metoda výpočtu v texturování. Toto je velmi významná vlastnost pro PBR Painting přes texturu/síť.
Toto video ukazuje, jak funguje vylepšená technologie dutin. Jedná se o vylepšenou technologii již nazývanou dutina RGB.
Nejprve se musíte ujistit, že je povolena verze dutiny RGB. Chcete-li to provést, přejděte do nabídky Úpravy > Předvolby, přejděte do části Nástroje a jako výchozí metodu výpočtu dutiny vyberte použít dutinu RGB.
Použití RGB dutiny v 3DCoat 2021
– Po povolení funkce přejděte do nabídky Textura a poté vyberte možnost Vypočítat zakřivení. Aby bylo možné provést výpočet, musíte chvíli počkat.
– Nyní můžeme vidět, jak se ve vrstvách objevila mapa dutin (RGB).
– Vidíme, že s novou technologií vypadá mapa jako hodně barev.
Mapa musí být nyní ve výchozím nastavení uzavřena; pojďme vytvořit chytrý materiál, abychom viděli, jak to funguje.
– Zaměřte se na novou ikonu úprav -vypadá jako váza-, tato byla přidána a dříve neexistovala a funkce aktualizace je nakonfigurována pomocí rotujících okrajů.
Je to přídavná šířka dutiny: Hodnota 0 znamená, že dutina je převzata z nastavení materiálů tak, jak je.
Hodnoty menší znamenají ostřejší dutinu, více než 0,5 – rozšíření dutiny. Nebo samozřejmě potřebujete ve scéně vrstvu dutin RGB, abyste mohli měnit šířku dutiny.
Funguje pouze za takových podmínek: více na konkávní, více na konvexní, méně na konkávní, méně na konvexní, více nebo ploché a více na zakřivené (můžete použít kterýkoli z těchto režimů).
– Nový parametr je zodpovědný za dutinu rádiusu. Ovlivňují to také úpravy stupně a kontrastu.
Nástroj pro lehké Baking
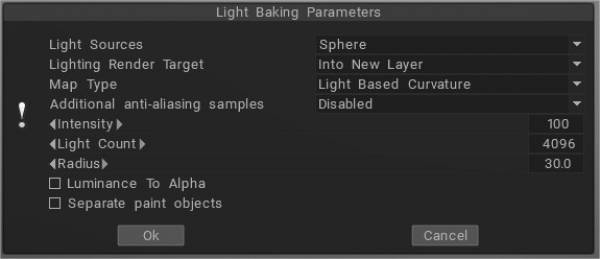
Light Baking Tool : Toto video popisuje nástroj Light Baking v 3DCoat.
Light Based Curvature : přesněji vypočítá výsledek na UV překrytí; černé oblasti se již neobjevují na různých objektech, které mají stejné UV souřadnice.
Tloušťka: Podobně jako AO vrhá paprsky z povrchu pletiva dovnitř. Může být použit ve stínování SSS.
Světlo z renderovací místnosti: Pokud si přejete bake světlo bez prostředí, použijte „světlo z renderovací místnosti“ místo „Světlo a odrazy“.
Podpovrchový rozptyl:
Průsvitný:
Ohnuté normály: Použití ohnutých normál v rámci materiálů může pomoci zlepšit jejich reakci na osvětlení a stínování. Stanovuje průměrný směr okolního osvětlení.
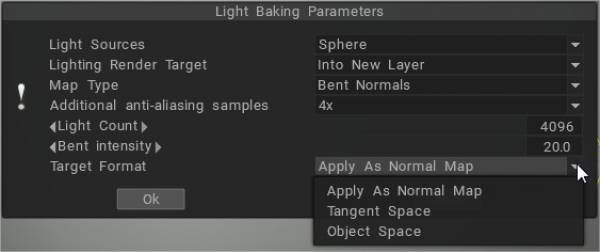
Příklad: Výhody použití Bent Normals
Světlo a odrazy: vyplňte vrstvu jakýmkoli reflexním inteligentním materiálem, bake svůj odraz a vytvoří reflexní vrstvu ve vrstvě textury. Zachytí jakékoli světlo, které jste nastavili v renderovací místnosti, včetně okolního světla.
Místní zakřivení: vypočítává zakřivení objektů s normal map a analyzuje zakřivení modelu v mnoha projekcích pixel po pixelu, což vám umožní získat přesnější a krásnější výsledek. Poloměr a intenzitu lze upravit.
Místní zakřivení RGB: Zakřivení s poloměrem 1, 20 a 100 se zapéká do kanálů RGB. (Použít dutinu RGB jako výchozí metodu výpočtu dutiny lze nastavit v Předvolbách).
Jako možná výchozí metoda výpočtu byla zavedena nová dutina RGB. V tomto případě bude vícerozsahová dutina vypočítána na GPU a v uživatelském rozhraní se objeví další ovládání podmínek/inteligentních materiálů, „Šířka dutiny“. Umožňuje změnu šířky/vyhlazení dutiny v reálném čase, což je velmi důležité pro realistické texturování PBR .
Šířku dutiny (pomocí dutiny RGB) lze použít pro chytré materiály pro každou vrstvu zvlášť. Každá vrstva materiálu má vlastní nastavení šířky dutiny. Umožňuje mnohem lepší efekty pro „stárnoucí“ materiály, jako je několik různě „stárlých“ vrstev barvy.
RGB dutina je vícerozsahová dutinová textura, každý kanál odpovídá jiné stupnici dutin. B je místní dutina, G je dutina středního rozsahu a R je dutina vzdáleného rozsahu.
Pokud již ve scéně máte starou vrstvu dutiny, musíte ji před použitím této funkce odstranit. To je velmi významný rys pro PBR malbu přes texturu/síť.
Pokud je dutina RGB ve výchozím nastavení povolena a načítáte scénu, která má vrstvu dutin ve starém stylu, Coat vás upozorní, že je lepší dutinu přepočítat, abyste získali lepší kontrolu.
Synchronizovat vrstvu s externím editorem: Tento příkaz umožňuje synchronizovat aktuální vrstvu s externím editorem. Cestu k editoru můžete nastavit v Předvolbách. (Výchozí nastavení je Adobe Photoshop.) Alfa kanál bude obsahovat masku průhlednosti.
Když zavoláte tento příkaz, program Adobe Photoshop se automaticky otevře s vaším souborem. Poté jej můžete změnit a přejít zpět na 3DCoat stisknutím CTRL+S.
Upravit všechny vrstvy v Ext. Editor: Upravte všechny vrstvy v externím editoru. Editor můžete změnit v nabídce Možnosti (ve výchozím nastavení Adobe Photoshop ). Tento editor by měl být schopen upravovat soubory PSD. Textura bude uložena jako vrstvy a otevřena jako soubor PSD v externím editoru. Poté můžete upravit texturu a dokonce přidat nové vrstvy. Když jej uložíte, 3DCoat jej automaticky znovu načte. Klávesová zkratka Ctrl+P
Upravit všechny vrstvy lesku: Upravte všechny vrstvy lesku v externím editoru.
Upravit všechny kovové vrstvy: Upravte všechny vrstvy lesku v externím editoru.
Upravit projekce v Ext. Editor: Aktuální projekci můžete upravit v Adobe Photoshop pomocí vrstev. Editor můžete změnit v nabídce Předvolby (ve výchozím nastavení Adobe Photoshop ). Tento editor by měl být schopen upravovat soubory PSD. Textura bude uložena jako vrstvy a otevřena jako soubor PSD v externím editoru. Poté můžete upravit texturu a dokonce přidat nové vrstvy. Když jej uložíte, 3DCoat jej automaticky znovu načte. Klávesová zkratka Ctrl+Alt+P
Project Through: Promítejte obraz přes všechny objekty, dokonce i přes zadní strany.
Měřítko promítání externího editoru : Dodatečné měřítko, které bude použito na promítaný obraz pro úpravy v externím editoru.
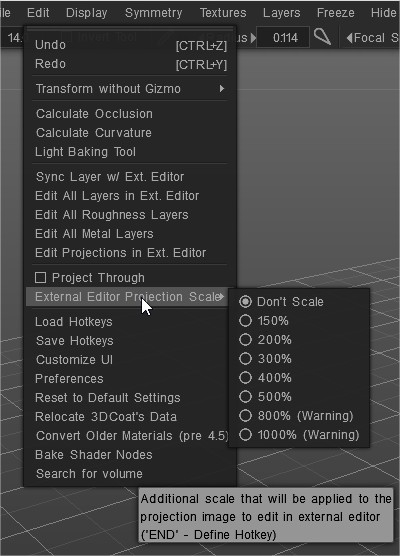
Načíst klávesové zkratky: Načte klávesové zkratky ze souboru.
Uložit klávesové zkratky: Uložení klávesových zkratek ze souboru.
Přizpůsobit uživatelské rozhraní: Odeberte/přizpůsobte prvek uživatelského rozhraní.
Předvolby: Nastavte klávesové zkratky, čas automatického ukládání, externí 2D editor, barvy uživatelského rozhraní a další…
Předvolby
Resetovat nastavení: Resetování je nutné, pokud se program chová nestabilně. Vyberte, která nastavení potřebujete resetovat. Možnosti souborů*.xml budou smazány. Program se restartuje, takže nejprve uložte změny
Přemístit data 3DCoat: Upravit umístění dat.
Převést starší materiály (před 4.5): Převést starší materiály (před 4.5)
Vyhledat objem:
Tutoriály
Rychlý tip Odstraňování problémů s AO Baking : Toto video ukazuje Rychlý tip pro odstraňování problémů s AO pečením v 3DCoat, pokud by se uživatel setkal s nepřiměřeným množstvím zpoždění.
AO Baking w/ OpenCL & Normal Map utilisation : Toto video pokrývá dvě hlavní nová vylepšení AO pečení v 3DCoat 4.5. Akcelerace OpenCL a využití normální mapy.
Pracovní postup Krita a 3DCoat Paul Geraskin.