We first brought you the most accurate and efficient automatic routines for adding usable Topology to Sculptural models, both organic and hard surfaced.
These routines greatly reduce the number of man-hours needed to create 3D assets from start to finish.
Automatic tools will often produce completely usable models -ready for texturing and even animation- all with the minimum manual input and toil.
Autoretopo essential updates
– Works correctly with low-poly meshes (even with irregular triangulation with long triangles).
It may detect sharp edges even over relatively “soft” voxelized objects. It creates “feature strokes” automatically in this case.
– You need to turn on “Hardsurface” mode to enable this detection. Now voxelize+hardsurface combination has sense.
– The old Crease Angle option is gone because hard surface detection is no longer crease based. There may be concentration of small polygons near the edge and there is no crease between polygons, but visually it looks like a crease.
Current algorithm is no longer crease based, it takes the curvature into account as the main source of crease info.
Autopo command can be activated on “Sculpt Room > Geometry Menu > Autopo” or by right-clicking on any mesh in the Sculpt room. This will open a context menu where you can select the Autopo option.
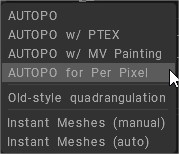
AUTOPO: Create edge loops with AUTOPO: This routine creates surface topology based on your specifications in the following dialogs and places the resulting polygonal mesh in the Retopo Room.
AUTOPO with Ptex: Runs the routine mentioned above and places the resulting mesh in the Paint Room for painting using Ptex. UV seams and Maps are created automatically.
AUTOPO with MV Paint: Runs AUTOPO and places the result in the Paint Room for painting with the “Micro-vertex” method. UV seams and Maps are created automatically.
AUTOPO for Per Pixel: Runs AUTOPO and places the result in the Paint Room for painting with the “per-pixel” method. UV seams and Maps are created automatically.
There are a few things to note about the AUTOPO tools. It is a good idea to enable symmetry planes to force symmetry during the process of creating automatic topology (assuming you want a symmetrical object).
If the object is not fully symmetrical, the program will keep symmetry only whenever possible.
If you do not like the automatic result, you can always go to the Retopo Room to manually adjust the mesh to suit your needs.
Also, when using this function, 3DCoat will automatically create a new sub-object in the Paint tab for each object layer in the Sculpt Tree.
Auto Retopo Multiple Layers: This video demonstrates how to Batch Process Multiple Layers when utilizing the Auto-Retopo toolset in 3DCoat. No more need to Auto-Retopo one layer at a time. This can be a big time and effort saver if you have many objects/layers.
Instant Meshes
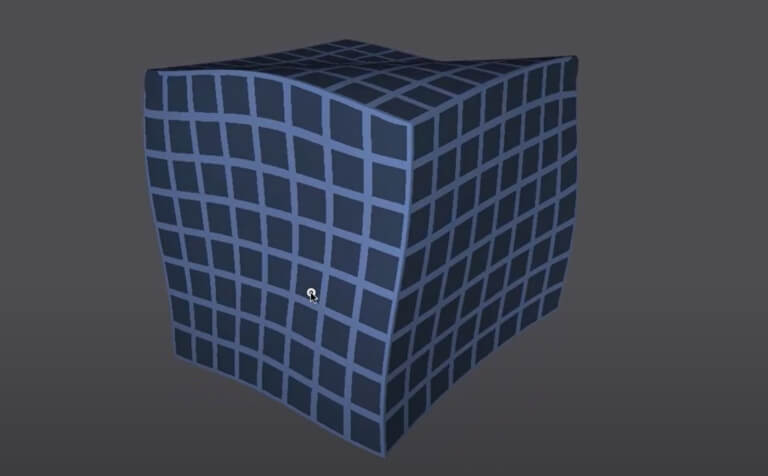
We present a novel approach to remesh a surface into an isotropic triangular or quad-dominant mesh using a unified local smoothing operator that optimizes both the edge orientations and vertex positions in the output mesh.
This algorithm produces meshes with high isotropy while naturally aligning and snapping edges to sharp features.
The method is simple to implement and parallelize, and it can process a variety of input surface representations, such as point clouds, range scans, and triangle meshes.
The full pipeline executes instantly (in less than a second) on meshes with hundreds of thousands of faces, enabling new interactive workflows and since the algorithm avoids global optimization, and its key steps scale linearly with input size, we can process extremely large meshes and point clouds, with sizes exceeding several hundred million elements.
Instant Meshes: This video is a brief overview of the Integration of the “Instant Meshes” Auto-Retopo engine into 3DCoat, as an option for using 3DCoat’s default Auto-Retopo engine.
For further information about Instant Meshes, please visit the following website of IGL and their more detailed demonstration of it.
Retopology Using Instant Meshes example video
Old-style quadrangulation

This is not good quadrangulation at all.
But if you don’t care about edge loops and need quads to mess quickly, use it.
Autopo Params
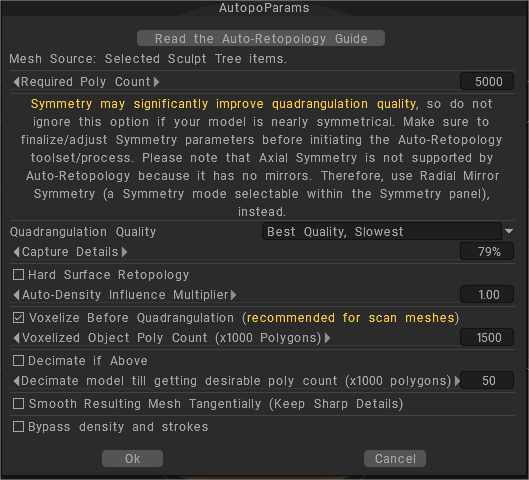
The Auto-Retopology guide give a brief information about the parameters of the autoretopo routine.
The result depends on the type of model used for retopology, for which there is no fixed guide. Everything translates to trial and error for each circumstance.
Mesh Source: Selected Sculpt Tree items
Required Poly Count: This is the polycount for the voxelized mesh. It is recommended to set it at least twice more than mesh polycount (after subdivision if applied).
Symmetry may significantly improve quadrangulation quality, so do not ignore this option if your model is nearly symmetrical.
Make sure to finalize/adjust Symmetry parameters before initiating the Auto-Retopology toolset/process.
Please note that Axial Symmetry is not supported by Auto-Retopology because it has no mirrors. Therefore, use Radial Mirror Symmetry (a Symmetry mode selectable within the Symmetry panel), instead.
Quadrangulation Quality: select the quality of the quadrangulation. Draft to have a quick idea of the flow of the contour or better to see the final result.

Capture Details: The higher the Capture Details value, the more poly stars can appear in the retopo mesh.
Hard Surface Retopology:
Auto-Density Influence Multiplier: Density of quads over the model will be generated automatically using local curvature. But in some cases you don’t need density variation (for example some hard surface models) or you need to emphasize density variation (to avoid losing fingers on the hand of the model).
Voxelize Before Quadrangulation (recommended for scan meshes): If object is completely closed and you don’t need hard surface quadrangulation, you may use voxelization to fix possible spikes or irregular geometry problems. It is recommended to voxelize first and then allow decimation.
Voxelized Object Poly Count (x1000 Polygons): Amount of polygons selected for voxelizing (multiplied by 1000).
Decimate if Above: Decimate model till getting desirable poly count (x1000 polygons).
Smooth Resulting Mesh Tangentially (Keep Sharp Details):
Bypass density and strokes: Skip “density” and “guides” dialogs and do auto-retopo completely automatic.
Density Shading

In models where you desire more polygonal density (for displacement purposes), 3DCoat allows you to designate these areas with a “mask”.
You can paint these regions with freehand Brush Tools, or you can make more precise designations by using the “E” Panel tools.
In practice, it is often helpful to allow AUTOPO to determine its topology without assistance -just to see which areas need more guidance- (this applies to Flow Guides, too).
Sometimes “no guidance” produces the best results.
After a first pass with AUTOPO, you will be able to see more clearly which areas need your manual help. It’s easy to get carried away, masking too many areas to be scrutinized by the algorithm.
Flow Guides
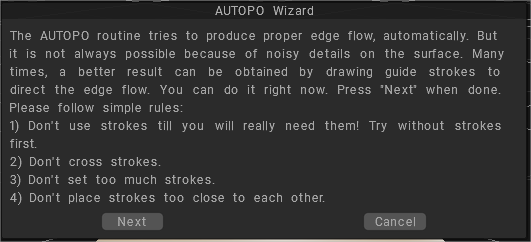
Flow Guides: When the user places no guides, AUTOPO usually produces good polygon flow throughout the resulting mesh, with no unwanted twisting. However, adding guides that do not reach far enough can result in this unpleasant twisting of edge loops and polygon rings.
The best practice, when dealing with organic shapes that have appendages (arms, legs, fingers), is to start and stop the guidelines before and after connecting joints, where a thinner piece of geometry meets a thicker piece (i.e., where an arm meets a shoulder or an arm joins a hand).
In these cases, the guide should be drawn as a continuous line starting before the shoulder and extending beyond the wrist and into the hand area. Fingers should be given guides that start and the tip and continue beyond the wrist when possible (the longer, the better). This helps eliminate any twisting.
In areas of your model where loop consistency is desired and there are no branching areas, use Through guides, longitudinally and laterally, starting and stopping the guideline outside of the mesh area.
These guides will, by default, be straight lines and serve to slice the model all the way through, saving you the time of drawing separate guides for the front and back surfaces.
This type of guide works well in areas like the torso and within the girth of an arm or leg, for example.
When a Through guide is used laterally across an area like an arm, it will form complete loops around the arm.
Automatic UV Unwrapping
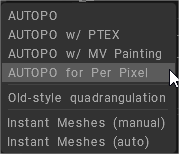
If you choose one of the more extremely automated options for AUTOPO, (“AUTOPO for Per-pixel”, for example), be aware that 3DCoat will mark and “Unwrap” your mesh in its automatic way.
This can often work out well, producing a UV Map with consistently sized quadrangles throughout, but the seams of this UV Map may be awkwardly placed for certain view angles and uses.
When you anticipate potential problems, it may be best to choose the simple “AUTOPO” function and mark all seams and Unwrap your mesh manually inside the “Retopo Room” before “Baking” your mesh into the Paint Room.
Tips for Hard Surfaces
Generally speaking, a hard-surfaced model will not be animated in an “organic” fashion but, if at all, will be animated along discreet “part” lines of construction (like a robot arm or leg, for example).
Even more, often is the case that a hard-surfaced model will not be animated within itself at all – but may only remain a static fixture or a model moving through space as a whole unit.
Sometimes a hard-surfaced model needs to have concrete divisions of texture space – designating unique texture areas that start and end along designated edges.
Each of these situations may require individual treatment and are, thus, better achieved by creating topology manually.
However, in those non-animated cases or where a texture will be consistent throughout (like a rusty boiler or a painted object consisting of one color).
AUTOPO could be the ultimate, time-saving alternative to manual texturing, UV marking, and unwrapping. In these cases, try running AUTOPO by offering, as your only input, the final, desired polycount. Add no Density Shading or Flow Guides.
Do a trial pass, letting AUTOPO do all the work and you may be surprised at the excellent results.
AUTOPO does a surprisingly good job at finding hard surface edges and divisions -relieving you of that responsibility- saving you time and sweat.
If you need to add input in the form of Guides or Density Shading, it can be necessary to use Orthographic Projections (front, side, back) without Perspective to accurately mark a “Through Guide” or a straight density demarcation.
Tutorials
Auto-Retopo multiple objects as one
Auto-Retopo for Hard Surface Models: This video covers tips for getting the best results when using the Auto-Retopo toolset on hard surface objects.
Auto-Retopo for Organic Models: This video covers some tips on using Auto-Retopo on more complex organic models.
Retopo Room Pt.4: AutoRetopo: This video continues the walkthrough of the Retopo toolset in 3D Coat but begins a deeper exploration of the new Auto-Retopo improvements.
Quick Start Auto-Retopo (Generate Mesh): This video concludes the Quick Start series for using Auto-Retopo in 3DCoat. The first video focused on Prepping the High Poly sculpt, and this video demonstrates the process of generating a low to medium poly retopo mesh using the Auto-Retopo wizard.
Quick Start Auto-Retopo (Model Prep): This video demonstrates some considerations and techniques for prepping one’s model before using the Auto-Retopo feature in 3DCoat.
 English
  Українська
 Español
 Deutsch
 Français
 日本語
日本語 Русский
 한국어
한국어 Polski
 中文 (中国)
 Português
 Italiano
 Suomi
Suomi Svenska
 中文 (台灣)
 Dansk
Dansk Slovenčina
 Türkçe
 Nederlands
 Magyar
 ไทย
ไทย हिन्दी
 Ελληνικά
 Tiếng Việt
 Lietuviškai
 Latviešu valoda
 Eesti
Eesti Čeština
 Română
 Norsk Bokmål