 Norsk Bokmål
  English
 Українська
 Español
 Deutsch
 Français
 日本語
日本語 Русский
 한국어
한국어 Polski
 中文 (中国)
 Português
 Italiano
 Suomi
Suomi Svenska
 中文 (台灣)
 Dansk
Dansk Slovenčina
 Türkçe
 Nederlands
 Magyar
 ไทย
ไทย हिन्दी
 Ελληνικά
 Tiếng Việt
 Lietuviškai
 Latviešu valoda
 Eesti
Eesti Čeština
 Română
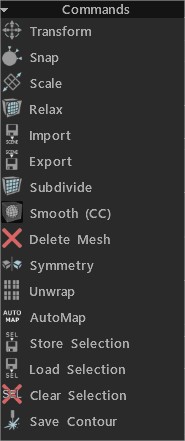
Transformer: Transformer valgte ansikter/vertekser. Hvis ingenting er, vil hele det valgte nettet bli transformert.
Snap: Fest retopo mesh toppunkter til overflaten. Det hjelper hvis du har endret objektets tilstand i scenen og ønsker å feste retopo nettverk på nytt. Bare utvalgte toppunkter vil bli påvirket hvis du er i “Velg”-verktøyet i toppunktmodus.
Skala: Skaler valgt eller hele mesh. Hver koblingsklynge vil bli transformert separat.
Slapp av: Slapp av hele retopo nettet eller undersettet. Hvis du er i “Velg”-verktøyet i toppunktmodus, vil bare utvalgte toppunkter bli påvirket.
Import: Import retopo mesh.
Export: Export poly mesh.
Del inn .
Glatt (CC): Del inn og jevn ut den gjeldende gruppen med Catmull-Clark-underavdelingen.
Slett mesh .
Symmetri: Påfør symmetri på nettet.
Unwarp: Plasser alle øyene på UV kartet.
Butikkvalg .
Lastevalg .
Fjern markering .
Lagre kontur: Denne kommandoen lar deg lagre kontur i reell skala som EPS eller DXF for ytterligere laserskjæring. Lengden på linjene tilsvarer den geometriske lengden. Det er nyttig hvis du vil kutte figurer med en laserskjærer og lime sammen deler.
Valgt
Utvid: Utvid området til valgte elementer.
Kontrakt: Kontraher arealet til valgte elementer.
Transformer: Transformer valgte ansikter/vertekser. Hvis ingenting er valgt, vil hele nettet bli transformert.
Normal ekstruder: Ekstruder langs den gjennomsnittlige normalretningen. Husk at nye hjørner ikke blir snappet automatisk, men de vil snappe i ytterligere operasjoner hvis du ikke slår av Auto snap.
Ekstruder ansikter: Ekstruder ansikter slik at hver side vil bli flyttet med samme avstand når det er mulig. Vær oppmerksom på at i noen tilfeller er forskyvning av nøyaktig parallelle flater umulig, men 3DCoat prøver å forskyve så nøyaktig som mulig.
Ekstruder toppunkter: Ekstruder flater slik at hvert toppunkt vil bli forskjøvet i samme avstand.
Intrude: Intrude valgte ansikter.
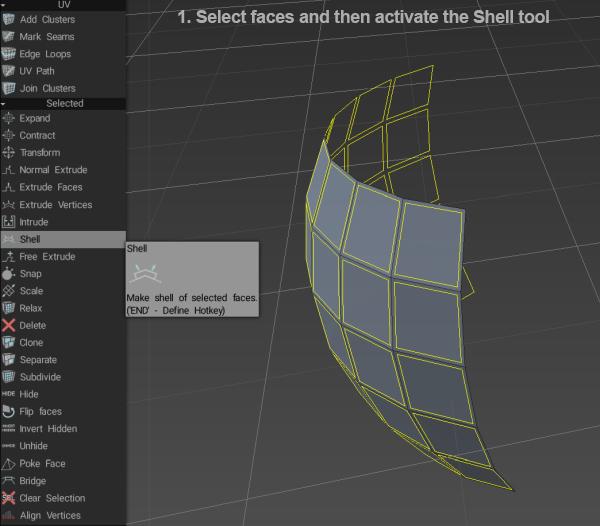
Skall: Lag et skall av utvalgte ansikter. Fluffy sa: Velg først ansiktene du vil “størkne”, og aktiver deretter Shell- verktøyet …
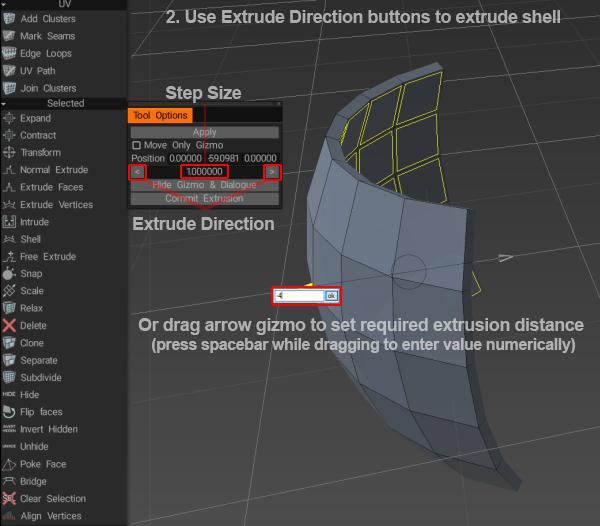
Bruk deretter knappene i Verktøyalternativer- vinduet eller pil-dip for å stille inn mengden ekstrudering…
Gratis ekstruder: Ekstruder i alle retninger. Husk at nye hjørner ikke blir snappet automatisk, men de vil snappe i ytterligere operasjoner hvis du ikke slår av Auto snap.
Cut Edges: Cut Edges i like segmenter. Brukeren vil forhåndsbestemme antall segmenter langs den(e) valgte kanten(e).
Snap: Fest retopo mesh toppunkter til overflaten. Det hjelper hvis du har endret objektets tilstand i scenen og ønsker å feste retopo nettverk på nytt. Bare utvalgte toppunkter vil bli påvirket hvis du er i “Velg”-verktøyet i toppunktmodus.
Skala: Skaler valgt eller hele mesh. Hver koblingsklynge vil bli transformert separat.
Slapp av: Slapp av hele retopo nettet eller undersettet. Bare utvalgte toppunkter vil bli påvirket hvis du er i “Velg”-verktøyet i toppunktmodus.
Roter CW: Roter valgte kanter med klokken.
Roter moturs: Roter valgte kanter mot klokken.
Ekstruder: Ekstruder valgte kanter.
Del: Velg flere kanter, og klikk deretter på Del. Flytt musen over kantene for å spesifisere delingsposisjonen, og klikk deretter for å dele. Du kan utløse dette verktøyet og dele valgte kanter ved å bruke INSERT-tasten.
Skjul: Bruk BKSP for å skjule valgte kanter.
Slett: Bruk DELETE-tasten for å slette valgte kanter.
Edge Loop: Trykk på L for å velge en kantløkke. Velg to kanter på en kantløkke for å begrense effekten.
Kantring: Trykk på R for å velge en kantring. Velg to kanter på en kantring for å begrense effekten.
Sel.Sharp: Velg skarpe kanter.
Del kant: Del opp de valgte kantene.
Bro: Ved å velge to kanter kan du lage et ansikt.
Sett sømmer: Merk valgte kanter som sømmer (i UV forhåndsvisningsvindu).
Slett UV sømmer: Slett sømmer over valgte kanter (i UV forhåndsvisningsvinduet).
Merk som skarp: Merk valgte kanter som skarpe. Normaler vil bli delt langs kantene.
Clear Sharp: Klare, skarpe kanter. Normaler vil ikke deles.
Butikkvalg: Butikkvalg.
Load Selection: LoadSelection.
Slett utvalg: Slett utvalg.
Align Vertices: Alignment Vertex by Plane. Du kan se bevegelsesretningen til toppunktene. Hvis ansikter er valgt, kan justering skje etter sirkel (Du kan redigere sentrum av sirkelen og radius), sylinder eller kule.
Justering med plan Ortogonal til Normal er implementert.
Hele mesh
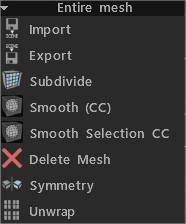
Import: Import retopo mesh.
Export: Export retopo mesh.
Del opp: Del opp polymesh.
Glatt (CC): Del inn og jevn ut den gjeldende gruppen med Catmull-Clark-underavdelingen.
Smooth Selection CC: Del inn og jevn ut valgte ansikter ved hjelp av Catmull-Clark-algoritmen.
Slett mesh: Slett poly mesh.
Symmetri: Påfør symmetri på nettet.
Pakk ut: Plasser alle øyene på UV kartet.