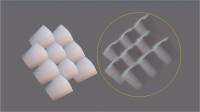
Альфа управляет формой кисти. Альфа — это карта интенсивности в градациях серого.
Используйте клавишу «T» для быстрого доступа к панели кистей.
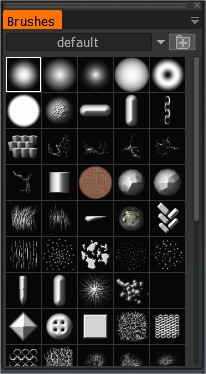
Это список кистей в 3DC. Вы можете добавить свои собственные кисти в формате TGA, PSD или ABR (формат пера, используемый в Adobe Photoshop). Нажмите на значок «Папка», чтобы добавить ее. Добавленная кисть появится в списке доступных кистей.
Вы также можете использовать 3D-модель в качестве кисти.
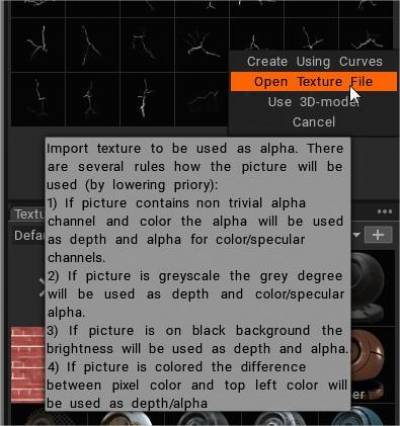
Кисть можно раскрасить, если изображение содержит альфа-канал. В этом случае альфа-канал будет использоваться как маска глубины.
Последовательность рисования
Выберите несколько кистей одновременно (shift+ЛКМ) и рисуйте, чтобы последовательно рисовать. Используя CTRL или SHIFT для выбора нескольких перьев, вы увидите несколько перьев, выбранных в предварительном просмотре, они будут использоваться случайным образом.
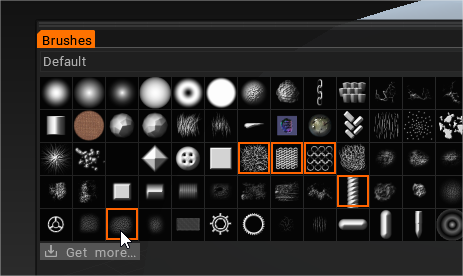
Радиус Brush
Чтобы изменить радиус Brush , используйте клавиши «[» и «]» или колесо мыши (при условии, что соответствующие настройки были сделаны в меню «Настройки»).
Глубинное давление
Чтобы изменить глубину, нажмите «—» и «+» или колесо мыши (при условии, что соответствующие настройки были сделаны в меню «Настройки»). Вы можете сделать то же самое, используя ползунки на верхней панели пера.
Гладкий
Сначала нажмите SHIFT и снова нарисуйте. Вы увидите, как поверхность разгладится.
Измените интенсивность сглаживания с помощью ползунка «Сглаживание».
Прямые линии
Сначала нажмите и удерживайте ЛКМ, затем нажмите SHIFT и снова нарисуйте. Тогда вы сможете рисовать очень прямые линии, как в Photoshop. Щелкните CTRL и нарисуйте — полости будут нарисованы.
Повернуть Brush
Вы можете видеть, как красная линия вращается на курсоре Brush , когда нажимается «(» или «)». Если вы выберете асимметричную форму Brush , то этот поворот покажет ориентацию Brush .
Вы можете использовать горячие клавиши «(» и «)» или колесо мыши (в соответствующих настройках в меню «Настройки»), чтобы вращать перо против часовой стрелки или по часовой стрелке соответственно. Параметры вращения варьируются от 1 до 360 градусов.
Панель «Brush» (или «Альфа») позволяет выбирать изображения, которые можно использовать для создания различных профилей кисти.
Это «профили», которые влияют как на глубину применения Brush , так и на форму «щетинок».
Однако в 3DCoat они состоят из четырех каналов рисования, и каждая «Brush» включает в себя 4 слоя, которые располагаются в виде Color-Transparency, HeightMap, Specular и EraseMask.
Порядок этих слоев во внешнем редакторе важен. Рассматривая каждый из них в отдельности:
- Цвет/прозрачность
- Высота/Глубина
- Зеркальный
- Стереть маску
Таким образом, каждая Brush может рисовать несколько каналов одновременно, если вы захотите. Делая их менее «Альфа» и больше похожими на многоканальный кончик кисти для изображения. Мы сохраняем термин «Альфа», чтобы соответствовать стандартным отраслевым терминам.
Brush альфа также может быть построена из файлов 3D-объектов, извлекая карту высот на основе вида модели.
Выберите понравившуюся Brush из списка значков. Нажмите на значок «Папка», чтобы добавить больше.
Вы можете добавить свои собственные кисти в формате TGA, PSD или ABR (формат, используемый в Adobe Photoshop).
Добавленная Brush появится в списке доступных кистей. Вы также можете использовать 3D-модель в качестве ручки.
Кисть можно раскрасить, если изображение содержит альфа-канал. В этом случае альфа-канал будет использоваться как маска глубины. Используйте CTRL или SHIFT, чтобы выбрать несколько кистей, вы увидите несколько выбранных кистей в предварительном просмотре, они будут использоваться случайным образом.
Параметры правой Brush мыши
Щелчок правой кнопкой мыши на любом невыбранном альфа- Brush вызывает полный список функций редактирования альфа-канала.
Параметры Brush Открывает панель «Параметры Brush ».
Удалить Brush: удаляет выбранную Brush.
Сохранить в PSD/TIF: сохраняет выбранный альфа-канал Brush в любом формате файла.
.PSD более интуитивно понятен, а .TIF более точен, предоставляя вам больше каналов для сохранения и управления в другом месте.
.TIF может содержать семь каналов — RGB, альфа, высота, отражение и «Стирание маски».
Загрузить из PSD/TIF: Это заменяет альфа-канал, по которому щелкнули правой кнопкой мыши, на выбранный вами вариант, сохраненный в формате .psd или .tif.
Редактировать во внешнем редакторе: создает «живое» соединение между 3DCoat и внешним редактором, который вы указали в разделе «Настройки» (редактор по умолчанию — Photoshop).
При выборе этого параметра открывается указанный редактор, и любые изменения, которые вы делаете и сохраняете из редактора, автоматически загружаются обратно в 3DCoat.
Редактировать как 16-битный TIF: это позволяет сохранять в 16-битном формате, а не в 8-битном. При использовании этого параметра Brush сохраняется в виде файла .psd, что позволяет автоматически перезагружать ее каждый раз, когда она редактируется и сохраняется во внешнем редакторе.
Раскрывающееся меню «Brush»
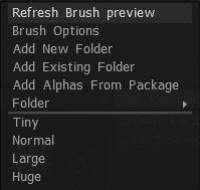
В правой части вкладки вы увидите стрелку, указывающую вниз. Это открывает набор функций, позволяющих вам просматривать и изменять текущие настройки Brush , добавлять и создавать новые папки с Brush , а также добавлять «пакеты» Brush и выбирать размер отображения для вашей Brush.
– Нажав на это, появится много дополнительных дополнительных опций:
Обновить предварительный просмотр Brush : обновляет значок альфа-канала.
Панель параметров Brush : открывает панель параметров Brush .
Добавить новую папку: это позволяет вам выбрать предварительно определенную папку альфа-форм, которые будут добавлены в список «Папка».
Эта опция позволит вам скопировать Brush (которую вы щелкнете правой кнопкой мыши) в папку, названную в «Списке папок», который вы определили ранее. Все определенные вами имена «Новой папки» появятся здесь.
Добавить существующую папку: позволяет выбрать одну кисть из папки, тем самым добавляя все кисти в папке для включения в папку, теперь с именем выбранного файла, который затем отображается в списке выбора «Папка». .
Добавление изображений из существующей папки: будет создана новая папка Brushes/Strips с тем же именем. Выберите хотя бы один файл, чтобы автоматически добавить все файлы из папки в список.
Добавить кисти из пакета: Добавляет кисти, которые были упакованы в файл формата «Penpack».
Если вы хотите создать свой собственный пакет и поделиться своими пользовательскими кистями, нажмите ПКМ и используйте команду create .penpack.
Папка: выберите папку с кистями. Список выбора всех папок, к которым вы разрешили доступ 3DCoat . Значки из этой выбранной папки будут видны на «Панели кистей».
Размер значка: Вы также можете изменить размер значков на указанный размер.
Tiny: набор значков альфа-канала имеет очень маленький размер.
Обычный: устанавливает для альфа-значка размер по умолчанию, который виден при первом открытии программы.
Большой: устанавливает размер альфа-значка больше, чем размер по умолчанию.
Огромный: увеличивает размер значка альфа-канала.
Репликация объектов на поверхности модели : в этом видеоролике начинается демонстрация различных методов, которые можно использовать для создания объекта в 3DCoat и либо создания из него альфа-канала 3D- Brush , либо репликации его экземпляров вдоль поверхности другого объекта.
Bake Your Rock Brush Using 3DCoat Y Export : в этом видео Anton Tenitsky показывает, как export фотоскан в максимальном качестве, чтобы использовать его в качестве новой кисти для скульптурного моделирования.
Как import файлы .abr
Нажмите на три горизонтальные точки в правом верхнем углу панели «Brush» и выберите «Добавить новую папку».

(Или нажмите плюсик).
Внутри этой папки нажмите символ плюс
Выберите опцию открыть файл текстуры, выберите файл .abr.
Вы также можете перетащить файл в область просмотра, и появится всплывающее диалоговое окно с параметрами import .
Учебники
Создание Brush : в этом видео я рассказываю о создании и импорте файлов изображений PSD из фотошопа и файлов 3D-объектов в качестве кистей. Джавис Джонс.
Создание пользовательских Brush кистей и Brush Move Stamp : в этом демонстрационном видеоролике рассматриваются две новые функции 3DCoat. В том числе возможность создать свою собственную альфа-кисть с помощью редактора профилей кривых, а затем новую кисть Move Stamp Brush (на панели E). Это позволяет вам предварительно просмотреть результат, но перемещать его по модели, пока вы не будете довольны размещением.
Поддержка альфа-каналов квадратных Brush : в этом видеоролике демонстрируется поддержка альфа-каналов квадратных кистей в 3DCoat. При первой загрузке изображений/альфа-кистей никаких дополнительных шагов не требуется. В этом видео основное внимание уделяется использованию ранее загруженных поддонов щеток для использования новой опоры.
Доступ к кистям и панелям с помощью горячих клавиш . В этом видеоролике демонстрируется возможность использования горячих клавиш для перемещения панелей и палитр прямо к курсору, а также то, как предотвратить переключение 3DCoat на разные пакеты кистей при выборе другой кисти или инструмента.
 Русский
  English
 Українська
 Español
 Deutsch
 Français
 日本語
日本語 한국어
한국어 Polski
 中文 (中国)
 Português
 Italiano
 Suomi
Suomi Svenska
 中文 (台灣)
 Dansk
Dansk Slovenčina
 Türkçe
 Nederlands
 Magyar
 ไทย
ไทย हिन्दी
 Ελληνικά
 Tiếng Việt
 Lietuviškai
 Latviešu valoda
 Eesti
Eesti Čeština
 Română
 Norsk Bokmål