 Русский
  English
 Українська
 Español
 Deutsch
 Français
 日本語
日本語 한국어
한국어 Polski
 中文 (中国)
 Português
 Italiano
 Suomi
Suomi Svenska
 中文 (台灣)
 Dansk
Dansk Slovenčina
 Türkçe
 Nederlands
 Magyar
 ไทย
ไทย हिन्दी
 Ελληνικά
 Tiếng Việt
 Lietuviškai
 Latviešu valoda
 Eesti
Eesti Čeština
 Română
 Norsk Bokmål
Значки переключения каналов в Paint Room
3DCoat имеет три канала, которые вы можете рисовать в любой момент.
Прежде чем вы узнаете, как каждый инструмент работает в режиме рисования, вы должны узнать о рисовании в каналах «Глубина / Цвет / Глянец», а также узнать о выборе цвета и типах рисования.
Этот значок при щелчке ЛКМ будет включать или выключать канал. Если канал выключен, вы увидите большой крестик над соответствующим значком.
Справа вы можете видеть на изображении эти три значка. Они слева направо:
- Глубина: используйте ползунок глубины, чтобы отрегулировать степень выдавливания, применяемую во время рисования. Используйте ползунок сглаживания, чтобы отрегулировать степень сглаживания, применяемого при рисовании с нажатой клавишей SHIFT. Для просмотра меню используйте D .
- Цвет: используйте ползунок непрозрачности, чтобы настроить количество применяемого цвета. Нажмите, чтобы отключить цвет. С помощью кнопки определяется правило рисования цвета. Для просмотра меню используйте C .
- Glossiness: управление интенсивностью канала Glossiness. Нажмите, чтобы включить или выключить глянцевость. Чтобы просмотреть меню, используйте R .
Используйте клавишу «~» для быстрого доступа к полупрозрачной панели, содержащей параметры для всех трех каналов в компактном виде (вы можете закрепить ее в любом месте вашего рабочего пространства).
Также, если вы наведете курсор на каждый значок, вы заметите, что для каждого есть еще несколько параметров, которыми также можно управлять с помощью ПКМ + перетаскивания вверх/вниз или влево/вправо.
- ПКМ и перетаскивание мыши вверх/вниз изменит интенсивность вашей Brush.
- ПКМ и перетаскивание мыши влево/вправо изменит размер вашей Brush.
Глубина
Наведите курсор на фиолетовую сферу и щелкните. Нажав здесь, вы можете включить или выключить глубину.
Если над сферой есть «X», она будет отключена.
Опция аддитивного рисования позволяет активировать/деактивировать опции аддитивного применения при рисовании линий. Если активно аддитивное рисование, две линии рисуются одна над другой.
Примечательно, что если эта опция отключена, крест создается только с объектами, нарисованными в текущем слое.
Красная линия на курсоре пера отображает глубину лежащего рельефа. Нажимайте клавиши «-» и «+» или колесико мыши (под соответствующими настройками в меню «Настройки»), чтобы увидеть, как изменяется глубина.
Если перо имеет сложную форму, следует прикладывать меньшее усилие, чтобы предотвратить резкие перепады высоты изображения. С другой стороны, было бы сложно представить весь объект как низкополигональный объект с картой нормалей; будут видны сильные геометрические искажения.
С помощью ползунка «Сглаживание» вы можете изменить уровень сглаживания. При нажатии клавиши SHIFT на курсоре пера появится зеленая линия, а нажатием клавиш SHIFT «+» и «—» или КОЛЕСА МЫШИ (при условии, что в меню «Настройки» были сделаны соответствующие настройки) можно настроить уровень сглаживания.
Цвет
Наведите курсор на значок «Цвет». Нажав на значок «серый X», вы запретите отрисовку цвета для текущей текстуры. Нажатие на значок зеленой сферы включает редактирование в диффузном канале, но без дополнительной текстуры, наложенной на канал. Если выбрана текстура, также есть значок папки и квадрат с текстурой. Нажмите на папку, чтобы заменить текстуру.
Ползунок «Непрозрачность» — это прозрачность, применяемая к цвету пера во время рисования. Вы можете уменьшить или увеличить прозрачность с помощью горячих клавиш «О» и «Р» соответственно. Вы можете видеть, что в зависимости от прозрачности цвет сегмента меняется на курсоре пера. Сегмент приобретает синий цвет, а его размер зависит от прозрачности.
Наведите курсор на раскрывающийся список, чтобы увидеть следующее. Здесь вы можете определить правило выбора цвета для рисования. Вы можете рисовать основным цветом или использовать смесь основного и фонового цветов:
- Текущий цвет. Используйте текущий цвет для рисования.
- Случайным образом один из двух цветов. Используйте один из двух цветов (текущий или дополнительный) случайным образом для рисования.
- Используйте случайный цвет между ними. Используйте случайное сочетание двух основных цветов.
Глянец
Выбрав значок сияющей сферы, вы активируете рисование в канале Glossiness. С помощью ползунка «Интенсивность» вы можете изменить отражающие свойства, применяемые во время рисования. Горячие клавиши «<» и «>» или колесико мыши (при соответствующих настройках в меню «Настройки») позволяют быстро изменить параметр Glossiness.
В отличие от непрозрачности, шероховатость будет увеличиваться до значения, установленного на панели инструментов.
Параметры верхней панели инструментов
Меню верхней панели инструментов настраивается в соответствии с рабочей областью, в которой вы работаете.
Поскольку некоторые параметры пера находятся в верхней строке меню, вы заметите, что когда вы меняете инструмент, то же самое происходит и с частью строки меню. Эти параметры: «Мягкий ход», «Зависимость от давления», «Радиус», «Сглаживание», «Глубина» и т. д.
Устойчивый ход: в этом режиме штрихи будут более точными из-за дополнительного сглаживания траектории.

Инструмент «Инвертировать»: Инструмент «Инвертировать». Переключить функцию текущего инструмента, например, удерживая нажатой клавишу CTRL.
Радиус: позволяет увеличивать и уменьшать размер пера в окне просмотра с помощью ползунка или путем ввода значения вручную. Это относительно масштаба сцены, которую вы установили.
Настройка параметров тейперинга: тейперинг позволяет нам модулировать или заменять давление пера значениями, полученными из нашей кривой.
Сдвиг фокуса: этот ползунок регулирует четкость альфа-канала, скорректированного вокруг центральной точки. Чем выше значение, тем мягче края большинства фигур (активируйте этот параметр в настройках).
Falloff: это позволяет вам управлять кистью с помощью кривой спада, обеспечивая более жесткий контроль над радиальной областью, на которую кисть влияет на глубину.
Глубина: это позволяет вам изменять интенсивность глубины ваших штрихов с помощью ползунка или путем ввода значения вручную.
Сглаживание: это позволяет увеличивать и уменьшать интенсивность сглаживания с помощью ползунка или путем ввода значения вручную.
Непрозрачность: это позволяет увеличивать и уменьшать интенсивность прозрачности цветовых каналов с помощью ползунка или ввода значения вручную.
Интенсивность глянца: это позволяет увеличивать и уменьшать интенсивность канала глянца с помощью ползунка или вручную, вводя значение. Меньшее значение дает рассеянный свет, более высокие значения дают более резкий свет.
Roughness: контролирует резкость отражений.
Металличность: изменение интенсивности металличности. Более высокое значение дает более высокую отражательную способность, более низкие значения дают более низкую отражательную способность.
Ограничитель условий : Еще одна важная функция на верхней панели — ограничитель высоты/цвета или условия. Эта функция позволяет вам, например, рисовать больше в полости, больше на пиках или больше на определенном цвете или даже на маске.
Значки пера, мыши и замка
Эти три значка показывают, в каком режиме сейчас находится ваш стиль. Вы можете переключаться с одного на другой, просто щелкнув ЛКМ по значку.
Значок мыши фиксирует давление пера на любое значение, которое вы имеете в соответствующем параметре, рядом с которым находится значок.
Значок пера позволяет нажимать перо непосредственно стилусом. Значок блокировки заблокирует размер пера «на экране». Это удобно, когда вы хотите изменить радиус пера, просто перемещая модель вперед и назад.
Значок замка рядом с ползунком глубины позволяет изменять радиус пера без изменения абсолютной глубины пера. В стандартном режиме радиус и глубина пропорциональны.
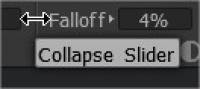
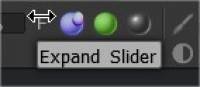
Сворачивание на панели инструментов
Вы также можете свернуть/развернуть настройки на панели инструментов, такие как Falloff, Depth и т. д. Это можно сделать, щелкнув в непосредственной близости от настройки, которую вы хотите свернуть. На изображении здесь показана область, по которой нужно щелкнуть, чтобы добиться этого.
Brush кисти
Определите, как радиус кисти зависит от давления кисти. Кривая будет использоваться только в том случае, если радиус кисти может зависеть от давления кисти.
Tapper (как для скульптурных, так и для живописных кистей)
Модификатор Taper : Taper позволяет модулировать или заменять давление пера значениями, полученными из кривой. Конечно, вам нужно включить или отключить зависимость радиуса или непрозрачности от давления, чтобы увидеть эффект. Само по себе тейперинг просто изменяет давление, а как вы его будете использовать – на ваше усмотрение. Обратите внимание, что длина сужения кратна текущему радиусу кисти.
Параметры дублирования слоев (для Sculpt Room)
Условия (ограничитель высоты/цвета) в Paint Room
Условия ограничения высоты/цвета
Выберите, как на глубину, цвет и блеск мазков кисти влияют цвета, высота и другие параметры. Не забудьте установить для него значение «Нет», когда вы закончите использовать эту опцию.
Учебники
Опция Anti-Bump Smoothing : в этом видео демонстрируется новая опция Anti-Bump Smoothing Option, доступная из меню комбинаций горячих клавиш SHIFT или CTRL + SHIFT при скульптинге в режиме Surface в 3DCoat.
Создание пользовательских Brush кистей и Brush Move Stamp : в этом демонстрационном видеоролике рассматриваются две новые функции 3DCoat. В том числе возможность создать свою собственную альфа-кисть с помощью редактора профилей кривых, а затем новую кисть Move Stamp Brush (на панели E). Это позволяет вам предварительно просмотреть результат, но перемещать его по модели, пока вы не будете довольны размещением.