 Русский
  English
 Українська
 Español
 Deutsch
 Français
 日本語
日本語 한국어
한국어 Polski
 中文 (中国)
 Português
 Italiano
 Suomi
Suomi Svenska
 中文 (台灣)
 Dansk
Dansk Slovenčina
 Türkçe
 Nederlands
 Magyar
 ไทย
ไทย हिन्दी
 Ελληνικά
 Tiếng Việt
 Lietuviškai
 Latviešu valoda
 Eesti
Eesti Čeština
 Română
 Norsk Bokmål
Панель слоев изменяется в зависимости от того, в какой комнате вы работаете. Слой не является базовым для объекта, а является своего рода слоем сцены.
В Paint Room слои используются так же, как в Photoshop или других приложениях для рисования, где аспекты каждого слоя можно контролировать независимо, например, режимы наложения и непрозрачность, но с дополнительным контролем над тем, как прорисовка глубины влияет на рассматриваемый слой.
В Sculpt room вместо информации о цвете есть информация о деформации для каждого слоя. Так, например, один слой может быть для больших деформаций лепки, а другой — для мелких деталей и т. д.
Чтобы bake деформацию скульпт-слоя, этого следует добиться передискретизацией меша.
Команды верхнего уровня
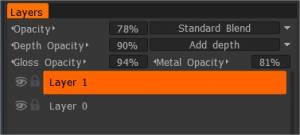
Непрозрачность: выберите значения непрозрачности, чтобы применить цвет.
- Режим смешивания непрозрачности: выберите метод смешивания цветов между цветом предыдущего слоя (слоев) и текущим цветом.
Непрозрачность глубины: выберите значения глубины для применения карт нормалей.
- Режим наложения глубины: выберите здесь режим наложения глубины:
- Добавить глубину: добавьте глубину слоя к предыдущему. Это стандартный режим наложения.
- Вычесть глубину: вычесть глубину слоя. Эта операция противоположна операции «Добавить глубину».
- Макс. Глубина: максимальное смещение будет выбрано между смещением этого слоя и суммой всех предыдущих слоев.
- Увеличить глубину: Экспоненциальное увеличение глубины. Нулевая глубина оставляет поверхность неизменной, положительные значения увеличивают амплитуду смещения, а отрицательные подавляют.
- Подавить глубину: экспоненциальное подавление глубины. Нулевая глубина оставляет поверхность неизменной, положительные значения подавляют амплитуду смещения, а отрицательные значения увеличивают ее.
Непрозрачность глянца: выберите значения для глянца, чтобы применить глянцевитость.
Непрозрачность металла: выберите значения для параметра Металл, чтобы применить металличность.
Если вы работаете с рабочим процессом Metalness/Roughness, непрозрачность глянца измените на непрозрачность Roughness.
Режимы наложения
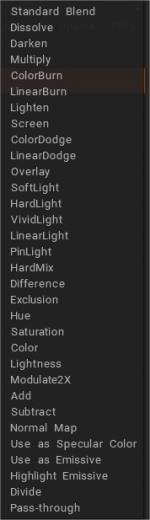
Выберите метод смешивания цветов между цветом предыдущего слоя (слоев) и текущим цветом.
- Сквозной: режим наложения применим только к группам. Это заставляет группу вести себя так, как будто группы не существует с точки зрения смешивания цветов.
- Emissive Map : Измените режим наложения, чтобы использовать любую карту в качестве эмиссионной (Glow map.)
—
Иконки отдельных слоев
Видимость слоя: просто переключите значок «Глаз», чтобы скрыть или показать выбранный слой. Удерживайте нажатой клавишу «Alt», чтобы скрыть все слои, кроме текущего.
Блокировка текстуры: Блокировка текстуры позволяет заблокировать текстуру цвета/глубины слоя независимо от его разрешения. Текстура в текущем состоянии будет сохранена на диск. Как только вы измените разрешение текстуры, заблокированная текстура будет использоваться вместо передискретизации пикселей текущего слоя. Это очень важно, если вы хотите прикреплять материалы к слоям и рисовать в низком разрешении. В этом случае окклюзия, полость и normal map должны быть сохранены в исходном разрешении. Эта функция помогает сохранить важные слои в исходном разрешении.
Значок с 6 точками (вверх/вниз): нажмите, чтобы выбрать и переместить текущий слой. Дважды щелкните, чтобы переименовать слой.
Значок со стрелкой вниз: смешивание слоев. Перейдите на вкладку «Смешивание».
Слой 0
– Что такое слой 0 в 3DCoat?
Думайте о слоях так же, как вы думаете о слоях Photoshop . Layer0 похож на фон в PS.
Что касается 3DCoat, думайте о непрозрачности как о альфа-значении цвета RBGA. Чтобы получить изменение непрозрачности (добавьте полупрозрачный мат и т. д.).
Вам нужно только рисовать с альфа-значением. затем, когда вы сейчас скроете слой 0, вы увидите полупрозрачный или полностью прозрачный слой с альфа-значением цвета слоя. Или вы можете установить непрозрачность слоя, например, если вы установите значение непрозрачности первого слоя как 0,3, затем скройте «слой 0», теперь вы должны видеть альфа-цвет слоя 0,3 (полупрозрачный).
Причина, по которой 3DCoat сохраняет видимость «слоя 0», заключается в том, что пользователь может легко раскрашивать (перезаписывать слой 0) сетку. (уровень 0 сохраняет альфа-канал равным 1,0 (без прозрачности), а идеальный цвет — 0,5 0,5 0,5 RGB).
Если слоя 0 нет, вы можете не видеть никакой поверхности, пока не import карту или не закрасите поверхность в другом слое. Это мешает нам рисовать.
После рисования или добавления смарт-материала с альфа-значением скройте слой 0, а затем export цветовую карту (рассеянный/альбедо) как RGBA (png, tiff и т. д.). Затем экспортированная карта цветов сохраняет альфа-значение.
или вы можете выбрать вариант export карты «Черно-белая непрозрачность» с картой цветов RBG.
Используйте альфа-значение цвета или export как карту непрозрачности (черно-белую) в зависимости от того, какое приложение рендеринга вы можете использовать. Тем не менее, большинство движков рендеринга и шейдеров могут правильно использовать альфа-канал цветовой карты.
Уровень 0: Избегайте использования его для каких-либо целей, кроме прозрачности.
Он содержит данные сетки и «базовый слой» краски для запекания.
Если вы сотрёте краску, всё равно хорошо bake . Однако созданные прозрачные области будут запекаться как альфа/транс.
Кроме того, если вы скроете слой 0, он отлично запекается и полностью с альфа / транс, тогда как любой другой слой не содержит данных о цвете.
Смещение всегда основано на слое 0. Но положение вершин в экспортируемом файле OBJ зависит от вашего выбора. Лучше использовать такие комбинации флажков export :
– набор 1:
[x] Использовать исходные позиции
[ ] Выбрать позиции из Layer0
[ ] Грубый…
Используйте его, если Слой 0 не был искажен.
– набор 2:
[ ] Использовать исходные позиции
[x] Выбрать позиции из Layer0
[х] Грубо…
Используйте его, если Слой 0 был искажен. Выбор из слоя 0 сохранит новые позиции, грубый подготовит его к дальнейшему подразделению.
Но если бы Layer X не был нормально искажен, то просто export смещения не помог бы. Вам нужно повторно запечь сетку, чтобы получить нормальное смещение или использовать векторное смещение.
Команды нижнего слоя
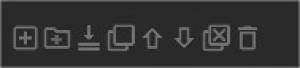
Значки в нижней части панели по порядку соответствуют следующим функциям:
Добавить новый слой: создает новый слой краски.
Создать группу папок: добавьте новую групповую папку.
Объединить вниз: объединить текущий слой со слоем ниже.
Дублировать: Дублировать выбранный слой.
Сдвинуть слой вверх: переместить слой вверх.
Сдвинуть слой вниз: переместить слой вниз.
Удалить все неиспользуемые слои: удалить все неиспользуемые слои.
Удалить: удаляет выбранный слой.
Меню слоев ПКМ
Щелчок правой кнопкой мыши по имени слоя открывает меню дополнительных команд.
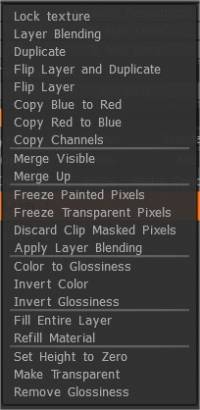
Блокировка текстуры: Блокировка текстуры позволяет заблокировать текстуру цвета/глубины слоя независимо от его разрешения. Текстура в текущем состоянии будет сохранена на диск. Как только вы измените разрешение текстуры, заблокированная текстура будет использоваться вместо передискретизации пикселей текущего слоя. Это очень важно, если вы хотите прикреплять материалы к слоям и рисовать в низком разрешении. В этом случае окклюзия, полость и normal map должны быть сохранены в исходном разрешении. Эта функция помогает сохранить важные слои в исходном разрешении.
Смешение слоев: Показать свойства текущего слоя.
Дублировать: Дублировать выбранный слой
Отразить слой и дублировать: Дублируйте слой и отразите его, используя топологическую симметрию.
Отразить слой: Отразить слой, используя топологическую симметрию.
Копировать синий в красный: этот параметр копирует синие части сетки в красные области. Сначала определите синие и красные области с помощью инструмента «Топологическая симметрия».
Копировать красное в синее: этот параметр копирует красные части сетки в синие области. Сначала определите красные и синие области с помощью инструмента «Топологическая симметрия».
Копировать каналы : Копировать любой канал одного слоя в любой другой канал этого или другого слоя.
Объединить видимые: объединяет все видимые слои вместе. Это действие необратимо.
Объединить вниз: объединить текущий слой со слоем ниже. «Отменить» недоступно.
Объединить: объединить этот слой и верхний слой. «Отменить» недоступно.
Заморозить закрашенные пиксели: заморозить только закрашенные области текущего слоя. Хорошо подходит для создания быстрых масок областей, которые вы не хотите закрашивать, которые уже были закрашены, или инвертирования после выполнения этой функции, чтобы замаскировать только незакрашенные области. Значение заморозки будет установлено равным прозрачности слоя.
Заморозить прозрачные пиксели: заморозить прозрачную часть слоя. Это важно, если вы хотите использовать маску прозрачности текущего слоя на другом слое. Используйте CTRL + ЛКМ на слое, чтобы выполнить то же действие.
Отменить маскированные пиксели обрезки: отбросить все пиксели, скрытые на текущем слое, замаскированные слоем маски обрезки.
Применить смешивание: применить смешивание и все эффекты к текущему слою.
Color to Specular: преобразовывает яркость цвета в зеркальный канал.
Color to Glossiness: преобразование яркости цвета в канал Glossiness.
Инвертировать цвет: инвертирует цвета на выбранном слое.
Инвертировать глянец: инвертирует глянец на выбранном слое.
Заполнить весь слой: Залейте весь слой, используя текущий материал и цвет.
Refill Material: повторно заполните непрозрачные области этого слоя текущим материалом. Удобно менять материал, используемый для заполнения слоя.
Установить высоту на ноль: устанавливает все высоты текущего слоя на 0.
Сделать прозрачным: слой станет полностью прозрачным. Удаляет все рисунки, сделанные на выбранном слое, и применяет прозрачность ко всем пикселям этого слоя.
Удалить глянец: Удаляет все значения глянца на выбранном слое и устанавливается на ноль.
Ярлыки слоев
Ctrl+Shift+N Добавить новый слой
Ctrl+Shift+Del Удалить слой
Дель Стереть Размороженный
Вставить заливку без заморозки
Ctrl+Insert Заполнить маской
Ctrl+Shift+D Дублировать слой
Ctrl+Shift+E Объединить видимые слои
Ctrl+E Объединить вниз
Ctrl+Insert Заполнить маской
Руководство
Группы слоев краски : в этом видео демонстрируется новая функция групп слоев краски в рабочей области 3DCoat Paint. Группы слоев в 3DCoat полностью совместимы с группами слоев в Photoshop.