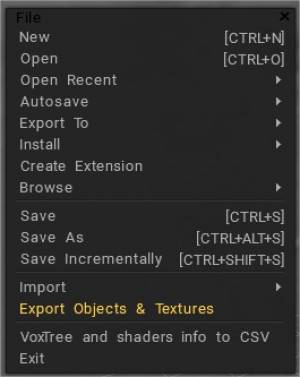
Новое: очистить всю сцену. Открыть: открыть файл Открыть недавние: список последних сцен. Автосохранение: список последних файлов автосохранения. Export в: Export сетки и текстур во внешнее приложение. Приложение должно быть запущено, а 3DCoat AppLink активирован. Установить: установить внешние файлы.
Установить расширение – (файл с расширением .3dcpack). Он может содержать текстуры, шейдеры, альфа-каналы, смарт-материалы, трафареты, объекты или любой другой контент, предоставленный создателем пакета.
Установите ассет Quixel как Smart Material: Сначала загрузите ассет в виде ZIP-файла. 3DC находит его автоматически, когда вы загружаете их в папку загрузки пользователя Windows.
Установите ресурс Quixel в виде шейдера. Сначала загрузите ресурс в виде ZIP-файла. 3DC находит его автоматически, когда вы загружаете их в папку загрузки пользователя Windows.
Создайте расширение, которое может содержать любые данные
Создать расширение: Создайте расширение, которое может содержать любые данные: текстуры, шейдеры, трафареты, смарт-материалы и т. д.
В этом видео показано, как установить и создать файлы 3DCpack.
Обзор: поиск в папках установки 3DCoat .
Import текстур > перенос вручную
3DCoat 2022 имеет совершенно новую структуру папок. Действительно обтекаемый и логичный, как это было предложено.
Почти все теперь разделено между двумя папками — data и UserPrefs.
Логично, что UserPrefs — это пользовательский контент.
Данные — это временная вещь.
Папка в документах изменилась, теперь это Docs/ 3DCoat/. Даже если структура папок изменена, она совместима с предыдущей. Как только 3DCoat обнаружит какие-то файлы, скопированные в новое место в Документах из старого, он преобразует файлы в новую структуру. Кроме того, если вы установите 3dcpack, он будет установлен правильно (за исключением пресетов, использующих старые инструменты, которых нет в наборе инструментов).
Таким образом, для перехода с более ранней версии вы можете скопировать папки из старой версии в Docs/ 3DCoat или создать 3dcpack в старой версии и установить его с помощью пользовательского интерфейса.
Сохранить : сохранить файл сцены. Сохранить как: сохранить текущую сцену под новым именем файла (CTRL+SHIFT+S). Сохранить постепенно: Сохранить текущий файл постепенно с новым именем — file_001.3b, file_002.3b и т. д. Это позволяет вам сохранять историю вашей работы, но не забывайте удалять файлы, которые вам больше не нужны, так как они занимают место на диске.
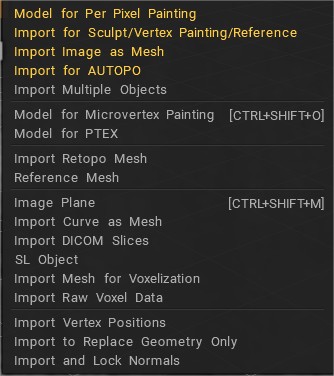
Меню Файл > Import
Import объекта: Import дополнительных объектов в сцену. Внимание: не import объекты с очень разными масштабами.
Import :
Модель для Painting по Per Pixel : Import модель для рисования непосредственно по пикселям в UV-наборе. Такой подход даст лучшее качество прорисовки текстуры, т.к. прорисовка будет выполняться непосредственно над пикселями на UV-наборе.
Import для Sculpt/ Vertex Painting/Reference: Import модели для вершинного рисования. Если модель имеет текстуру, она будет преобразована в цвет вершин. Кроме того, это хороший способ import огромные эталонные объекты.
Import изображение как сетку: Здесь вы можете создать сетку из набора изображений — цвет, рельеф, смарт-материал. Сетка будет готова для рисования вершин.
Import для AUTOPO
Import несколько объектов: эта команда позволяет выбрать несколько объектов и выбрать, что с ними делать — import каждый объект в новый слой, суммировать в текущий слой или вычесть все из текущего.
Модель для Painting Microvertex : Import модель из формата OBJ, LWO или FBX.
Модель для PTEX: Import модели для PTEX.
Import Retopo Mesh: Import внешнюю сетку, которая будет использоваться в качестве сетки ретопологизации. Это не эталонный меш, поэтому он должен быть низкополигональным!
Справочная сетка: Import сетку для использования в качестве эталона для инструмента ретопологии. Эту сетку можно дополнительно деформировать с помощью инструментов в Tweak room.
Плоскость изображения: Плоскость изображения.
Import кривую как сетку:
Объект СЛ:
Объект ВБД:
Import сетки для вокселизации: Import полигональную сетку для вокселизации в комнате скульптуры. Сетка должна быть закрыта. Если он не закрыт, вы должны import его с толщиной или сделать его закрытым.
Import необработанных данных Voxel : Import необработанных вокселей в виде набора значений внутри 3D-сетки.
Import Vertex Position: Вы можете import позиции вершин из внешнего меша. Вы можете import всю сцену или только некоторые объекты. Эта процедура сравнивает объекты по именам и заменяет позиции объектов с одинаковыми именами.
Import только для замены геометрии: замена геометрии в текстурах и слоях с сохранением сцены. Новая модель должна иметь аналогичную конфигурацию UV .
Import и блокировка нормалей: когда вы import сетку для per-pixel рисования, вы можете заблокировать нормали для лучшей совместимости с normal map , запеченной для этого набора нормалей. Но если вы не заблокировали нормали на начальном этапе, вы можете import и заблокировать их позже с помощью этой команды.
Вы также можете перетащить любой тип файла в окно просмотра, чтобы открыть команду import .
перетаскивания
Export
Export объектов и текстур: Export текущие объекты с текстурами. Export для Мастерской Steam:
Export для 3D-печати: Выход: выход из программы
Горячие клавиши меню «Файл»
Ctrl+N Новая четкая сцена Ctrl+O Открыть файл Ctrl+S Сохранить файл Ctrl+Alt+S Сохранить файл как Ctrl+Shift+S Сохранить постепенно Ctrl+Shift+O Import модели Ctrl+Shift+M Import плоскость изображения
 Русский
  English
 Українська
 Español
 Deutsch
 Français
 日本語
日本語 한국어
한국어 Polski
 中文 (中国)
 Português
 Italiano
 Suomi
Suomi Svenska
 中文 (台灣)
 Dansk
Dansk Slovenčina
 Türkçe
 Nederlands
 Magyar
 ไทย
ไทย हिन्दी
 Ελληνικά
 Tiếng Việt
 Lietuviškai
 Latviešu valoda
 Eesti
Eesti Čeština
 Română
 Norsk Bokmål