• ไทย
  • เอกสาร 3DCoat
  • Chapters
    • รู้เบื้องต้นเกี่ยวกับ 3DCoat
    • เริ่มต้นใช้งาน
    • อินเทอร์เฟซและการนำทาง
    • ส่วนประกอบของ Brush
    • ห้องพื้นที่ทำงาน
    • Scripting และ Core API
    • คำถามและคำตอบ
    • licensing
    • บทแนะนำการฝึกอบรม
  • Pilgway
  • Products
    • 3DCoat
    • 3DCoatTextura
    • 3DCoatPrint
    • PBRLibrary
  • Blog Posts
  • Store
  • ไทย ไทย
    • English English
    • Українська Українська
    • Español Español
    • Deutsch Deutsch
    • Français Français
    • 日本語 日本語
    • Русский Русский
    • 한국어 한국어
    • Polski Polski
    • 中文 (中国) 中文 (中国)
    • Português Português
    • Italiano Italiano
    • Suomi Suomi
    • Svenska Svenska
    • 中文 (台灣) 中文 (台灣)
    • Dansk Dansk
    • Slovenčina Slovenčina
    • Türkçe Türkçe
    • Nederlands Nederlands
    • Magyar Magyar
    • हिन्दी हिन्दी
    • Ελληνικά Ελληνικά
    • Tiếng Việt Tiếng Việt
    • Lietuviškai Lietuviškai
    • Latviešu valoda Latviešu valoda
    • Eesti Eesti
    • Čeština Čeština
    • Română Română
    • Norsk Bokmål Norsk Bokmål
  • Creating 3D Character Using 3DCoat
Expand All Collapse All
  • รู้เบื้องต้นเกี่ยวกับ 3DCoat
  • เริ่มต้นใช้งาน
    • System requirements
    • Why 3DCoat is Unique?
    • การเปิดใช้งาน 3DCoat
    • ข้อผิดพลาดในการเริ่มต้น
      • Startup error Mac
    • Color management
    • Upgrading permanent license
    • Linux Setup
      • Linux initial setup per-user installation
      • Linux initial setup for system
      • Tablet setup
      • To GTK3 from GTK2
    • โครงสร้างโฟลเดอร์
      • Custom documents folder
    • รูปแบบต่างๆ ของ “การแก้ปัญหา”
    • Tablet on Window
    • Import และ Export
    • Applinks ใน 3DCoat
      • ลิงค์แอป Blender
        • Blender with the Applink in Linux
      • Blender 4.2/3/4/5 applink
      • Max Applink
      • Houdini applink
      • Lightwave uplink
  • Navigation
    • การเปิดกล่องโต้ตอบ (เมนูเริ่มด่วน)
    • แผงนำทาง
    • กล้องและระบบนำทาง
      • Customize Navigation as Blender
    • Viewport Navigation Gizmo
    • Left tool panel
    •  Activity Bar
    • การนำทางโดยใช้อุปกรณ์ 3DConnexion
      • How to compile Spacenavd on non Ubuntu distro
    • Stylus doesn’t work in sculpting
    • ปุ่มลัด
  • อินเทอร์เฟซและการนำทาง
    • เมนูไฟล์
    • แก้ไขเมนู
      • Calculate Curvature
      • Calculate Occlusion
      • Light Baking Tool
      • การตั้งค่า
    • ดูเมนู
    • สมมาตร
    • Textures
    • Calculate
    • เมนูเลเยอร์
    • เมนูแช่แข็ง
    • Hide
    • Bake
    • เส้นโค้ง 2022
      • เมนูเส้นโค้ง
      • Curves Properties RMB
      • เติมชั้นตาข่าย
      • Scale of imported curves
    • เมนู Windows
      • แผงป๊อปอัพ Windows แบบแท็บ
      • สไลเดอร์
    • Scripts
    • Addons
    • Capture
    • เมนูช่วยเหลือ
    • การปรับแต่ง
    • แก้ไขหรือสร้างห้องใหม่
  • ส่วนประกอบของ Brush
    • แถบด้านบน Brush
    • แปรงใช้งานทั่วไป
      • สร้างแปรงและสติกเกอร์
      • สร้างอัลฟ่าจากการแกะสลักปัจจุบัน
      • สร้าง Brush จากวัตถุ 3 มิติ
      • Create brushes based on Curves
      • Load photoshop .abr brushes
    • จังหวะ
      • เมนูป๊อปอัพเส้นโค้ง
    • ตัวเลือก Brush
    • ตัวจำกัดเงื่อนไข
    • แผงแถบ
    • แผงลายฉลุ
    • วัสดุอัจฉริยะ
      • เพิ่มรูปภาพหรือวัสดุใหม่
      • แนบวัสดุอัจฉริยะเข้ากับเลเยอร์
      • Import Quixel Material
    • วิธีสร้างพรีเซ็ตสำหรับ Brush
  • ห้องพื้นที่ทำงาน
    • Painting
      • Painting พื้นผิวและโหมด
        • Painting Per-Pixel
        • Painting แทนที่ (Micro-Vertex)
        • Ptex Painting
        • Painting พื้นผิว (Polypainting)
      • นำเข้าสู่ห้อง Painting
        • Initial CC subdivision
        • UV Set smoothing
        • Sharp (hard) edge
        • ล็อคค่าปกติ
        • โหลดเค้าโครง UV ใหม่หลังจากการเปลี่ยนแปลงโมเดล
        • DAZ Genesis models into 3DCoat
      • เมนูของพื้นที่ทำงาน Painting
        • Edit menu
        • เมนูพื้นผิว
          • เครื่องมือ Baking พื้นผิว
        • ซ่อน
        • เมนูสำหรับ Bake Paint
        • ตัวเลือกสี
      • แถบด้านบนสำหรับ Painting
      • แผงเลเยอร์
        • แผงผสม
        • Layer and Clipping Masks
      • เครื่องมือห้อง Painting
      • ความทึบ - ความโปร่งใส
      • ปรับแต่งพื้นที่ทำงาน
        • ปรับแต่งชุดเครื่องมือ
        • ส่งออกจากห้องปรับแต่ง
      • แผงแสดงตัวอย่างหน้ากาก/วัสดุ
      • ส่งออกจากห้อง Painting
    • พื้นที่ทำงาน UV
      • แถบด้านบน UV
      • แผงเครื่องมือ UV ด้านซ้าย
      • แผงแสดงตัวอย่าง UV
      • ตัวอย่างขั้นตอนการทำงาน UV
      • นำเข้าห้อง UV
      • ส่งออกจากห้อง UV
    • รีโทโพโลยี
      • นำเข้าสู่ห้อง Retopo
      • เมนู Retopo Mesh และเมนู Bake
        • โหมดกระจกเสมือน
      • Bake menu
        • Treat Poly Groups as Paint Objects
        • Baking guide
      • ท็อปบาร์
        • เลือกรูปทรงเรขาคณิต
      • แผงเครื่องมือด้านซ้ายในห้อง Retopology
        • วัตถุประสงค์และหน้าที่โดยรวม
        • เพิ่มรูปทรงเรขาคณิต
          • เครื่องมือ Strokes ใน Retopology
        • เครื่องมือปรับแต่ง Retopo
        • เครื่องมือ UV
        • คำสั่งสำหรับห้อง Retopology
      • AUTORETOPO
        • Autopo guide
      • โพลีกรุ๊ป
    • ปั้น
      • Sculpt Layer
      • ต้นไม้แกะสลัก
      • ตัวเลือก Sculpt Brush
      • Top Bar
      • เครื่องยนต์ Brush
      • เมนูย่อยเรขาคณิต
      • แกะเมนู “คลิกขวา”
      • เฉดสี
      • โหมด Voxel
        • การแกะสลัก Voxel บริสุทธิ์
        • ความหนาแน่นและความละเอียด
        • เครื่องยนต์ดิน
        • เครื่องมือ Voxel
        • เครื่องมือพื้นผิวบน Voxels
        • เครื่องมือปรับแต่ง Voxel
        • Painting เชิงปริมาตร
        • เครื่องมือวัตถุ Voxel
      • โหมดพื้นผิว
        • เครื่องมือพื้นผิว
        • เครื่องมือปรับแต่งพื้นผิว
        • เครื่องมือปรับพื้นผิว
        • Painting พื้นผิว
        • เครื่องมือวัตถุพื้นผิว
        • ความละเอียดหลายระดับ
          • Multires tools
          • Multires adjust
          • Multires commands
      • ปั้นโค้ง
        • เส้นโค้งสไปลน์
        • Splines model creation
      • การแทนที่เวกเตอร์
      • เครื่องมือแปลงพื้นผิว
        • เครื่องมือแปลง Voxel
        • Instancer
        • Move
        • Pose
        • Fit
        • Reproject
        • Surface Array
      • Voxel Primitives & เครื่องมือ Import
      • บูลีนสด
      • คำสั่งสำหรับห้อง Sculpt
      • Import สู่ห้องแกะสลัก
      • ส่งออกจากห้องแกะสลัก
    • แสดงผล
      • Comparison of different roughness values
      • ฟังก์ชั่น Render Panel
      • จานเสียง
      • อบแสงปลอม - ไม่ใช่ PBR-
    • Factures
      • ขั้นตอนการทำงาน
    • ง่ายที่สุด
    • การสร้างแบบจำลอง
      • Mesh Menu
      • แผงเครื่องมือด้านซ้ายในห้องสร้างแบบจำลอง
        • เพิ่มเรขาคณิต
          • เลือกแล้ว
        • บิด
        • Smart Hybrid
        • UV
          • คำสั่ง
        • ตาข่ายทั้งหมด
      • ตัวอย่างพื้นผิวห้องใต้หลังคาโดย Fluffy
      • การปิดกั้นโดย Poeboi
      • Import Zbrush Polygroups for UV mapping
    • Kitbash - การสร้างโมเดล 3 มิติอย่างรวดเร็ว
      • Create kitbash
      • Left tool panel Kitbash
    • 3DPrint
    • Photogrammetry
      • How to install Reality Capture
      • Reality Capture doesn’t show up ?
    • ตาข่ายถึงห้อง NURBS
    • Nodes
      • Sculpt shaders Nodes Library
  • Scripting และ Core API
    • Scripting
    • Core API
    • ไพทอน API
  • ฟรี 3DCoatPrint

Light Baking Tool

768 views 1

Written by Carlos
January 4, 2025

Sometimes you need to bake all lighting into the diffuse color of the texture.
Open shader ball for example, fill layer with any reflective Smart Material, bake your reflection and it creates reflection layer  in texture.
It picks up any light you have set up in render room, including environment light (To change baked illumination change the environment map).

If bake is too dark try modifying setting intensity. 
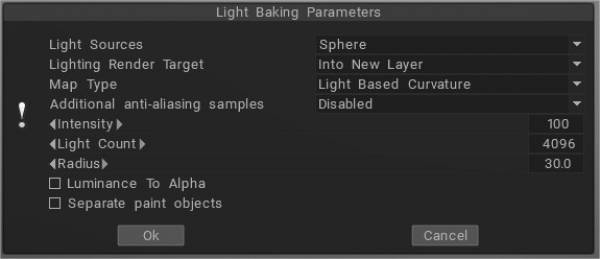
If you wish to bake light without environment “light from render room” is not necessary anymore, because you can achieve the same result by using “light and reflections” in flat shading mode.

Map Type


Light Based Curvature: more correctly calculates the result on UV Overlap; black areas no longer appear on different objects which have the same UV coordinates.
Thickness: Similar to AO, it casts rays from the surface of the mesh to the inside (modifying radius value). It can be used in SSS shading.
Light From Render Room: If you wish to bake light without an environment, use “light from render room” instead of “Light and Reflections.
Subsurface Scattering: Use this settings to get rid of the dirty shadow lines on the subsurface scattering.
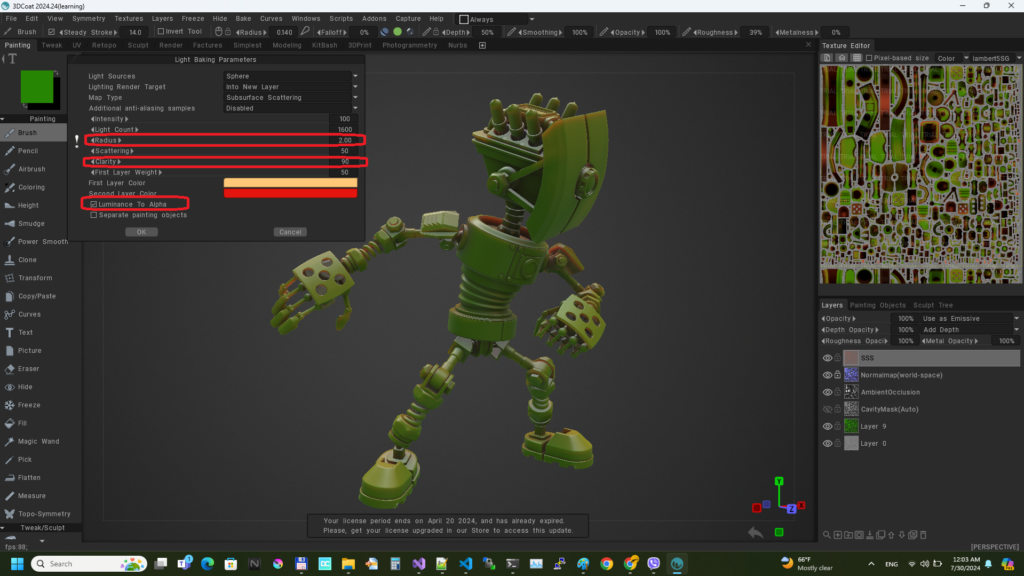
Translucent: A translucency color map can be used to vary the translucent color of a surface. Use it to recreate glassy materials.
Bent Normals: Benefits of Using Bent Normals. They combine the ao and normal map together to get better occlusion for indirect light and reflection.
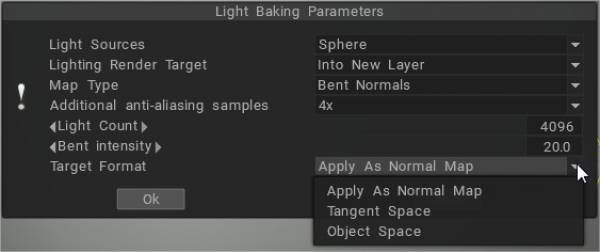
Light and Reflections: fill the layer with any reflective Smart Material, bake your reflection, and it creates a reflection layer in the texture layer.

It picks up any light you have set up in the render room, including the environment light.
Local Curvature: calculates curvature on objects with a normal map and analyzes the model’s curvature in many projections pixel by pixel, which allows you to get a more accurate and beautiful result. The radius and intensity can be adjusted.
Local Curvature RGB: Bakes curvature with radius 1, 20, and 100 to RGB channels, respectively. (Use RGB cavity as the default cavity calculation method can be set on Preferences).

RGB Cavity map


The new RGB cavity was introduced as a possible default calculation method. In this case, the multi-range cavity will be calculated on the GPU, and additional control in UI of conditions/smart materials will appear, the “Cavity width.” It allows for variation in the cavity width/smoothing in real time, which is very important for realistic PBR texturing.

Cavity width (using the RGB cavity) may be used for smart materials for each layer separately. Each material layer has its own cavity width settings. It allows for much better effects for “aging” materials, like several differently “aged” layers of paint.

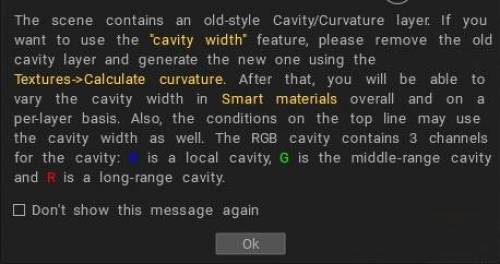
RGB cavity is a multi-range cavity texture, each channel corresponds to a different cavity scale. B is the local cavity, G is a middle-range cavity, and R is the far-range cavity.

If you already have the old cavity layer in the scene, you need to delete it to use this feature. This is a very significant feature for the PBR painting over the texture/mesh.
If the RGB cavity is enabled by default and you are loading the scene that has the old-style cavity layer, the Coat will warn you that it is better to re-calculate the cavity to get better control.
Global (light based) curvature and local curvature are related to the geometry of a surface.


Global (light based) curvature refers to the overall shape of a surface and is a measure of how much the surface deviates from being flat.
For example, a sphere has positive global curvature, while a plane has zero global curvature.

Local curvature, on the other hand, refers to the curvature of a surface at a particular point or over a small region.
This curvature can be different from the global curvature and can vary from point to point on a surface.
For example, a sphere has positive local curvature everywhere, while a parabolic cylinder has positive local curvature in some regions and negative local curvature in others.

Tutorials


Light Baking Tool: This video covers the Light Baking tool in 3DCoat.

Baking Lighting & Reflections in Unlit Shader: This video briefly shows how to bake a PBR material along with reflections and lighting into a texture for an unlit shader.

Tags:Light Baking Tool

Was this helpful?

1 Yes  No
Related Articles
  • Surface Array
  • Top Bar
  • Curves Properties RMB
  • Left tool panel Kitbash
  • Create kitbash
  • Color management
Previously
Calculate Occlusion
Up Next
การตั้งค่า
AI:
Hi! How can I help you?
Attention: This is a beta version of AI chat. Some answers may be wrong. See full version of AI chat