 ไทย
ไทย  English
 Українська
 Español
 Deutsch
 Français
 日本語
日本語 Русский
 한국어
한국어 Polski
 中文 (中国)
 Português
 Italiano
 Suomi
Suomi Svenska
 中文 (台灣)
 Dansk
Dansk Slovenčina
 Türkçe
 Nederlands
 Magyar
 हिन्दी
 Ελληνικά
 Tiếng Việt
 Lietuviškai
 Latviešu valoda
 Eesti
Eesti Čeština
 Română
 Norsk Bokmål
You should understand the good organization of objects in 3DCoat.
- The object is just a set of polygons; it is independent of UV sets.
- Materials are also sets of polygons. Usually, a UV set contains several materials.
- UV sets correspond to textures. They, in general, exist independently on objects.
- Layers exist through all objects and UV sets.
So if you bake objects in the paint room from Retopo room, it creates one object, materials that correspond to Polygroups, and Surface Materials that correspond to UV sets in Retopo room.
Every Bake Retopo mesh → Paint objects creates this set.
So objects and UV sets may be related, but it is not 1:1 correspondence.
If you do some simple retopo pieces and bake, you will get one object, one material, and one UV set. Better if at least UV sets will have unique names.
If you bake objects from the File menu, it will also create additional objects, materials, and UV sets.
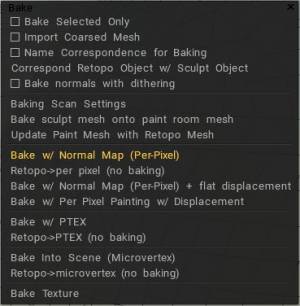
Bake selected only: Bake in the Paint Room only those faces selected currently.
Import coarsed mesh: Bake a mesh in the Paint Room that has the number of polygons specified.
Use name correspondence for baking: Assures that only Retopo Groups bearing the same name as their Voxel Layer counterparts are Baked into the Paint Room. You may use this option to simplify Sculpt Object baking if the names of Retopo Objects correspond to Sculpt Object names.
If you check the option, each Retopo Object will be baked using only the Sculpt Object of the same name and its children.
Name correspondence it’s actually sequential texture baking.
Other tools allow you to explode the mesh meaning it will move all the individual parts out in space so that you can bake everything in one pass and 3DCoat is handled somewhat differently but the objective is the same.
Another thing to keep in mind is if you have secondary elements that you want to be baked with another mesh as if they are all one then what you would do is in the Sculpt tree layer panel in the sculpt workspace you would make those child layers.
Correspond Retopo Object w/ Sculpt Object: This function will help find Retopo Objects that have corresponding Sculpt Objects. If there are any corresponding objects with similar names, the Retopo Object will bake only the details from the Sculpt Object with the same name.
Bake normals with dithering: refers to the process of baking a normal map (a texture that stores surface normal information) while applying dithering, which is a technique that adds controlled noise to the image to smooth out banding artifacts that can occur when converting a high-precision normal map to a lower bit depth format, especially when exporting to 8-bit for game engines.
Essentially, it helps to hide the limitations of a lower color range by adding subtle noise to the image, resulting in a more visually pleasing normal map with less noticeable banding.
A technique called dithering is used to smooth out potential banding or harsh transitions in the baked normal map, resulting in a more refined and visually pleasing normal map, especially when baking detailed high-poly models onto lower-poly meshes.
Key points about baking normals with dithering in 3DCoat:
- Reduces banding: Dithering adds subtle variations in pixel values, which helps to mask the appearance of distinct steps or banding in the baked normal map, especially where sharp transitions occur on the model’s geometry.
- Improves visual quality: By introducing a bit of randomness in the normal map data, dithering can create a more natural and smooth appearance when the normal map is applied to a low-poly model.
Difference between baking from Retopo room and Paint room
There is one difference between baking from retopo room and Paint room.
Mesh in retopo room has no split normals (or smoothing groups, or sharp edges) unless you will not specify crease angle in baking/import dialog during baking.
This is principal problem, retopo mesh has no split normals now.
So the only way to bake external mesh with sharp edges (smoothing groups) is to import it in Paint room and bake from paint room bake menu (Paint->Bake->Bake sculpt mesh onto Paint room mesh).
Blender/Substance normalmap looks like baked on subdivided mesh, so normalmap has only high-frequency details.
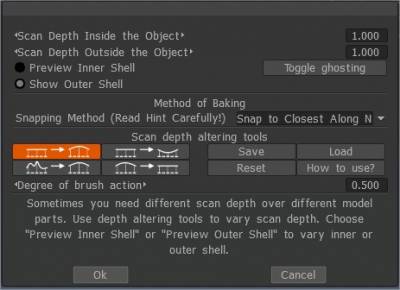
Baking Scan Settings
The Bake Settings Panel is where you set the overall cage that cover the mesh for scan depth projection.
Inside the object is the cage that limits the inner surface of the model, Outside the object is the outer surface of the model.
Refers to the options within the “Bake” function in the Retopology room, allowing you to control how detailed information from a high-poly mesh is baked onto a lower-poly mesh, essentially transferring surface details like normals and displacement onto a new texture map for efficient rendering in real-time applications like games; this is accessed by navigating to the Retopology room, selecting “Bake menu”, and then accessing the “Bake Scan Settings” dialog box.
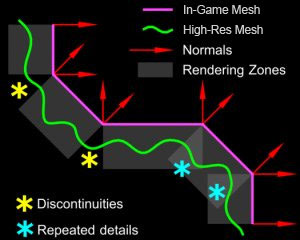
By default, the rays that are cast from the low-poly surface travel a limited distance, to prevent the low-poly from receiving normal information from far away parts of the high-poly. This distance is usually called “frontal/rear distance”, as the rays can be cast towards the inside, outside of the model, or both.
Toggle ghosting: you may have at the stage is when you try to observe the inner cage to make adjustments here you can’t quite see through the object you can see it where it’s protruding outside the box logic and obviously this really is not what we want so one way to counteract that is to ghost all you voxel layers.
Method of baking: There are two baking methods.
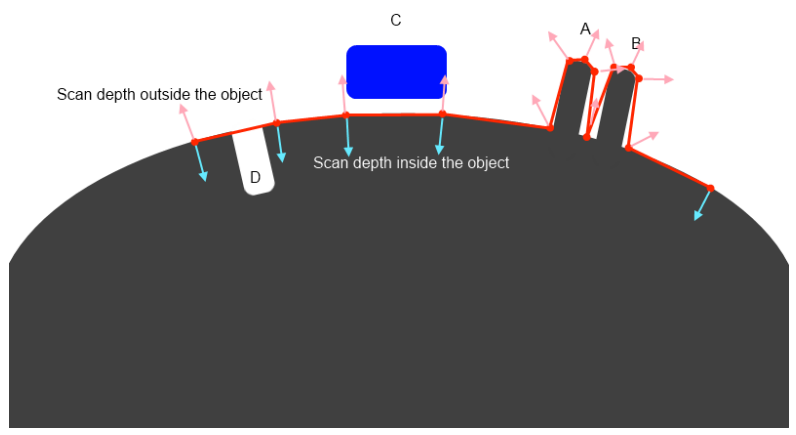
- SNAP TO CLOSEST ALONG NORMAL: It is simplest approach that will work well in simple cases. It is default mode. In this case the point closest to the retopo mesh will be baked. You may set bigger scan depth for this method and it still will work. In our example you may set it twice longer and it will correctly capture details A, B, D. But C will not be captured at all because grey surface is closest to the retopo mesh.
- SNAP TO OUTER SURFACE: This method is intended for complex cases and rather pro users. It captures most distant details in normal direction. Let us look on our example. If we will set outer scan distance twice longer then C will be correctly baked, but A and B will not because of most outer will be neighbor spike and you will get mess on normalmap. So you should not set big scan distance for this method. But if you will set it too small so that A and B will be captured, C will not be captured.
For this purpose “Scan depth altering tools” introduced. Sometimes you need different scan depth over different model parts.
Use depth altering tools to vary scan depth, separately for outer and inner shells of scanning depth.
You can grow, decrease, smooth or erase field.
Use CTRL to invert action and SHIFT to smooth field.
Scan Depth altering tools: Sometimes you need different scan depth over different model parts. Use depth altering tools to vary scan depth. Choose “Preview Inner Shell” or “Preview Outer Shell” to vary inner or outer shell.

Degree of brush action: The bigger value leads to stronger action of brush when you paint degree of altering of the scan depth.
Quick Start: Retopo Baking: This video demonstrates the Retopo Baking toolset.
Bake Object for Per Pixel Painting
Once the baking process is done if you elect the PPP method of baking, a Panel popups giving the option to select the settings to use for the projection step from 3D to 2D into textures.
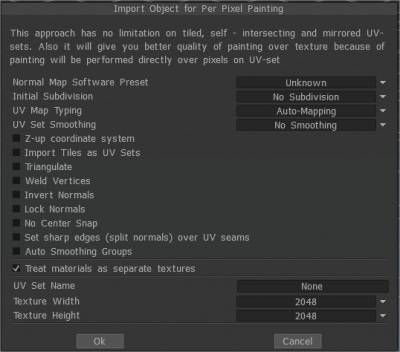
Normal Map Software Preset: Normal method used for baking in correspondence to external software where the model will be exported: OpenGL or DirectX.
Initial subdivision: Set the initial subdivision of the object for a smoother look (if needed).
UV-mapping type: Keep the original UV or choose Auto-mapping.
UV-set smoothing: This option works only if you subdivide the model during import.
Z-up coordinate system Z-up based coordinate system for compatibility with Rhino, 3DS-Max, and other applications with Z-axis up.
Import Tiles as UV sets. Import separate UV tiles as separate UV sets.
Triangulate: Triangulate a mesh to avoid UV glitches.
Weld Vertices: Weld separate vertices that are at the same point in space.
Invert Normals:
Lock Normals: Don’t recalculate normals; use normals directly from the object file. If you subdivide mesh, this option will be ignored.
Don’t Snap Subdivision Vertices to Surface: This option helps to avoid snapping the subdivided mesh to the surface of the high-poly mesh. It makes the Layer0 mesh very smooth. In this case, all displacement (normal maps) will be placed on higher layers. This option is very helpful if you export a low poly mesh and displacement map.
No Center Snap: 3D-Coat tries to move a bound box of the model to the origin of the scene by default. Check this box if you want to import the model as is, without any centering.
Set sharp edges: (split normals) over UV seams
Auto smoothing groups: This option allows the creation of smoothing groups automatically. By specifying a value in the “Maximum angle” option responsible for the maximal angle between faces when the edge becomes sharp, it is necessary to activate the Auto smoothing groups option. To use this option, turn the Auto smoothing groups on.
UV-set name: Enter UV-set name.
Texture width: Set texture width.
Texture height: Set texture height.
• Note: If your video card has less than 2GB of Vram, you should avoid textures larger than 2000 x 2000.
Baking Options
Bake sculpt mesh onto paint room mesh: This command will bake changes in the Sculpt room object to the Paint Room object and update the paint layers in the process. Previous paint layers will be preserved (whenever possible), while newly baked maps will be assigned new layers. This command takes the paint scene object as retopo mesh and bakes details and color from Sculpt scene to the painted object.
Re-Bake Sculpt Mesh changes onto Paint Mesh: This command will bake changes in the Sculpt room object to the Paint Room object and update the paint layers in the process.
Previous paint layers will be preserved (whenever possible), while newly baked maps will be assigned new layers.
This command takes the paint scene object as retopo mesh and bakes details and color from Sculpt scene to the painted object.
Update Paint Mesh with Retopo Mesh: This command will replace the currently visible Paint Room object(s) with visible Retopo Mesh.
It allows updating normal maps and color layers related to volumes.
Pay attention that painted areas on sculpt mesh will overwrite painted areas on the paint room object. It works only for the per-pixel painting approach. So be careful to avoid losing data.
A UV set is required, but if you have not assigned a UV set, it will be generated automatically.
The operation will replace mesh in painting room with the mesh from the retopo room.
Pay attention, it works only for per-pixel painting approach!
Layers will be kept, but UV-s of retopo mesh should be similar to the painting room mesh.
The operation is not undoable, so we recommend you to save scene before the attempt to replace geometry.
Bake with Normal Map (Per-Pixel)
Bake with Normal Map (Per-Pixel): Bake the Retopo mesh from the currently selected Retopo Group into the Paint Room and the “Objects” Panel for texturing using the “Per-Pixel” method. Details are baked as a Normal Map on a special layer. Displacement will not be baked.
A dialog is presented which allows Import Object for Per Pixel Painting.
Retopo→per pixel (no baking): Bake only the Retopo geometry without projecting details into the Paint Room and Objects Panel for per-pixel painting.
Bake w/ Normal Map (Per Pixel) + Flat Displacement: Bake objects for per-pixel painting and bake normal map on special layers.
Displacement will be baked as flat displacement to each triangle. The layer “Flat Displacement” will be hidden and available to export.
Flat displacement is the value of displacement from the flat faces. It may be used in game engines to make shader-based displacement. But there is no sense to import it as the displacement or use as the source for normal maps, there will be facets as you seen.
So, for shading the Normal map only should be used! The flat displacement should be used only internally in game engines!
Bake w/ Per Pixel Painting w/ Displacement: Baking of displacement per pixel painting may produce the wrong result in some cases because per pixel painting works not well for deep displacement.
Bake with Ptex (Per-Face Texturing)
Ptex (Per-Face Texturing) is an alternative approach to texturing. It is a per-face texture mapping system that does not require UV assignment.
Ptex is a better version of Vertex colors. You are not confined to as much polycount as vertices.
Namely, autosize (computing the resolution of each per-face texture optimally using a target texels-per-unit in object space).
All you need to do is just allocate texture sizes to the faces and paint with no seam issues and also stores files better.
With Udims, your texture files and size increase with assets you use for a project. Ptex requires just one file for storing all that data per asset.
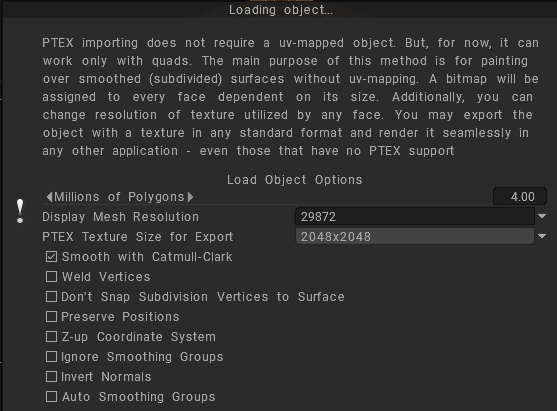
Bake with Ptex: Takes the mesh defined in the Retopo Group for an object and bakes it into the Paint Room and “Objects” Panel, making it ready for texturing operations using the Ptex method.
Retopo→PTEX (no baking): Bake only the outer “hull” of the Retopoed object into the Paint Room and Objects Panel for texturing using the Ptex method.
Bake Into Scene (Microvertex)
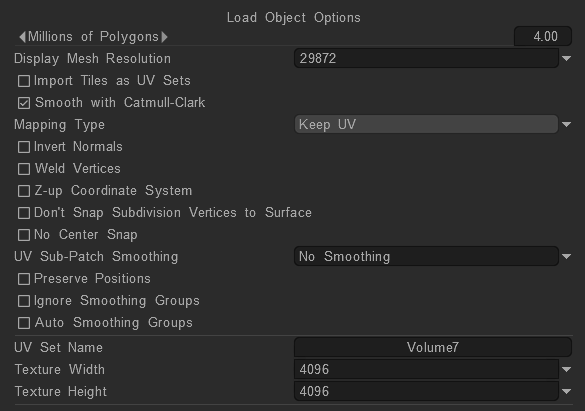
Mapping type
Specify what kind of texture coordinates should be used during the edit process
To load the model in microvertex representation 3DCoat requires one to one correspondence between the texture and surface points; one point on the UV-Map should correspond to only one point on the surface.
If your object meets this requirement, select Keep UV to keep UV Coordinates.
Choose this option only when the entire model is mapped without overlaps
Even if your model has symmetry or overlaps (but not self-overlaps) you can load it with the Keep clusters object.
Choose this option if your model has overlaps in UV-mapping. This will move clusters so they do not overlap. When the texture is exported it will be saved using the original UV-coordinates.
If a mapping conflict is detected, the more painted pixels will be preferred.
3DCoat will put all clusters over one texture without overlaps.
Use this option for Baking hulls. Helps to bake correctly in the situation when there is some floating geometry over the surface of the retopo surface.
Usual baking searches closest point to retopo cage, merging hulls helps to find most “outer” point form the retopo surface.
Examples: floating pieces over surface, intersected cylinders with almost same radius, intersected edges.
During the export all textures will be saved using the original UV coordinates, so feel free to load objects with symmetry and overlaps.
Try to avoid self overlapping clusters, and complex, non-convex polygonal shapes.
Ideally, objects with no UV-mapping should be manually mapped, but selecting Auto-mapping will yield good results. This option provides automatic UV-mapping.
While the result is usually satisfactory, unmapped or complex convex shapes should be mapped manually.
If you are editing architectural or non – organic shapes disable smoothing for best results. In this case you will be able to export the current displacement and normal maps.
Bake Into Scene (Microvertex): Bake patch into the scene. This operation requires a UV set. The patch will be projected (baked) onto the old mesh, and the layer structure will be preserved. Readies mesh for texturing using the “Micro-Vertex” method.
Retopo→microvertex (no baking): Readies the Retopo mesh for texturing using the “Micro-Vertex” method but uses only the “raw” form of the mesh and performs no “baking” operations. Bake the result into the Paint Room and “Objects” Panel.
Baking patch means baking retopo object as is, without projecting details.
Exporting a Displacement Map: A step-by-step video showing how to bring in a low poly UV’d object and sculpt additional details onto it, then how to bake out a displacement map and view it onto the low poly model by Industry Tuts.
Texture Baking Tool
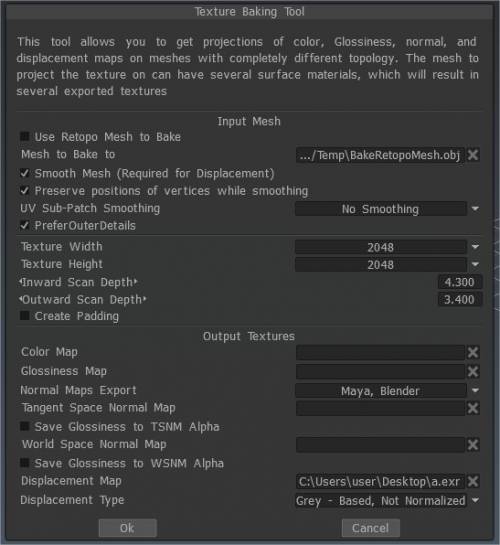
Bake texture (Deprecated): Invokes the Texture Baking Tool, which allows you to bake the Diffuse, Specular, Normal, and Displacement textures already applied to your “Baked” Retopo mesh onto a similar, external polygonal mesh file.
Tutorials
Baking in 3DCoat 2025: A video looking at the basic baking options in 3D Coat 2025 for baking normal maps from high poly sculpted details to a texture. This is just how I do it at the moment, there may be other workflows or the software may change in future versions.
What is Texel Density and How to Master it: Explanation of what texel density is, how to use it, and some tools you can use to set correct texel density easily on your models.
Exporting a Displacement Map: A step-by-step video showing how to bring in a low poly UV’d object and sculpt additional details onto it, then how to bake out a displacement map and view it onto the low poly model by Industry Tuts.
Ptex, the other side of texturing: This article on fxguide discussed Ptex as alternative approach to texturing.
Texture Baking Tools: This old video demonstration covers a few texture baking improvements/additions as of 3DCoat V4 (currently outdated).
Baking models for painting: Bring external (high detail and low poly) models in and baking maps in 3D Coat ready for painting.
Sending files from 3DCoat to photoshop and setting up gradient maps as a first pass for painting.
Texture Baking: This video begins the demonstration of the Texture Baking process in 3DCoat. Explaining in general terms, how the process typically works, including Sequential Texture Baking.
Bake Settings Dialog Old Version for V4: This video continues the demonstration of the Texture Baking/Merging to Paint Room process. It covers the “Bake Scan Settings” dialog in detail, where to find the “Happy Baking Guide” pdf, and clearing the Paint Room (in order to prevent duplicate meshes and paint layers) when re-attempting a bake.
EDIT: As of build 4.0.10, there is no longer the need to exit the Bake Settings Dialog to switch UV maps when applying local “Zones” to the model.
How to bake out Displacement Maps
A short tutorial showing how to bake out and export Displacement maps in 3DCoat.