มี export เพียงสองประเภทที่สามารถดำเนินการได้ในขณะที่ทำงานในพื้นที่ทำงาน Painting :
1. Export ออกแบบจำลองหลายเหลี่ยมตามที่กำหนดใน Retopo Workspace
2. Export พื้นผิวที่ทาสีทั้งหมดที่สร้างขึ้นใน พื้นที่ทำงาน Painting
หากไม่มี UVs ก็ไม่มีพื้นผิวที่จะ export
เลย์เอาต์ UV จะกำหนดวิธีที่ภาพ 2 มิติหรือแผนที่พื้นผิวถูกห่อลงบนพื้นผิว 3 มิติ
UVs มักจะจำเป็นเมื่อคุณเริ่มทาสีพื้นผิวหรือคุณต้องการ bake แผนที่ปกติออกมา
ข้อมูล Painting พื้นผิวทั้งหมดจะอยู่ภายในเลเยอร์ต่างๆ ซึ่งสร้างขึ้นใน พื้นที่ทำงาน Painting
ข้อมูลนี้มีอยู่ในรูปแบบของ UV Maps พื้นฐาน 5 แบบที่สร้างขึ้นพร้อมๆ กับที่คุณระบายสีข้อมูลนั้นลงบนประติมากรรมของคุณ
เช่นเดียวกับกรณีที่ส่งออกข้อมูลจาก UV Workspace จะต้องใส่ข้อมูลในรูปแบบที่แอปพลิเคชันอื่นๆ เข้าใจ
รูปแบบนี้เป็นของแผนที่ UV แผนที่แยกต่างหากจะถูกบันทึกสำหรับพื้นผิวแต่ละประเภทจากห้าประเภทที่คุณสร้างขึ้นโดยการวาดภาพบนโมเดลของคุณ:
Diffuse Color, สีความเงา, Emissive Intensity, ข้อมูล Normal (bump) และข้อมูล Displacement

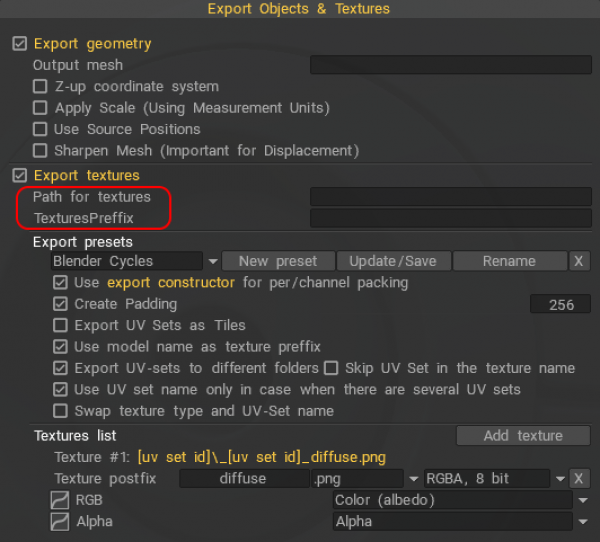
เปิดใช้งานคำสั่ง Export ตัวสร้าง เพื่อดูค่าที่ตั้งไว้ล่วงหน้า export
การส่งออก Displacement Map วิดีโอทีละขั้นตอนแสดงวิธีการนำวัตถุที่มีโพลี UV ต่ำเข้ามาและแกะสลักรายละเอียดเพิ่มเติมลงบนวัตถุนั้น จากนั้นจึง bake ทำ displacement map และดูบนแบบจำลองโพลีต่ำโดย Industry Tuts
Displacement จะถูกส่งออกโดยใช้ความแตกต่างระหว่างตำแหน่งของจุดยอดและตำแหน่งของมันบน Layer 0
ตำแหน่งจุดจะถูกนำมาจากเลเยอร์ 0 นี่เป็นตัวเลือกที่ต้องการสำหรับ export โพลีต่ำ
การแทนที่ขึ้นอยู่กับเลเยอร์ 0 เสมอ แต่ตำแหน่งของจุดยอดในไฟล์ OBJ ที่ส่งออกนั้นขึ้นอยู่กับตัวเลือกของคุณ เป็นการดีกว่าที่จะใช้ช่องทำเครื่องหมาย export ดังกล่าวร่วมกัน:
– ชุดที่ 1:
[x] ใช้ตำแหน่งต้นทาง
[ ] เลือกตำแหน่งจาก Layer0
[ ] หยาบ…
ใช้มันถ้าเลเยอร์ 0 ไม่ผิดเพี้ยน
– ชุดที่ 2:
[ ] ใช้ตำแหน่งต้นทาง
[x] เลือกตำแหน่งจาก Layer0
[x] หยาบ…
ใช้ในกรณีที่เลเยอร์ 0 ผิดเพี้ยน เลือกจากเลเยอร์ 0 จะบันทึกตำแหน่งใหม่ หยาบจะเตรียมไว้สำหรับการแบ่งย่อยเพิ่มเติม
แต่ถ้าโดยปกติแล้ว Layer X ไม่ได้บิดเบี้ยว เพียงแค่ displacement export จะไม่ช่วยอะไร คุณต้องอบตาข่ายใหม่เพื่อให้ได้การกระจัดตามปกติหรือใช้การกระจัดเวกเตอร์
Export ไปยังตัวอย่าง Unreal โดย Digman
การตั้งค่า 3DC: – เลือกความหยาบ/ความเป็นโลหะในเมนูพื้นผิว
– ดูเมนู GGX เบอร์ลีย์ 12 (Unreal4)
– เมนูไฟล์ — Export วัตถุและพื้นผิว—- Export แผง- Unreal5
(Unreal 4.27 หรือ 5.) เลือก fbx และไฟล์พื้นผิวที่จะ import normal map จะถูกนำเข้าโดย Unreal อย่างถูกต้อง ไม่จำเป็นต้องทำงาน
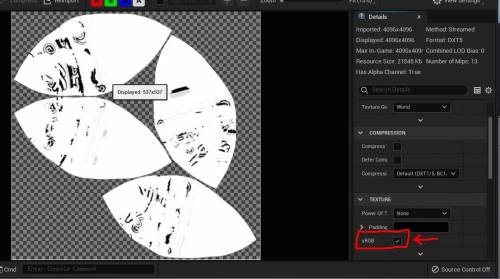
ความเป็นโลหะและความหยาบถูกนำเข้าเป็น SRGB เปิดโปรแกรมแก้ไขรูปภาพสำหรับแต่ละรูปภาพแล้วยกเลิกการเลือก Srgb บันทึกภาพ ตอนนี้พวกเขาจะเป็นแผนที่เชิงเส้นและจะแสดงผลอย่างถูกต้อง พวกเขาจะแสดงเป็นเชิงเส้นในตัวแก้ไขวัสดุ
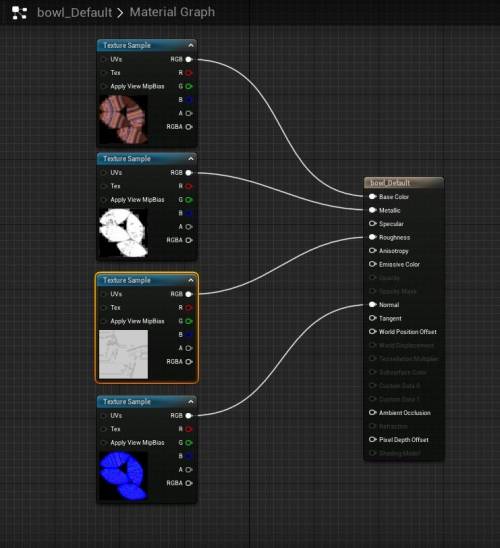
คุณควรสร้างเนื้อหาเริ่มต้นไว้แล้ว ดับเบิลคลิกเพื่อเปิด
ลากไฟล์พื้นผิวทั้งหมดไปที่โปรแกรมแก้ไข default_material และป้อนลงในช่องที่ถูกต้อง
สมัครและบันทึก
ภาพสุดท้าย: แน่นอน แสงจะแตกต่างกันในการตั้งค่าง่ายๆ นี้ สีถูกต้อง ความเป็นโลหะและความหยาบใกล้เคียงกับ 3DC PBR ตอบสนองอย่างที่คุณทราบกับการตั้งค่าแสงที่แตกต่างกันอย่างถูกต้อง ดังนั้นแสงจึงแตกต่างกันในฉากที่ไม่จริงและ 3DC


 ไทย
ไทย  English
 Українська
 Español
 Deutsch
 Français
 日本語
日本語 Русский
 한국어
한국어 Polski
 中文 (中国)
 Português
 Italiano
 Suomi
Suomi Svenska
 中文 (台灣)
 Dansk
Dansk Slovenčina
 Türkçe
 Nederlands
 Magyar
 हिन्दी
 Ελληνικά
 Tiếng Việt
 Lietuviškai
 Latviešu valoda
 Eesti
Eesti Čeština
 Română
 Norsk Bokmål