 ไทย
ไทย  English
 Українська
 Español
 Deutsch
 Français
 日本語
日本語 Русский
 한국어
한국어 Polski
 中文 (中国)
 Português
 Italiano
 Suomi
Suomi Svenska
 中文 (台灣)
 Dansk
Dansk Slovenčina
 Türkçe
 Nederlands
 Magyar
 हिन्दी
 Ελληνικά
 Tiếng Việt
 Lietuviškai
 Latviešu valoda
 Eesti
Eesti Čeština
 Română
 Norsk Bokmål
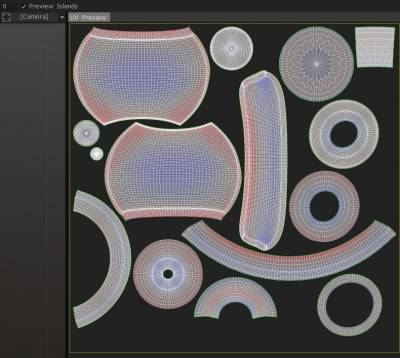
ภายในหน้าต่างแสดงตัวอย่าง UV คุณยังสามารถควบคุมการเกาะของ UV และอื่น ๆ ได้โดยตรง คุณจะเห็นหุ่นจำลอง Gizmo โดยคลิกที่ LMB บนเกาะ เกาะที่เลือกจะเน้นขอบทั้งหมดของรูปหลายเหลี่ยมที่เกี่ยวข้องภายในวิวพอร์ต 3 มิติ
นอกจากนี้ เครื่องมือขั้นสูงสำหรับการแก้ไขแผนที่ UV ของคุณจะอยู่ในส่วน “ที่เลือก” ของเครื่องมือ retopology โดยตรง เครื่องมือเหล่านี้จำเป็นต้องเลือกในหน้าต่างแสดงตัวอย่าง UV หากต้องการเลือกคลัสเตอร์ (หรือเกาะ) ให้คลิกที่มี LMB
หุ่นยนต์แสดงตัวอย่าง UV
เครื่องมือขั้นสูงเพิ่มเติมสำหรับการแก้ไขแผนที่ UV ของคุณอยู่ในส่วน “ที่เลือก” ของเครื่องมือ retopology โดยตรง เครื่องมือเหล่านี้จำเป็นต้องเลือกในหน้าต่างแสดงตัวอย่าง UV หากต้องการเลือกคลัสเตอร์ (หรือเกาะ) ให้คลิกที่มี LMB
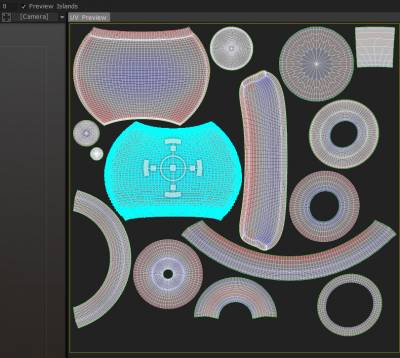
พบได้ในหน้าต่างแสดงตัวอย่าง UV Gizmo 2D Transform นี้ช่วยให้คุณปรับขนาด ยืด หมุน และแปลเกาะใดก็ได้ที่คุณเลือก
คุณสามารถวางคลัสเตอร์ด้วยตนเองตามที่เห็นสมควรก่อนที่จะบรรจุ (การคลายการห่อที่เหมาะสมที่สุด) ลงในแผนที่ UV คุณต้องเปิดกล่องกาเครื่องหมาย “Manipulator” เพื่อใช้สิ่งนี้ จะอยู่ที่แถบด้านบน ใช้ Gizmo นี้เพื่อแปลงจุดยอด ขอบ ใบหน้า เกาะ และการเลือกใดๆ (เช่น เกาะต่างๆ ฯลฯ) ภายในหน้าต่างแสดงตัวอย่าง UV
ใช้ Gizmo นี้เพื่อควบคุมจุดยอด ขอบ ใบหน้า และเกาะทั้งหมดภายในหน้าต่างแสดงตัวอย่าง UV
ในบล็อกที่เลือก คุณจะพบชุดคำสั่งที่เกี่ยวข้องกับการเลือกในหน้าต่างแสดงตัวอย่าง UV หลังจากใช้คำสั่ง Unwrap ที่พบใน Retopo Room แล้ว คุณอาจต้องการแก้ไขเกาะ UV ในหน้าต่างแสดงตัวอย่าง UV ก่อนผสานตาข่ายของคุณเข้ากับห้องระบายสี
หมุน CW: การดำเนินการ นี้จะหมุนเกาะที่เลือกตามเข็มนาฬิกา
หมุนทวนเข็มนาฬิกา: สิ่งนี้จะหมุนเกาะที่เลือกทวนเข็มนาฬิกา
Flip U: จะเป็นการพลิก U ของแผนที่ UV
Flip U: จะเป็นการพลิก V ของแผนที่ UV
ผ่อนคลาย: ใช้การปรับแสงให้เรียบทั่วกระจุก (หรือเกาะ) ที่เลือกเพื่อลดการยืดหรือหนีบ
แก้ไข
Quick Start เครื่องมือเค้าโครง UV Pt1
Quick Start เครื่องมือเค้าโครง UV Pt2
ความหนาแน่นของ Texel ย่อย (ความหนาแน่นของ Texel/อัตราส่วนพิกเซล)
โดย ALEX MEISTER
3DCoat ใช้โทนสีแผนที่ความร้อนเพื่อแสดงความหนาแน่นของเท็กเซลของคุณ
หากคุณไม่คุ้นเคยกับคำว่า “ความหนาแน่นของเท็กเซล” เป็นเพียงอัตราส่วนของพิกเซลที่ใช้เติมหน่วยขนาดที่กำหนดในฉาก 3 มิติ
เป้าหมายทั่วไปคือการปรับขนาดเกาะ UV ทั้งหมดตามอัตราส่วนนี้ กล่าวโดยย่อ วัตถุขนาดเล็กในฉากควรใช้พิกเซลน้อยกว่าวัตถุขนาดใหญ่
หากเกาะ UV ได้รับการปรับขนาดอย่างถูกต้องตามขนาดในฉาก 3DCoat จะให้สีของเกาะเป็นสีเทา เกาะที่ใช้พิกเซลมากกว่าที่ควรจะเป็นสีแดง และเกาะที่ใช้พิกเซลน้อยกว่าที่ควรจะเป็นสีฟ้า
Texel Density กับ Scaling Texel
ความหนาแน่นของ Texel ดังที่ได้กล่าวไว้ในส่วนย่อยของ Unwrap ทำให้แน่ใจว่าแต่ละส่วนของแบบจำลองของคุณมีพื้นที่เพียงพอบน UV สำหรับพื้นผิว ส่วนใหญ่แล้วนี่คือสิ่งที่คุณต้องการ
แต่บางรุ่นโดยเฉพาะที่มีพื้นผิวเดียวต้องอาศัยรายละเอียดเพิ่มเติมในบางส่วน คุณสามารถรับสิ่งนี้ได้โดยเลือก UV ที่คุณต้องการให้ใหญ่ขึ้นในการแสดงตัวอย่าง UV และปรับขนาดให้ใหญ่ขึ้น (มันจะกลายเป็นสีแดงและส่วนที่เหลือจะกลายเป็นสีน้ำเงิน)
แต่ละครั้งหลังจากปรับมาตราส่วนเกาะ UV ของคุณแล้ว คุณสามารถกด “Pack UV” เพื่อให้โปรแกรมจัดการให้พอดีที่สุดสำหรับเกาะทั้งหมด ตอนนี้คุณมีส่วนหนึ่งที่ใหญ่กว่าสำหรับพื้นที่พื้นผิวที่มากขึ้น สำหรับเครื่องประดับ หรือสิ่งที่ต้องการรายละเอียดมากกว่าส่วนอื่นๆ เนื่องจากมันจะอยู่ใกล้กล้องมากขึ้น
จากตัวอย่างนี้ เมื่อฉันลดขนาดส่วนสีน้ำเงินทั้งสองลง เนื่องจากแทบไม่มีความสำคัญที่แท้จริง และแน่นอนว่าการลงรายละเอียดในภายหลัง การลดขนาดลงจะแสดงให้คุณเห็นว่าวัตถุอื่นๆ ทั้งหมดมีขนาดใหญ่เกินไปเมื่อเปรียบเทียบกัน วิธีที่ง่ายที่สุดในการทำเช่นนี้คือการลดขนาดชิ้นส่วนที่คุณไม่ต้องการข้อมูลมากนัก จากนั้นเลือก PackUV2
เวิร์กโฟลว์พื้นฐาน
สรุปเวิร์กโฟลว์พื้นฐานสำหรับการนำเมชจากห้อง Voxel ไปที่ห้องพ่นสี – และท้ายที่สุดจนถึงจุดที่ “ส่งออก” ทั้งข้อมูลเมชและพื้นผิว:
- ปั้นโมเดลของคุณในห้อง Voxel และโหมด Surface
- เพิ่มโทโพโลยีแบบกำหนดเองโดยใช้ AUTOPO หรือด้วยตนเองภายใน Retopo Room
- ทำเครื่องหมายตะเข็บและแกะตาข่าย Retopo ของคุณ
- จัดการองค์ประกอบแผนที่ UV และเพิ่มประสิทธิภาพแผนที่ UV ของคุณ (ในห้อง Retopo )
- แกะตาข่าย Retopo ของคุณและเพิ่มประสิทธิภาพแผนที่ UV ของคุณด้วยการ “บรรจุ”
- อบตาข่าย Retopo ของคุณในห้องพ่นสี (และแผง “วัตถุ”) แล้วใช้พื้นผิวของคุณ
- เลือก “ไฟล์/ Export โมเดล” – บันทึกข้อมูลตาข่ายและพื้นผิวทั้งหมดตามพารามิเตอร์ที่คุณเลือก
เคล็ดลับง่ายๆ สำหรับ 3D-Coat: เลือก UV-Islands โดยตรงในวิวพอร์ต (โดย Christoph Werner)